
Before this: How to Create an Event?
How to Create Custom AI Effect
Steps to create your own custom AI photo effect from scratch in the AI Assets → AI Effects tab: AI model and resolution selection, prompt writing, reference/intro images, testing and cover art. The saved effect is added to the event's Active AI Effects gallery.
- An event must be created and selected (the AI Assets page is in the event settings)
- Pro subscription must be active — requires AI Assets Pro; if not, the 'Upgrade to Pro' lock banner will appear on the page
- Account must have enough AI credits — Production during testing and shooting costs credits (SAVING the effect does not cost credits)
step by step
Step 1 · Open AI Effects tab
AI Assets → AI Effects
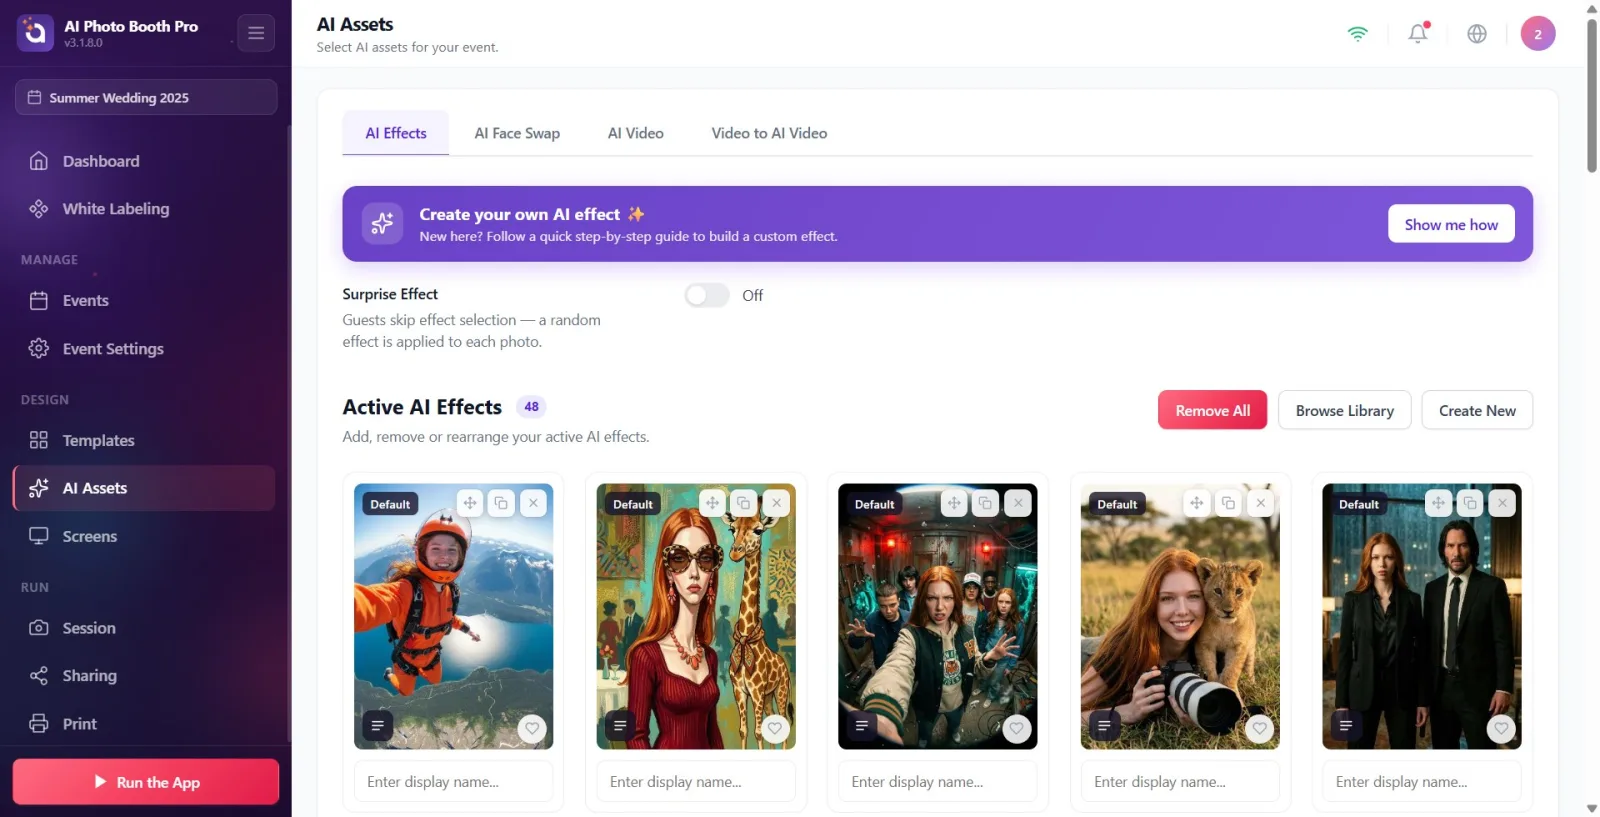
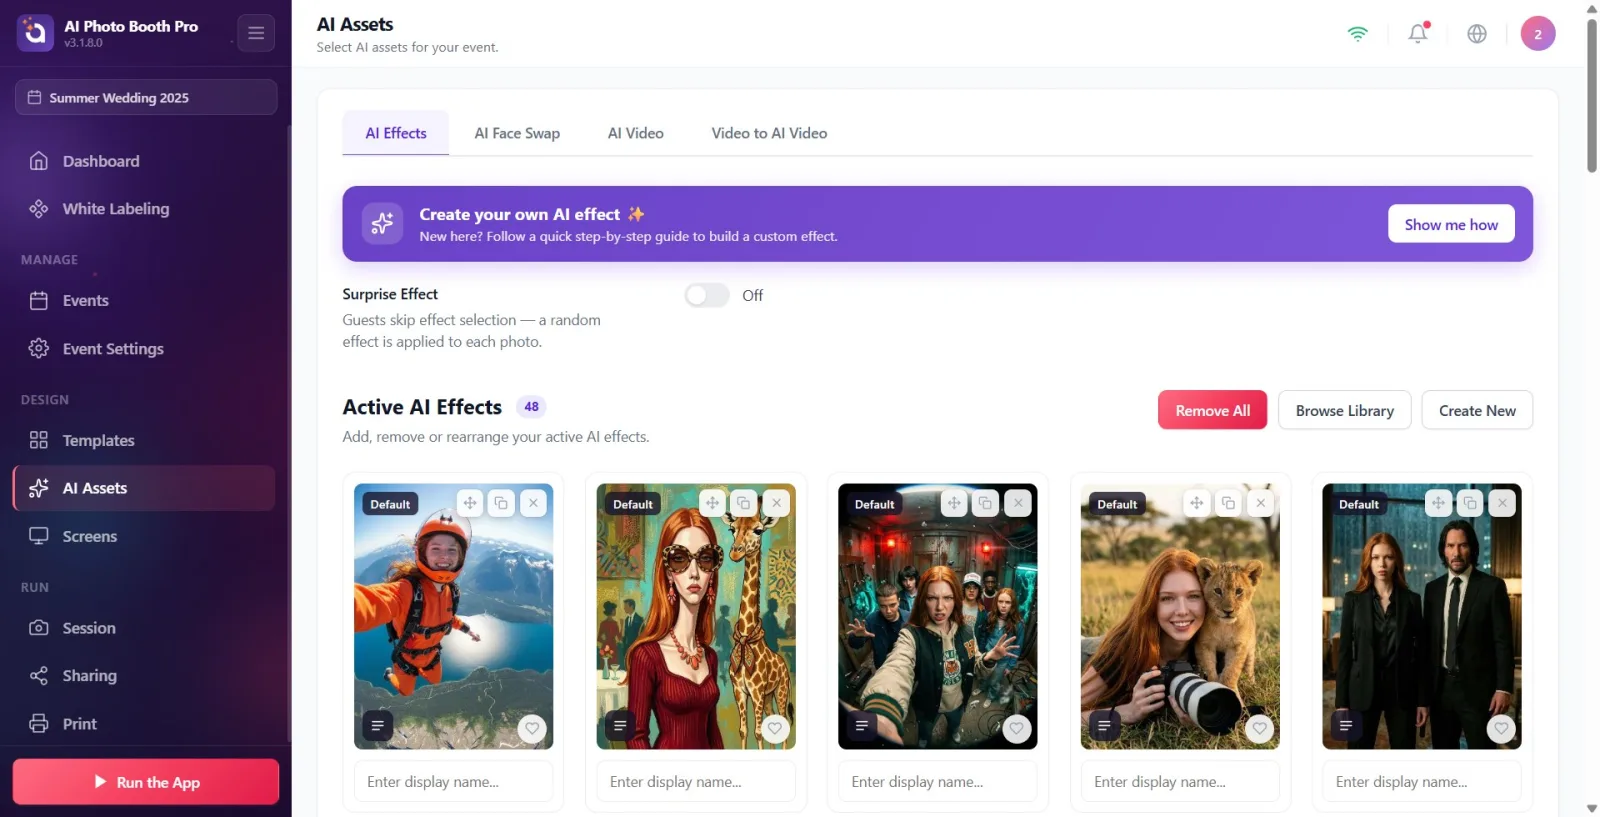
Open the AI Assets page in the settings. Switch to AI Effects tab from the top tabs (other tabs are AI Face Swaps and AI Video). The Active AI Effects gallery appears at the bottom and the purple Create your own AI effect ✨ guide banner appears above. If the page is locked (not Pro), the 'Upgrade to Pro' banner will appear first.
🔎 Items on the screen: Tabs: AI Effects / AI Face Swaps / AI Video; Active AI Effects header; Browse Library and Create New buttons at top right; 'Show me how' in the guide banner.
Step 2 · Open the creation modal
AI Assets → AI Effects → Create New
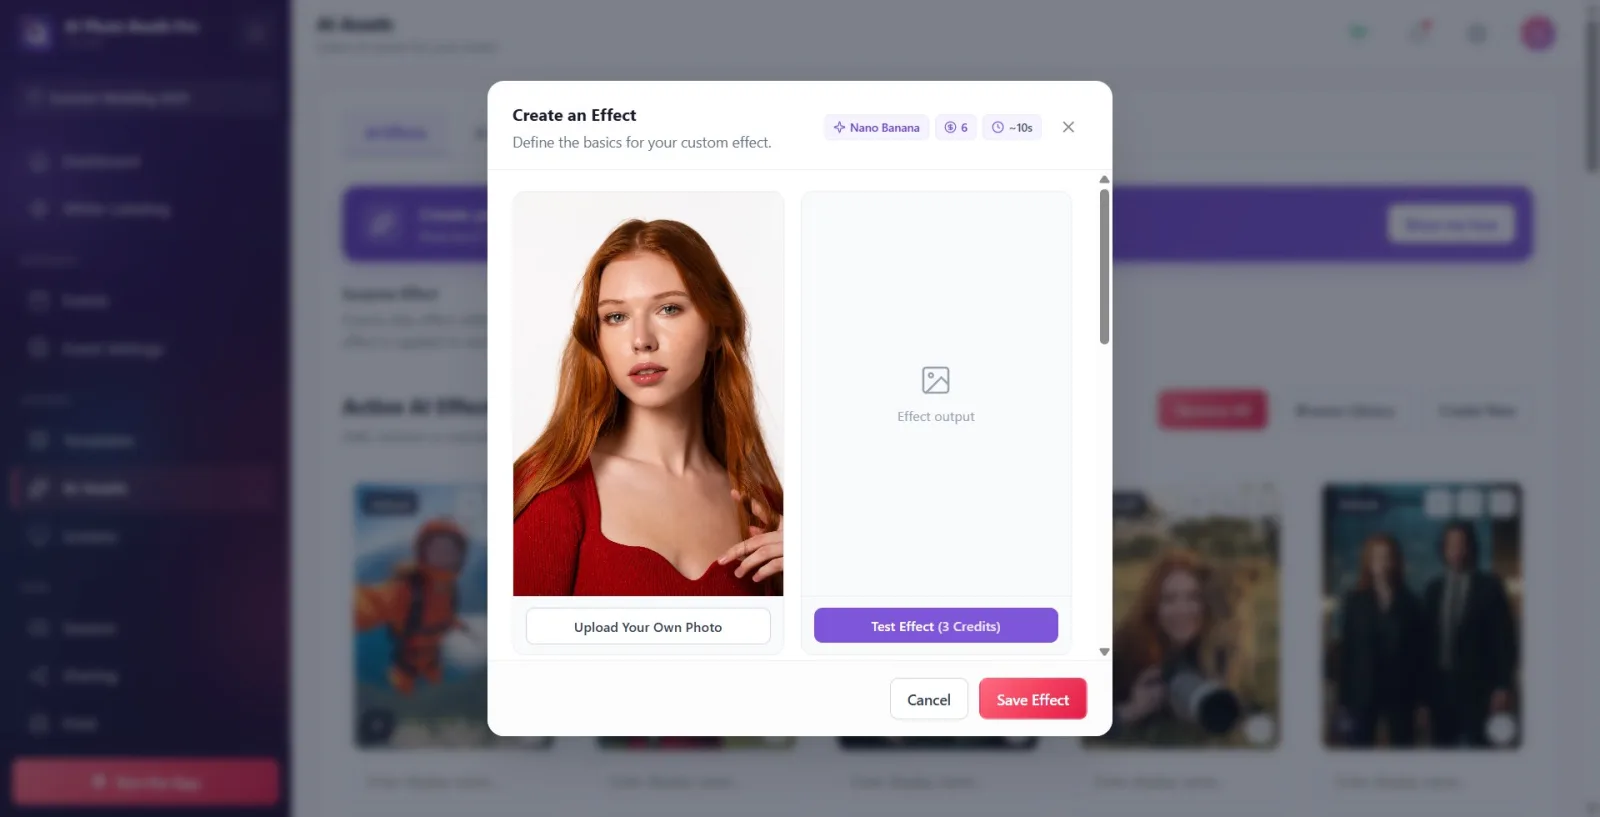
Click the Create New button to the right of the gallery title. The modal titled Create an Effect opens (subtitle: Define the basics for your custom effect.). Badges for the selected model's name, live production credit cost, and estimated time (~sec) appear in the top strip of the modal.
🔎 Items on the screen: Create New button; modal title Create an Effect; model name / credit / '~sn' badges at top; closure (X) at top right.
Step 3 · Enter the effect name
AI Assets → AI Effects → Create an Effect
Type the name of the effect in the Effect Name field. This field is required (marked with an asterisk '*'). Example placeholder: e.g. Neon Cyberpunk. If left blank, the field turns red and This field is required warning appears when saving.
🔎 Elements on the screen: Effect Name label + text box (placeholder e.g. Neon Cyberpunk); '*' for imperative.
Step 4 · Select AI model
AI Assets → AI Effects → Create an Effect
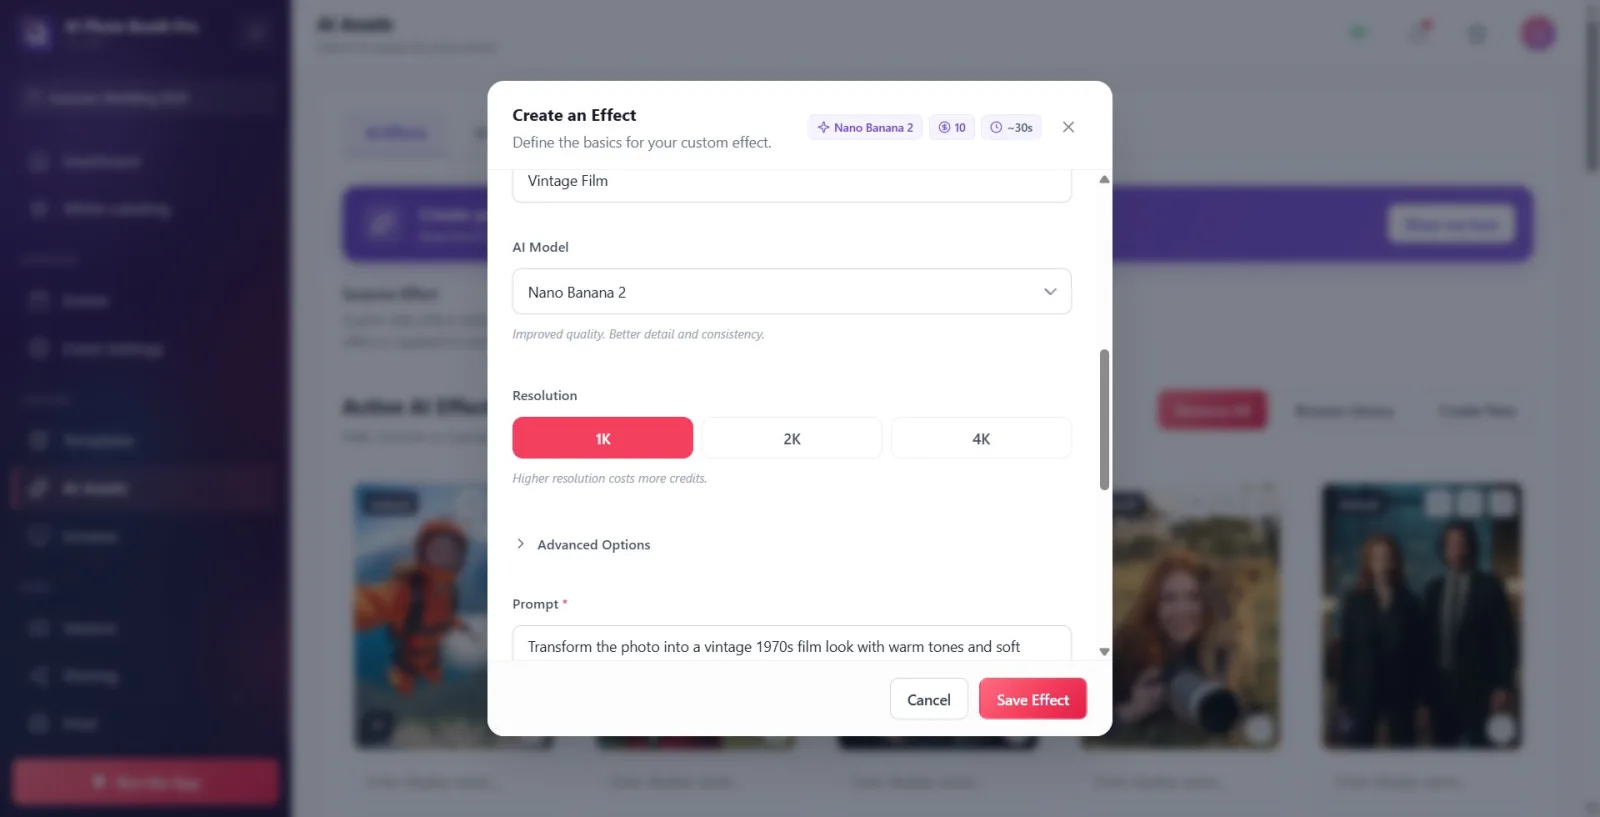
Select the production model from the AI Model drop-down menu: Nano Banana (default), Nano Banana 2, Nano Banana Pro or GPT Image 2. The description at the bottom of the menu summarizes the selected model (e.g. Nano Banana → Fast generation. Best for quick iterations., GPT Image 2 → 'OpenAI GPT Image 2. Premium quality, slower throughput (~75sec).'). When the model changes, the credit and duration badges at the top are automatically updated.
🔎 Items on the screen: AI Model drop-down menu; model description (hint line) below. Model names appear in English in the application (Nano Banana / Nano Banana 2 / Nano Banana Pro / GPT Image 2).
Step 5 · Select resolution (Nano Banana 2 / Nano Banana Pro only)
AI Assets → AI Effects → Create an Effect
If the model is Nano Banana 2 or Nano Banana Pro, the Resolution selector appears: 1K / 2K / 4K buttons; DEFAULT is 1K. Hint: Higher resolution costs more credits. — selection changes the credit badge at the top. This selector NEVER appears on the Nano Banana and GPT Image 2 models (those models ignore resolution).
🔎 Elements on the screen: Resolution label; 1K / 2K / 4K buttons (coral/red filled with selected); Higher resolution costs more credits. hint at the bottom.
Step 6 · Write prompt (description)
AI Assets → AI Effects → Create an Effect
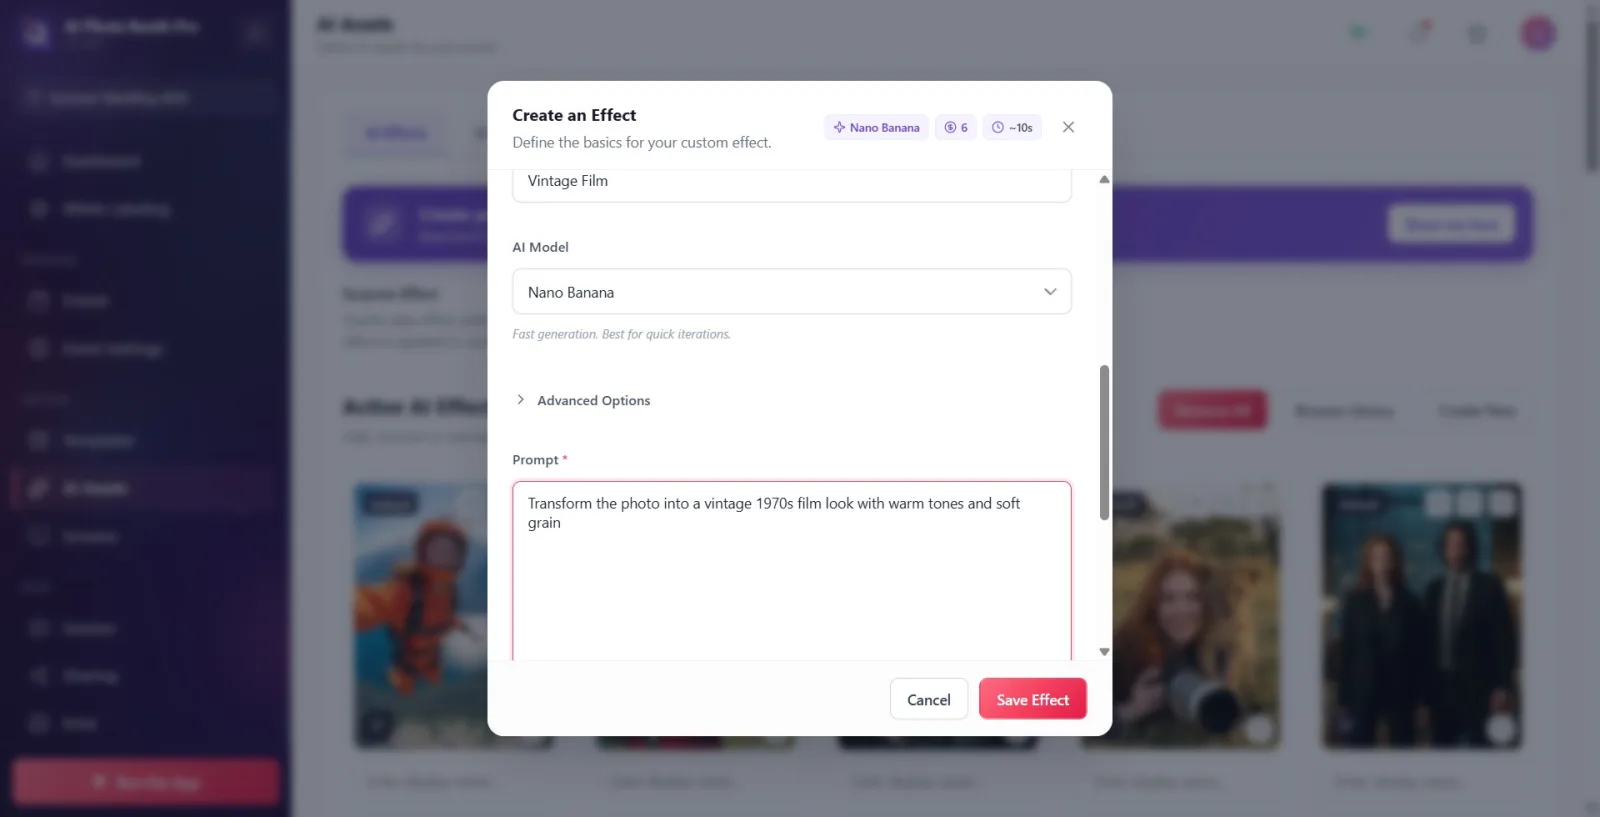
Describe the effect you want to create in the Prompt field. It is required ('*') and must be at least 5 characters. Placeholder: Describe the effect you want to create.... If you click on the Available personalization variables: chips ({Name}, {Number}, {Color}, {Interest}, {Scene}, {Weather}, {CustomPrompt}) under it, it will be added to the cursor location; these are automatically populated with the guest's data during shooting. If Test or Save is attempted with a prompt shorter than 5 characters, 'Prompt Required' / 'Prompt cannot be empty!' warning appears.
🔎 Elements on the screen: Prompt multi-line text field (placeholder Describe the effect you want to create...); Available personalization variables: label + clickable variable chips.
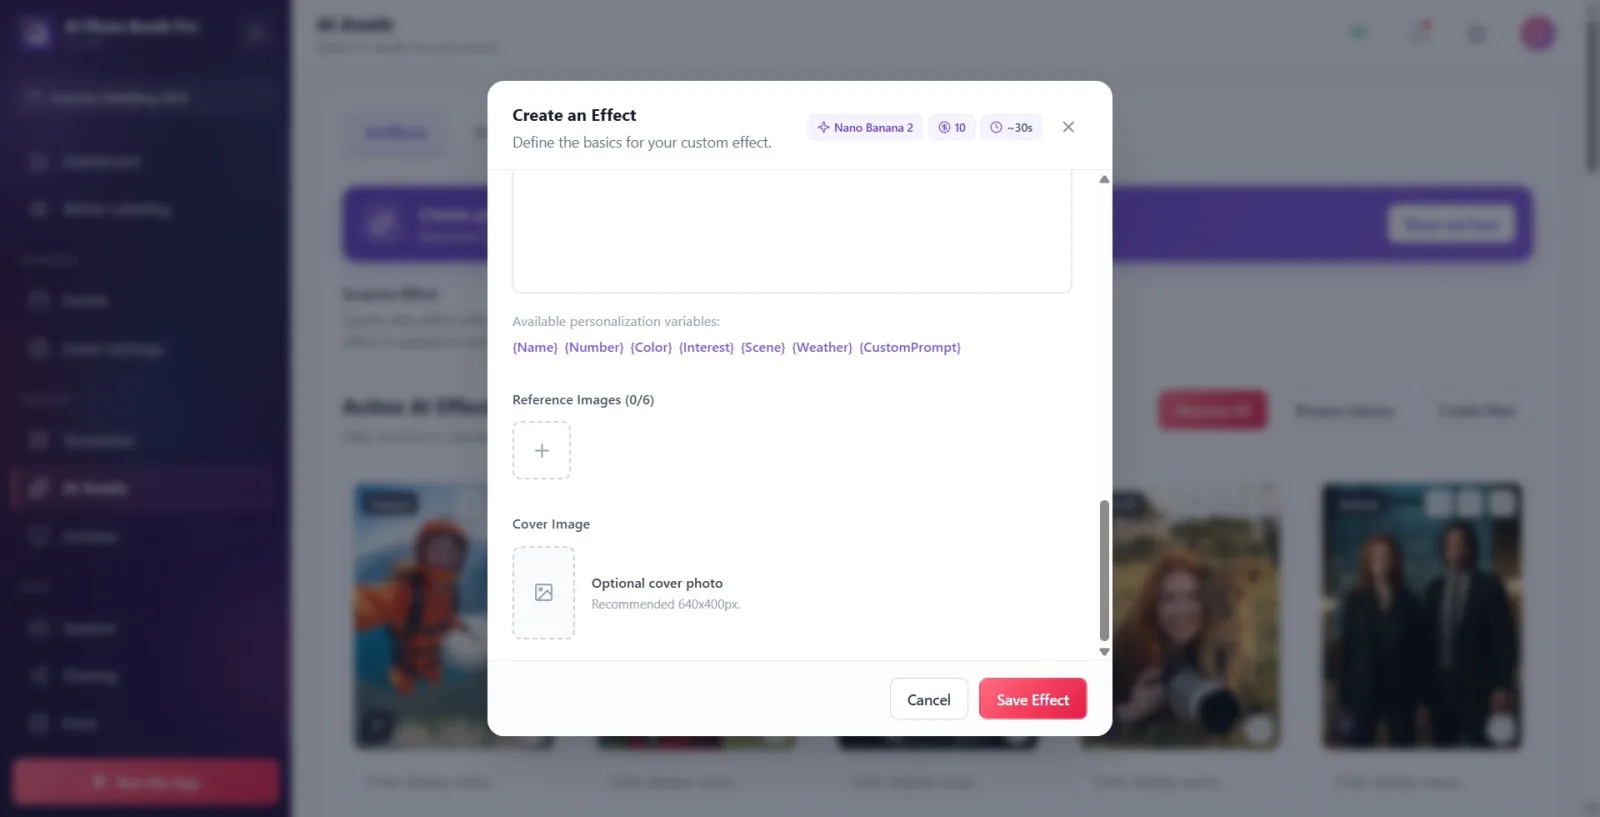
Step 7 · (Optional) Add reference images
AI Assets → AI Effects → Create an Effect
Click the '+' box in the 'Reference Images (X/limit)' section; Select one or more images from the NATIVE file selector that opens. Images are used as style/composition reference. The maximum quantity allowed varies by model: Nano Banana 2, GPT Image 2 and Nano Banana 2 6, Nano Banana Pro 8. When the limit is reached, the '+' box disappears; You can remove the image by clicking the cross in the corner of each thumbnail. (If you later change the model to one with lower limits, the excess references will be trimmed at the end.)
🔎 Elements on the screen: Reference Images title + '(used/limit)' counter; thumbnail strips of added images; '+' insert box (opens native FilePicker).
Step 8 · (Optional) Advanced Options
AI Assets → AI Effects → Create an Effect
Click on the Advanced Options heading and expand the foldable section. The Face Swap switch is present on ALL models — Swaps the original face onto the generated result. if turned on. In the Nano Banana 2 only model, the Google Arama and Image Search (web/visual-enabled production) switches also appear.
🔎 Elements on the screen: Advanced Options folding header (arrow icon); key Face Swap + hint Swaps the original face onto the generated result.; 'Google Search' / 'Image Search' switches in Nano Banana 2 alone.
Step 9 · (Optional) Test the effect
AI Assets → AI Effects → Create an Effect
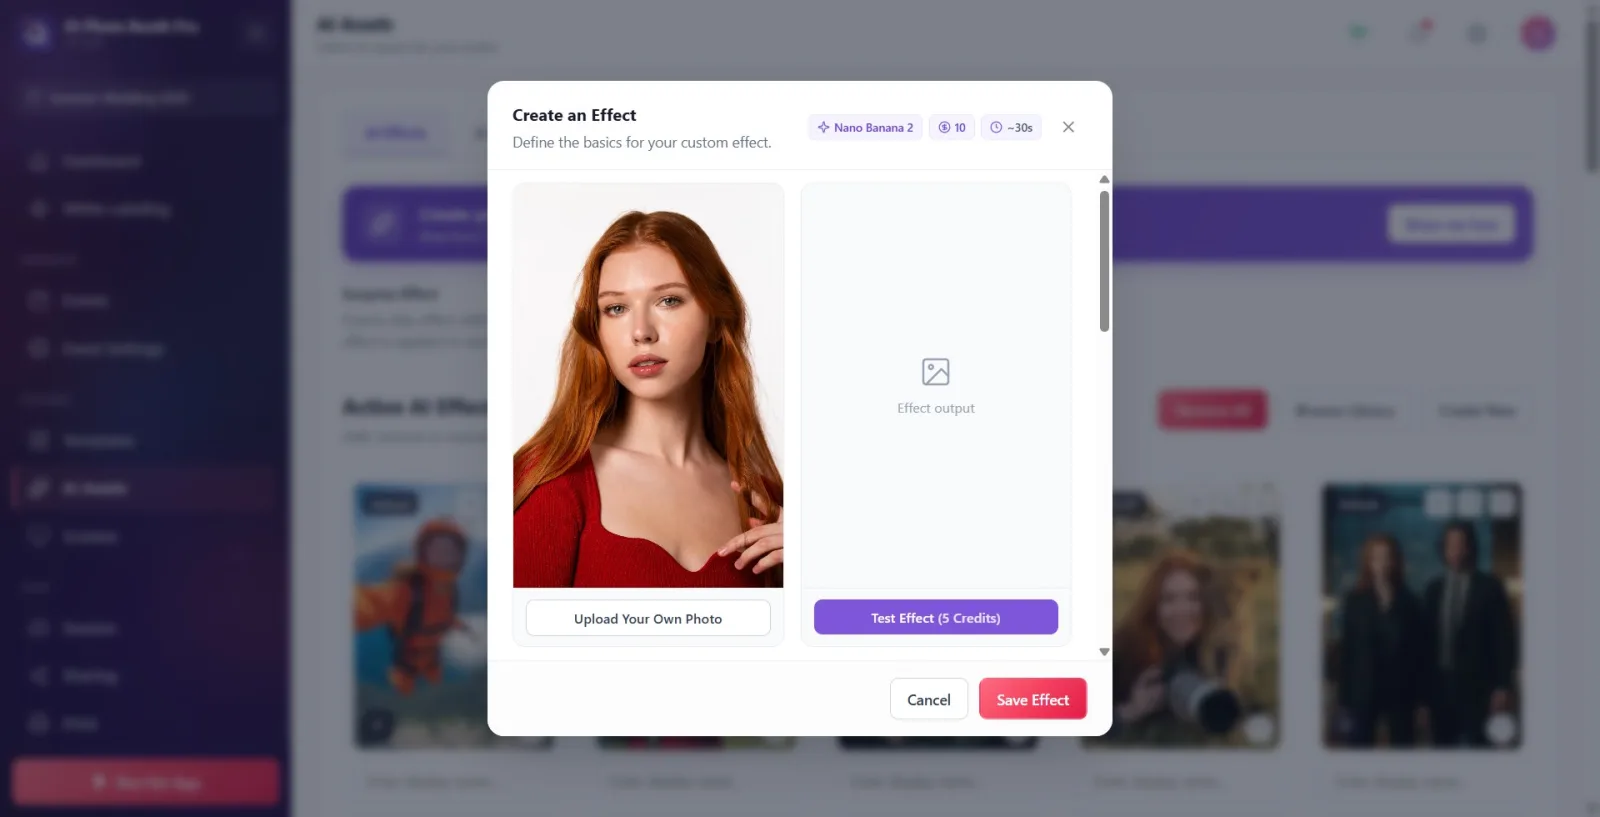
If desired, select an input photo with the Upload Your Own Photo button in the left preview box (LOCAL file chooser; otherwise the default sample photo will be used). Press the 'Test Effect (X Credits)' button in the right box — the effect works on this input and SPENDS CREDITS. After Generating... appears, the result appears in the right box. You can save the result with the download icon or cover directly with the Use as Cover button.
🔎 Items on the screen: Left box: input photo preview + Upload Your Own Photo; right box: Effect output / Generating... status, 'Test Effect (… Credits)' button, download icon and (post-test) Use as Cover.
Step 10 · (Optional) Set cover image
AI Assets → AI Effects → Create an Effect
Select a cover image from the LOCAL file chooser (Recommended 640x400px.) by clicking the preview box in the Cover Image section. When the cover is set, the text becomes Cover image set; It is rolled back with Remove cover. If you do not select a cover, the test result (if any) or the default image will be the automatic cover.
🔎 Elements on the screen: Cover Image label; clickable preview box; status text Optional cover photo / Cover image set; Recommended 640x400px.; Remove cover (with cover).
Step 11 · Save the effect
AI Assets → AI Effects → Create an Effect
Press the Save Effect button at the bottom of the modal. If Effect Name or Prompt is empty, the fields are marked with red This field is required and recording stops. Recording costs NO CREDITS (credit only goes to Testing and production during shooting). The saved effect is added to the 'Active AI Effects' gallery. If you close with 'Cancel', no changes will be saved.
🔎 Elements on the screen: Modal bottom ribbon: Cancel button and Save Effect button.
Step 12 · Ownership: edit own effect, clone someone else's
AI Assets → AI Effects (gallery card)
The same modal is used for editing and cloning (title and save text vary by mod). Click on the pencil/clone icon in a gallery card: The (non-default) effect YOU created opens with the title → Edit & Customize and updates IN PLACE with Save Changes. Editor/default/public effect → Opens with title Clone & Customize, adds ' (Copy)' to its name and saves as COPY in your library with Save as New Effect; The original does not change. The Default / Library badge on the card and the clone icon instead of a pencil indicate that that effect is not editable (will be cloned).
🔎 On-screen elements: Pen (edit) or clone icon on card; Default / Library badge; modal title Edit & Customize / Clone & Customize; save button Save Changes / Save as New Effect.
Saving does not consume credits; The credit goes only on the Test Effect button and on each production during shooting. The top badge shows the 'live' (production in shot) cost, while the '(X Credits)' in the Test button shows the testing cost — both are updated when the model and resolution change.
The default model is Nano Banana (for fast, cheap, fast experiments). Select Nano Banana 2 / Nano Banana Pro for better quality; These two have the 1K/2K/4K Resolution selector (default is 1K).
Add personalization variables like {Name}, {Color}, {Scene}, {Interest} to the prompt — auto-populated for each guest. Clicking on the chip inserts the variable at the cursor location.
Reference image limit depends on model: Nano Banana 2, Nano Banana 2 and GPT Image 2 6, Nano Banana Pro 8. Reference images are optional — used for style/composition guidance.
You can save it without testing; But Test allows you to see the real result of the prompt and if you like it, you can make that result a cover with 'Use as Cover'.
All file selections (intro photo, reference images, cover art) open with the native selector — it works the same in the touch kiosk as on the desktop (no HTML file box is used).
If you're a beginner, you can start the step-by-step guide tour with the 'Show me how' button in the Create your own AI effect ✨ banner at the top of the gallery.
Leaving the name or prompt blank and pressing save: both are mandatory; also prompts shorter than 5 characters stop Test and Save ('Prompt Required' / 'Prompt cannot be empty!').
Select Nano Banana or GPT Image 2 and look for a resolution (1K/2K/4K) selector: this selector appears only in Nano Banana 2 and Nano Banana Pro.
Pretending to 'edit' someone else's /editor/default effect: that effect does not change the original; It is CLONED with the name ' (Copy)' and becomes a copy to your library with Save as New Effect. Only your own (non-default) effect is updated in-place with Save Changes.
Looking for the Google Arama / Image Search switches in each model: these appear only in the Nano Banana 2 model. Face Swap is available on all models (in Advanced Options).
Confusing test credit with live (production) credit: The credit on the test button is the test cost; The badge at the top shows the cost of each photo at the time of capture.
Thinking the cover image is mandatory: the cover is optional. If you do not select it, the test result or default image will be the automatic cover.
Related topics
Adding a Stock AI Effect (Browse Library) AI Video Creation AI Face Swaps
