
Before this: How to Login to the Application?
An event is created with the step-by-step Create New Event wizard on the Event Management page: enter a name/description, choose whether to start from scratch or by copying an existing event, (if copying) select the source event, and set the template format (portrait/landscape/both) and the event types. Once creation finishes, the new event automatically becomes the Current (active) event and you are taken straight to the Guided Setup wizard. From the same page you can reactivate an older event (archive) or import one from the cloud.
- You must be signed in (logged in) to the app — creating an event depends on account/license information.
- You must be in the Settings interface (not in kiosk run/booth mode).
- If you are going to start with Copy Previous Event, you must have at least one existing event you can copy.
Step by step
Step 1 · Open the Event Management page
Settings → Event Management
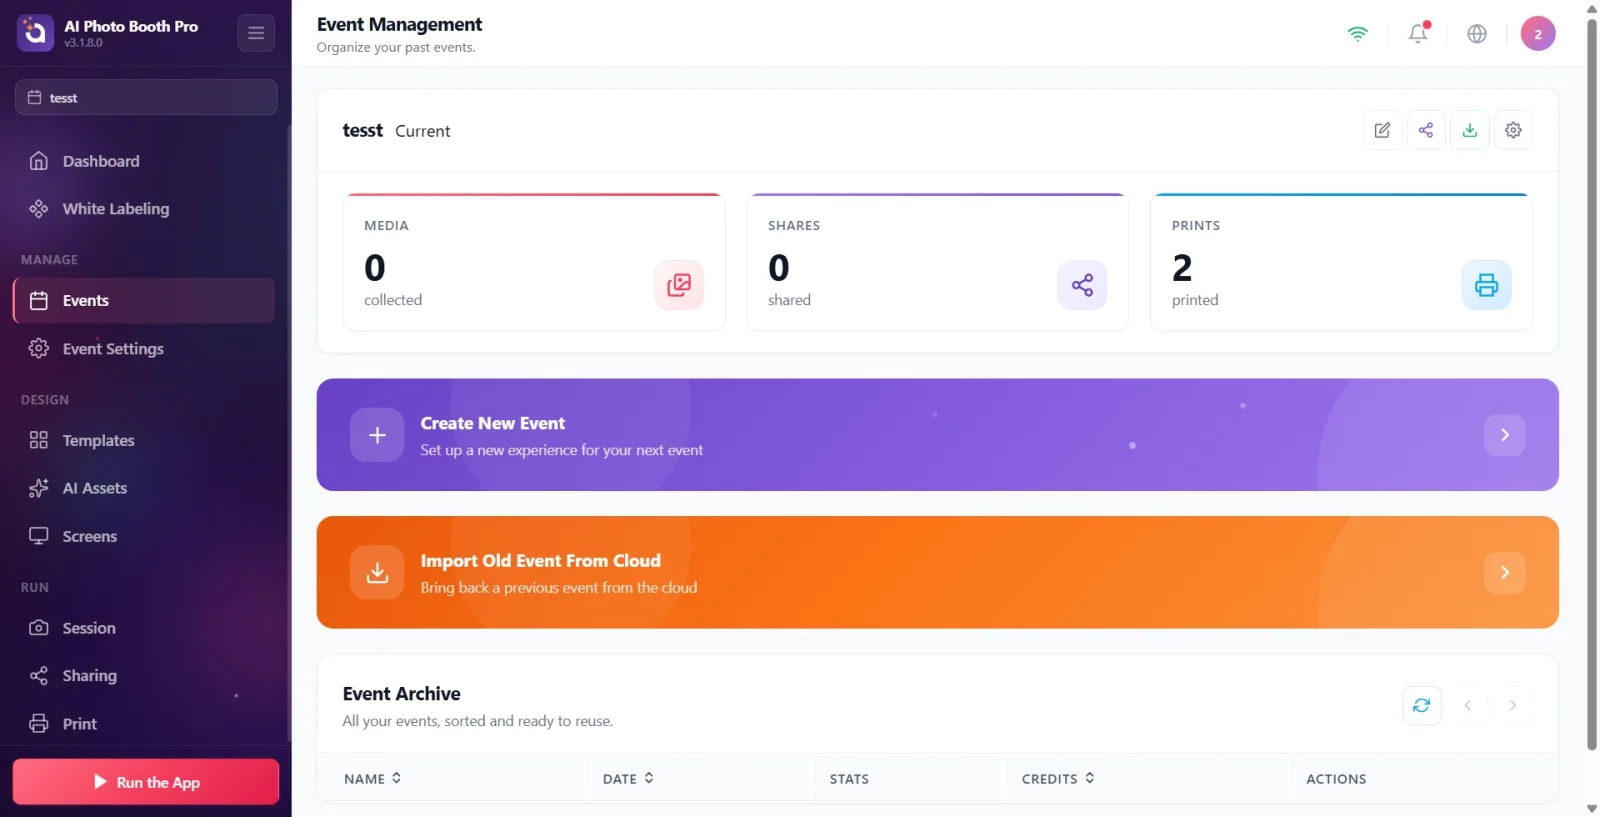
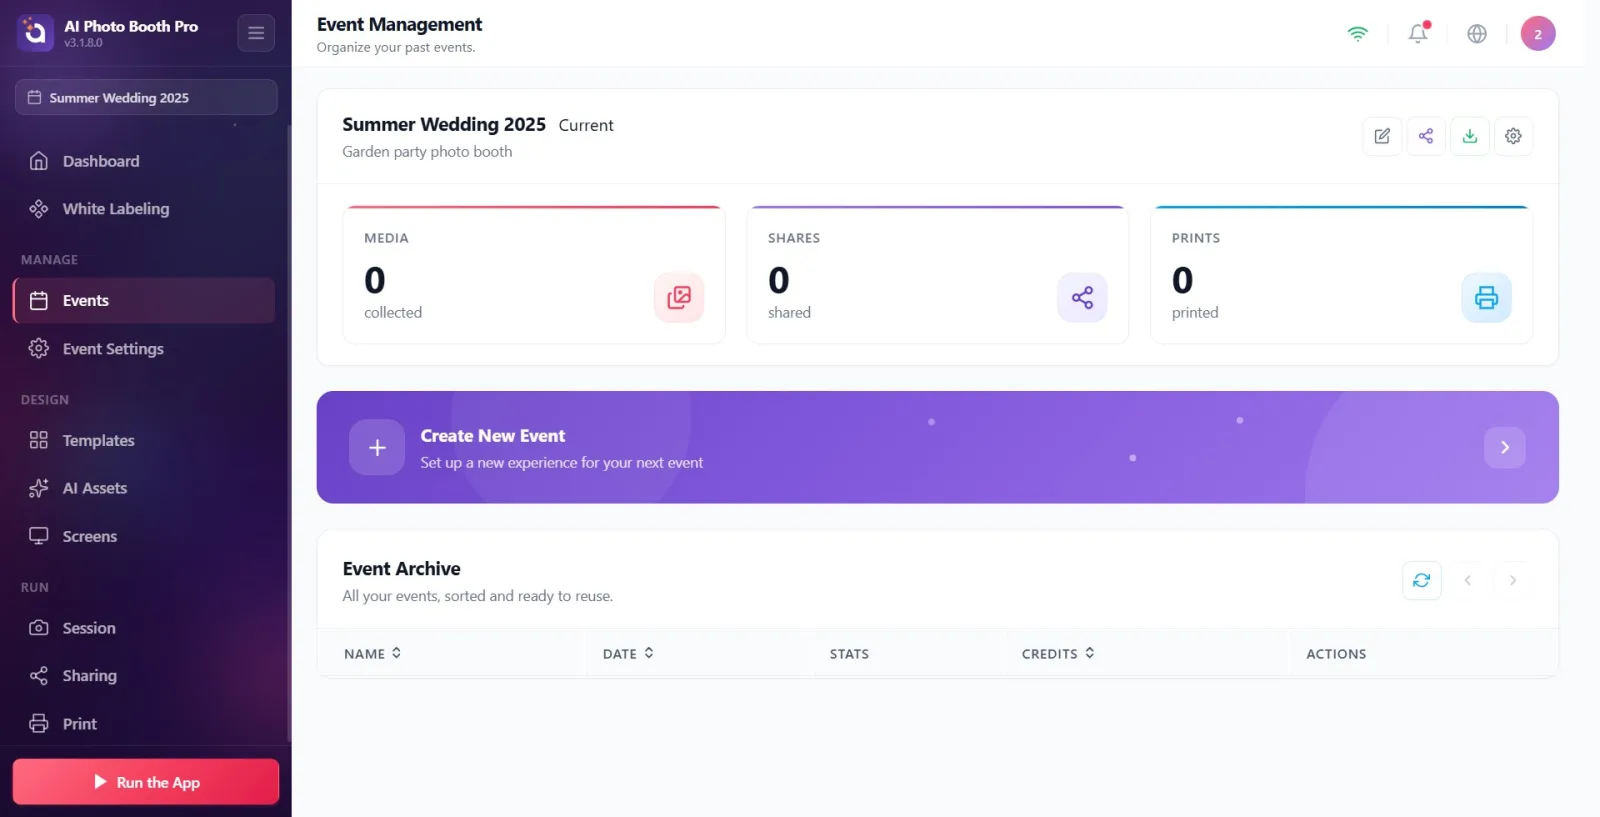
Open the Event Management section from the left menu. (Alternative: you can also reach this page with the Event button on the dashboard.) On the page you'll find — if present — the current/active event card at the top, the purple Create New Event banner in the middle, and the Event Archive below. If you have no events, a No events yet empty-state screen appears instead.
🔎 On-screen elements: left menu Event Management; on the page the Create New Event banner, the Event Archive table; in the empty state the No events yet heading and the Create First Event button.
Step 2 · Start the creation wizard
Event Management → Create New Event
Click the purple Create New Event banner. If you have no events, press the Create First Event button on the empty-state screen instead. (The Create an Event button on the dashboard also opens this page and launches the wizard directly.) A wizard window titled Create New Event opens; the name of the step you are on appears below the title. The wizard has 4 main steps; if you select Copy Previous Event, an extra step is inserted in between.
🔎 On-screen elements: the Create New Event banner / in the empty state the Create First Event button; on the dashboard Create an Event; the opened window title Create New Event + step subtitle.
Step 3 · Step 1 — Enter event details
Create New Event → Enter event details
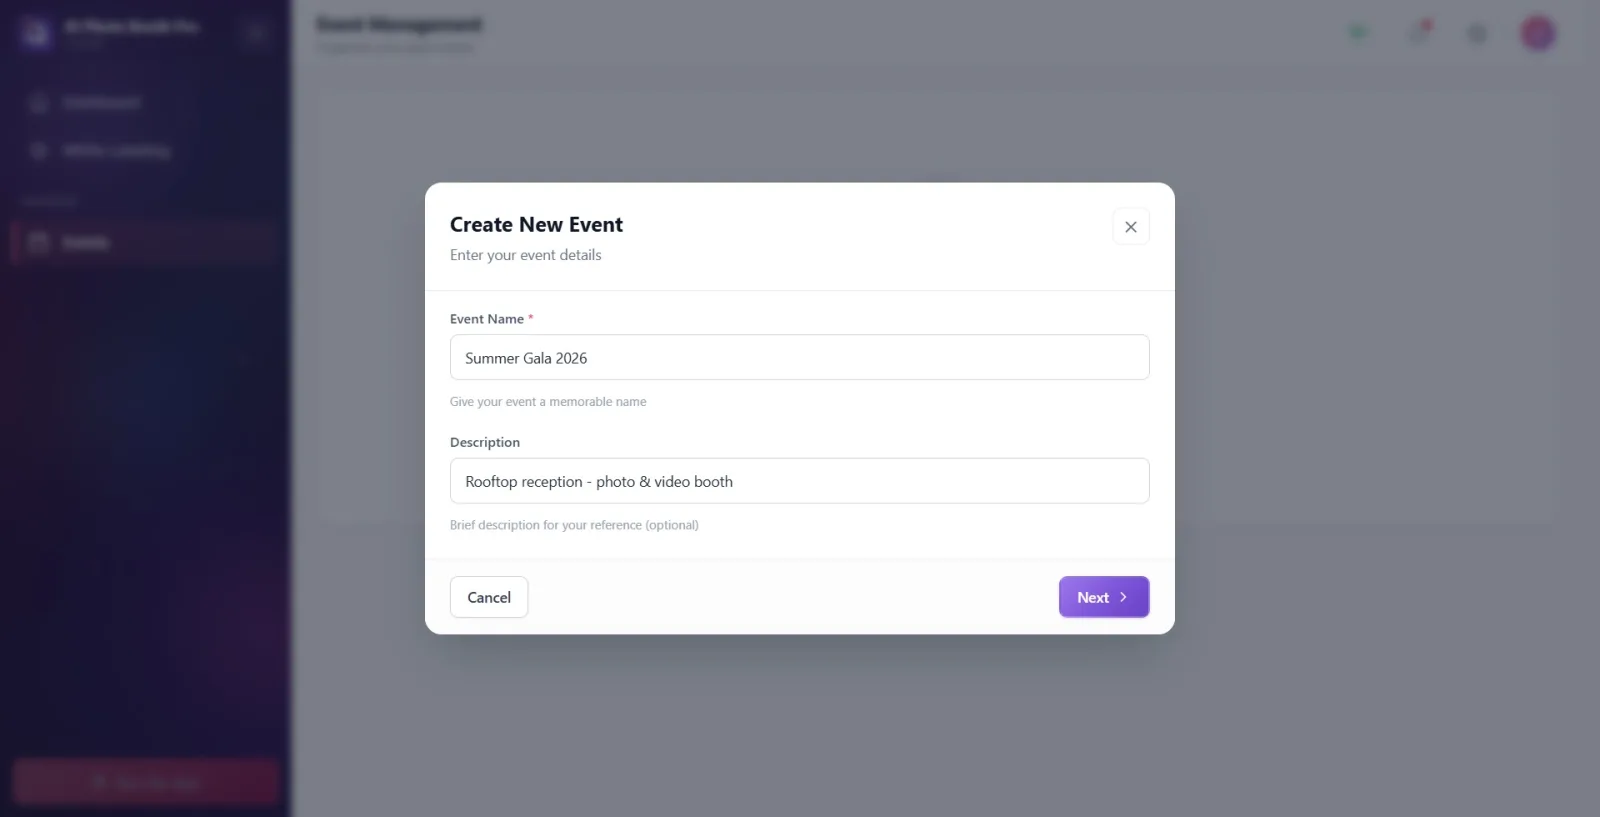
Type a name in the Event Name field — this is required (there is a red asterisk * next to it; placeholder e.g. Summer Wedding 2025). If you want, enter a short note/motto in the Description field (optional). While the name is empty, the Next button at the bottom right stays disabled; it becomes active once you type a name. Press Next.
🔎 On-screen elements: the Event Name (required) input + help text Give your event a memorable name; the Description input + help text Brief description for your reference (optional); bottom bar: Cancel on the left, Next on the right.
Step 4 · Step 2 — Choose how you want to start
Create New Event → How would you like to start?
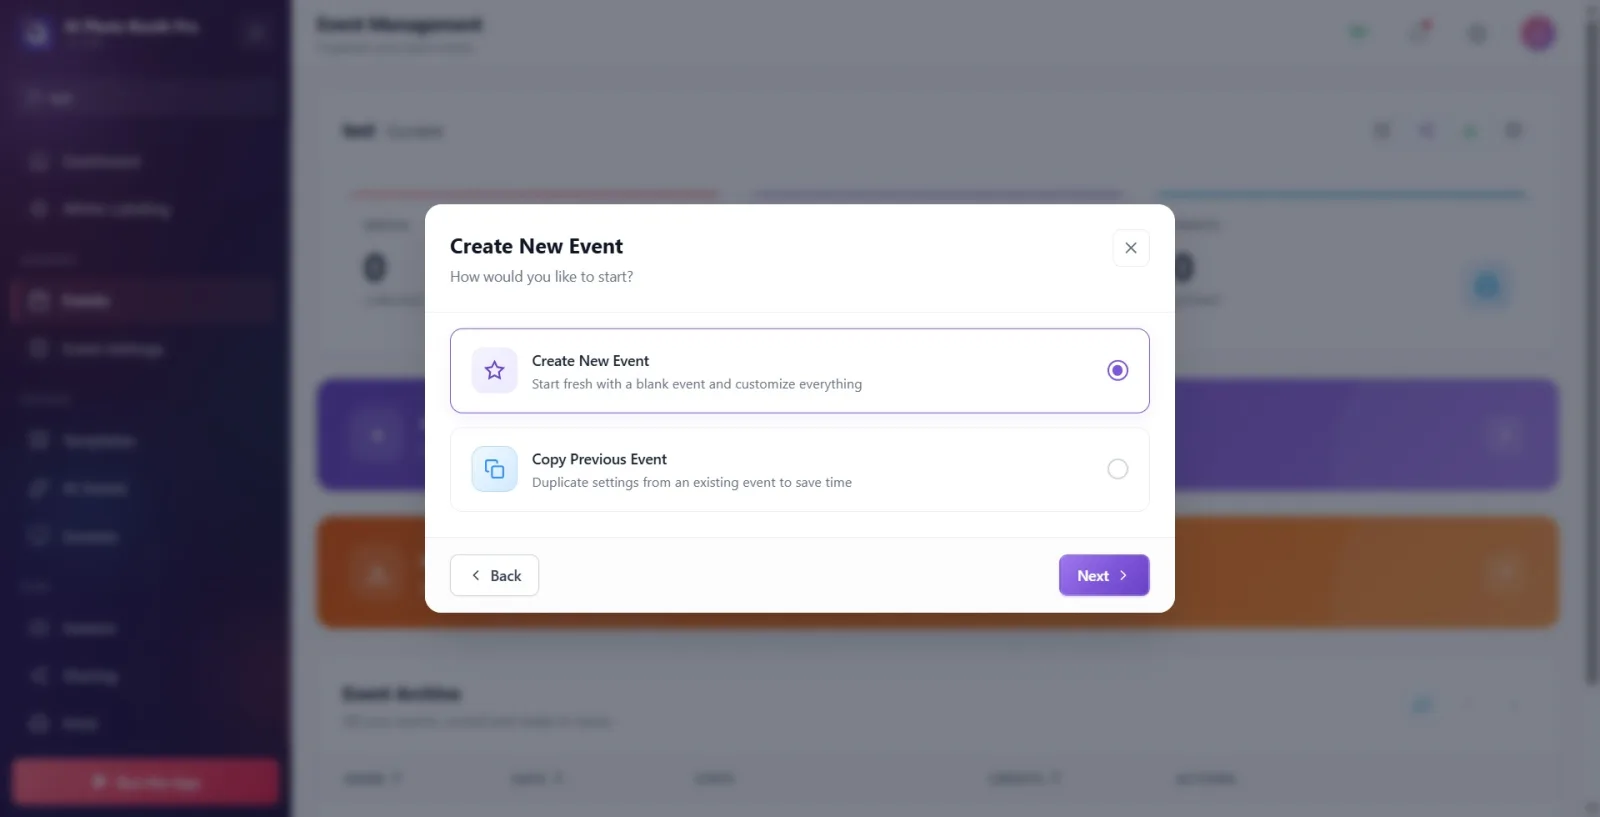
Choose one of the two cards: Create New Event (start from scratch with a blank event, Start fresh with a blank event and customize everything) or Copy Previous Event (copy the settings of an existing event). By default Create New Event is selected. Press Next. Note: if you select Copy Previous Event, the next screen asks you to pick the event to copy; with Create New Event this intermediate step is skipped and you go straight to the format step.
🔎 On-screen elements: two radio cards: Create New Event and Copy Previous Event; on the bottom bar Back / Next.
Step 5 · Step 2b — Select the event to copy (only when copying)
Create New Event → Select an event to copy from
This step appears ONLY if you selected Copy Previous Event in the previous step. The info box at the top states that all settings, templates, and configurations of the event you select will be copied to the new event (and can be changed later). From the Select an Event dropdown (the menu reading Choose from your events), select the event you want to copy, then press Next. Until an event is selected, Next is disabled.
🔎 On-screen elements: info box ('All settings, templates, and configurations of the selected event will be copied to your new event...'); the 'Select an Event' label + dropdown (placeholder 'Choose from your events'); help text 'Select one of your existing events'.
Step 6 · Step 3 — Select the template format
Create New Event → Select template format
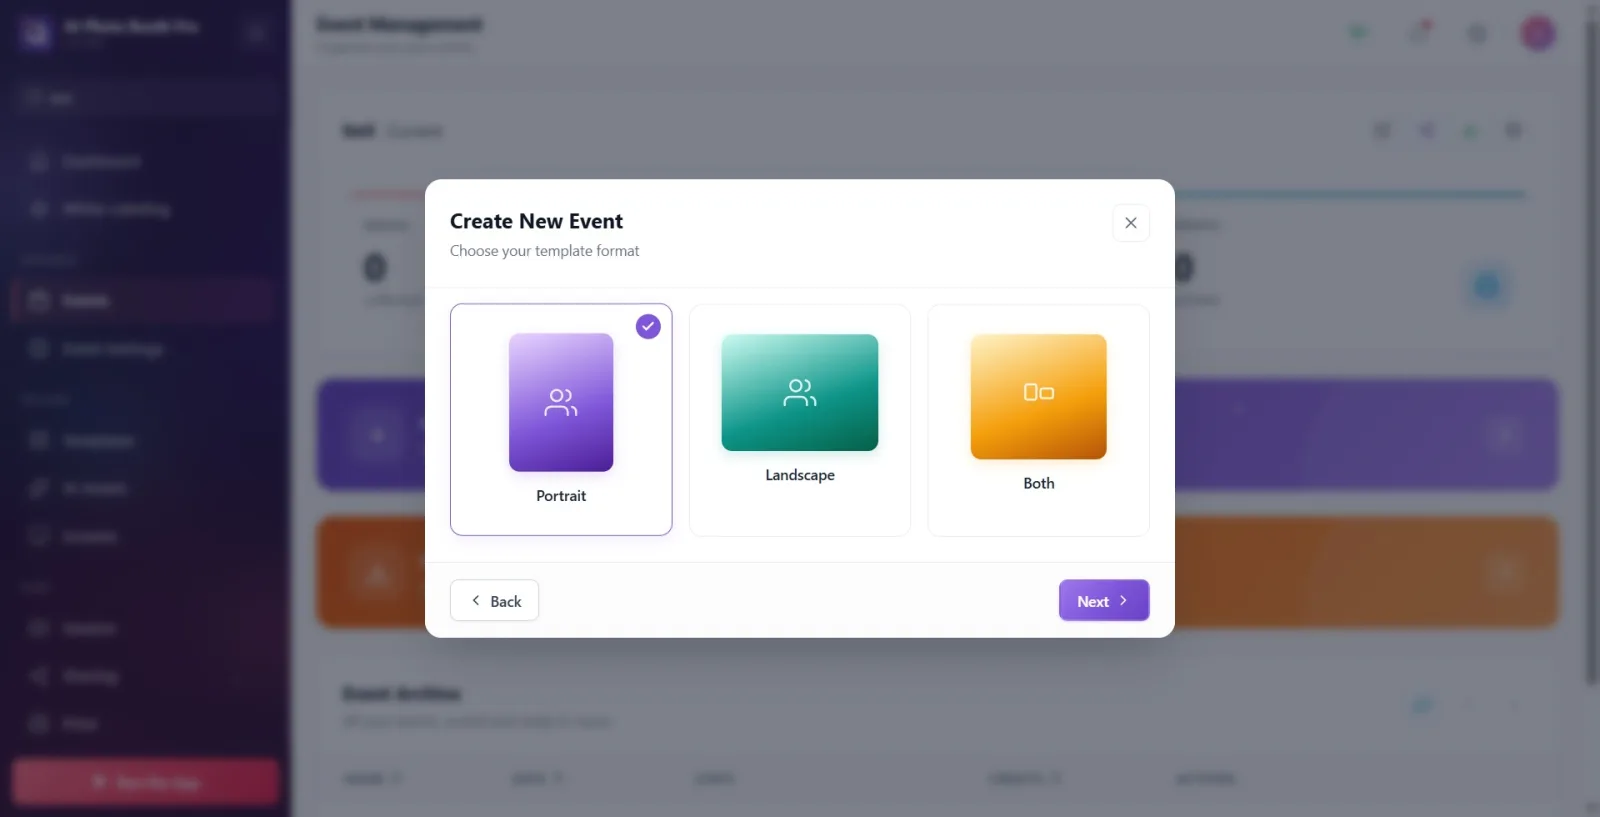
Set the output orientation: Portrait (vertical), Landscape (horizontal), or Both. The default is Portrait. Click the card you want (a check mark appears on the selected one) and press Next. Note: the labels on these cards are shown in English regardless of the app's interface language.
🔎 On-screen elements: three format cards: Portrait / Landscape / Both (labels in English, each card has a selection check area).
Step 7 · Step 4 — Select event types
Create New Event → Select event type
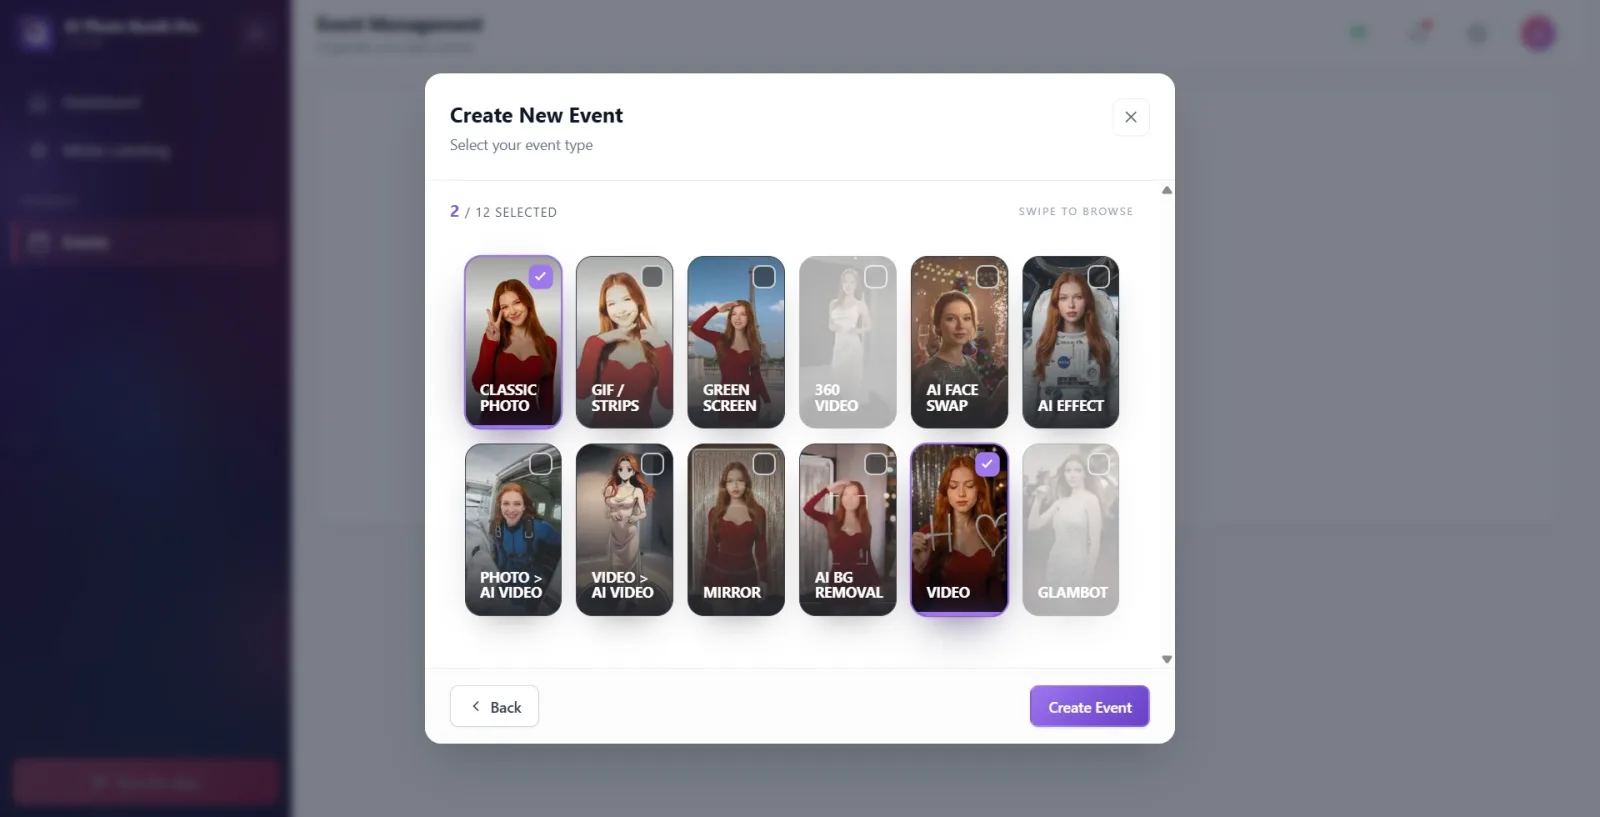
Select the experience(s) the booth will offer; at least one type must be selected. The cards are no longer a grid but a vertically scrolling list — each card plays a silent, auto-looping preview video showing how that type works (scroll the list down with the mouse or a touch swipe). There are 12 types in total: Classic Photo, GIF / Strips, Green Screen, 360 Video, AI Face Swap, AI Effect, Photo > AI Video (formerly named "AI Video" — renamed so it isn't confused with Video to AI Video), Video > AI Video (new — an AI transformation whose input is a video, see Document 52), AI BG Removal, Video, Glambot, Mirror (new — behaves exactly like Classic Photo, only the label/cover differ). The top toolbar shows a counter for the number of selected types ("N / 12 selected") and a "Swipe to browse" scrolling hint. The classic types can be selected together, multiple at once; however, 360 Video and Glambot work on their own: selecting one of them disables all other types (you cannot set up a hybrid stand in a single event). After making your selection — on this final step — press the Create an Event button at the bottom right. While no type is selected, this button is disabled.
🔎 On-screen elements: Counter at the top ("N / 12 selected") + "Swipe to browse" hint; below it a vertically scrolling list of 12 video cards (Classic Photo, GIF / Strips, Green Screen, 360 Video, AI Face Swap, AI Effect, Photo > AI Video, Video > AI Video, AI BG Removal, Video, Glambot, Mirror — all English labels, with video previews); a check icon on selected cards; disabled cards appear dimmed; Create an Event at the bottom right on the final step.
Step 8 · Create the event and wait
Create New Event → creating
When you press Create an Event, a Creating Your Event... loading animation spins in the window, with You can customize every detail after setup written beneath it. Below that, a small purple dot now also appears next to a live progress-phase line — first Building your event and templates…, then Applying default settings and media…. Wait until the process finishes; do not close the window while it runs.
🔎 On-screen elements: loading screen: spinning ring (spinner) + Creating Your Event... heading + You can customize every detail after setup subtext + status line below with a purple dot.
Step 9 · Redirect to Guided Setup and the event becoming active
Guided Setup (/eventsetup)
Once creation succeeds, the window closes and you're automatically taken to the Guided Setup wizard (Guided Setup, /eventsetup) — it used to go straight to the camera, now a short wizard opens that walks you through colors → session → sharing → (if applicable) video → camera → run, in that order. From this point on, the new event is the Current (active) event: if you return to the Event Management page, the current event card at the top shows a Current badge and Media / Shares / Prints counters. The Run the App button in the left menu also becomes enabled now. See Document 51 for the step-by-step walkthrough of Guided Setup; if you want, you can skip ahead with Skip the rest in the wizard and return directly to Event Management.
🔎 On-screen elements: the Guided Setup screen that opens once creation finishes (see Document 51, SS-GS-01); on Event Management the current event card: 'Current' badge + 'Media'/'Shares'/'Prints' metrics; in the left menu 'Run the App'.
Related document: rehberli-kurulum
Step 10 · (Later) Change the active event / reuse from the archive
Event Management → Event Archive
To make an event you created earlier active again, click its row in the Event Archive table or press the Reuse button in that row — that event instantly becomes the Current event. The same row also has Duplicate (create an exact copy), Edit (update name/description), and Delete actions. Delete only removes it from this device; the copy in the cloud is preserved.
🔎 On-screen elements: the Event Archive table (columns: Name, Date, Stats, Credits, Actions); row buttons Reuse / Duplicate / Edit / Delete; at the top, pagination arrows Previous / Next.
Step 11 · (Alternative) Import a ready-made event from the cloud
Event Management → Sync Cloud Events
To bring an event created on another device onto this device, click the sync (loop) icon in the Event Archive header and open the Sync Cloud Events window. (If you have no events, the Import from Cloud button on the empty-state screen also opens the same window.) In the list, press the Import button in the row of the event you want to bring over; while it downloads, Importing... is shown, and when it finishes it is marked as Imported and the event is added to the archive.
🔎 On-screen elements: the Sync Cloud Events window (columns Name/Date/Actions); row button Import → Importing... → Imported; in the empty state the Import from Cloud button.
The wizard flow changes based on your choice: if you select Create New Event, the order is Name → Start → Format → Type (4 steps); if you select Copy Previous Event, the Select an event to copy from step is inserted in between.
The only required field is the event name; the Next button stays disabled until a name is entered. Defaults: start Create New Event, format Portrait.
The labels on the event type and format cards appear in English in every interface language (e.g. Portrait, Classic Photo, AI Face Swap) — this is normal, not a missing translation.
The 360 Video and GlamBot types are used on their own; while one is selected, the classic booth types (and vice versa) become disabled. In a single event these two cannot be selected together with other types.
As soon as creation finishes, you're taken automatically to the Guided Setup wizard — if you want, you can skip it with Skip the rest and go straight to the camera setup instead (Document 13).
As soon as the new event is created, the Run the App button in the left menu becomes enabled; the kiosk can only be run when there is a selected (current) event.
If you choose Delete for an event, it is removed only from this device; the copy in the cloud remains and can be brought back with Sync Cloud Events.
The active event is not listed separately in the archive table; it is shown on the current event card at the top. To switch to a different event, Reuse from the archive is enough.
Trying to press Next without entering the event name: while the name is empty the button is disabled, so a name must be typed first.
Trying to press Create an Event on the final step without selecting any event type: at least one type must be selected, otherwise the button stays disabled.
Trying to select 360 Video or GlamBot together with other types and thinking the cards are unclickable: these types work on their own and intentionally disable the others.
Thinking that the format and type cards appearing in English is a bug: these labels are intentionally not localized.
Trying to close the window while the Creating Your Event... animation is spinning during creation: you must wait until the process finishes.
Thinking something went wrong when you are redirected to the Guided Setup wizard after creating the event: this is expected behavior, part of the flow (Document 51).
Re-creating an event made on another device because you cannot see it in the archive on this device: it must first be imported with Sync Cloud Events.
Related topics
Guided Setup Templates Event Settings → Camera Event Settings → Main Event Archive / Import from Cloud
