
Before this: How to Create an Event?
The 'Camera' tab of Event Settings is where you select and connect the camera for the kiosk, control the live preview and adjust brightness/rotation/mirror/flash (on a DSLR also advanced exposure like ISO, shutter, aperture) settings. The tab consists of two parts: Add Camera at the top, Camera Settings at the bottom.
- An event must be created and open for editing (the Event Settings screen should appear)
- The camera you want to use must be physically connected: USB for webcam/DSLR, Bluetooth for GoPro (Windows only), source application for virtual camera (OBS, etc.) must be open and live.
- Camera permission may be requested on first use (Android/iOS) — if permission is not given, the camera cannot be turned on
- A supported DSLR (Canon / Nikon etc.) must be connected for DSLR advanced settings and Set Settings with AI
step by step
Step 1 · Open Camera tab
Settings → Event Settings → 'camera'
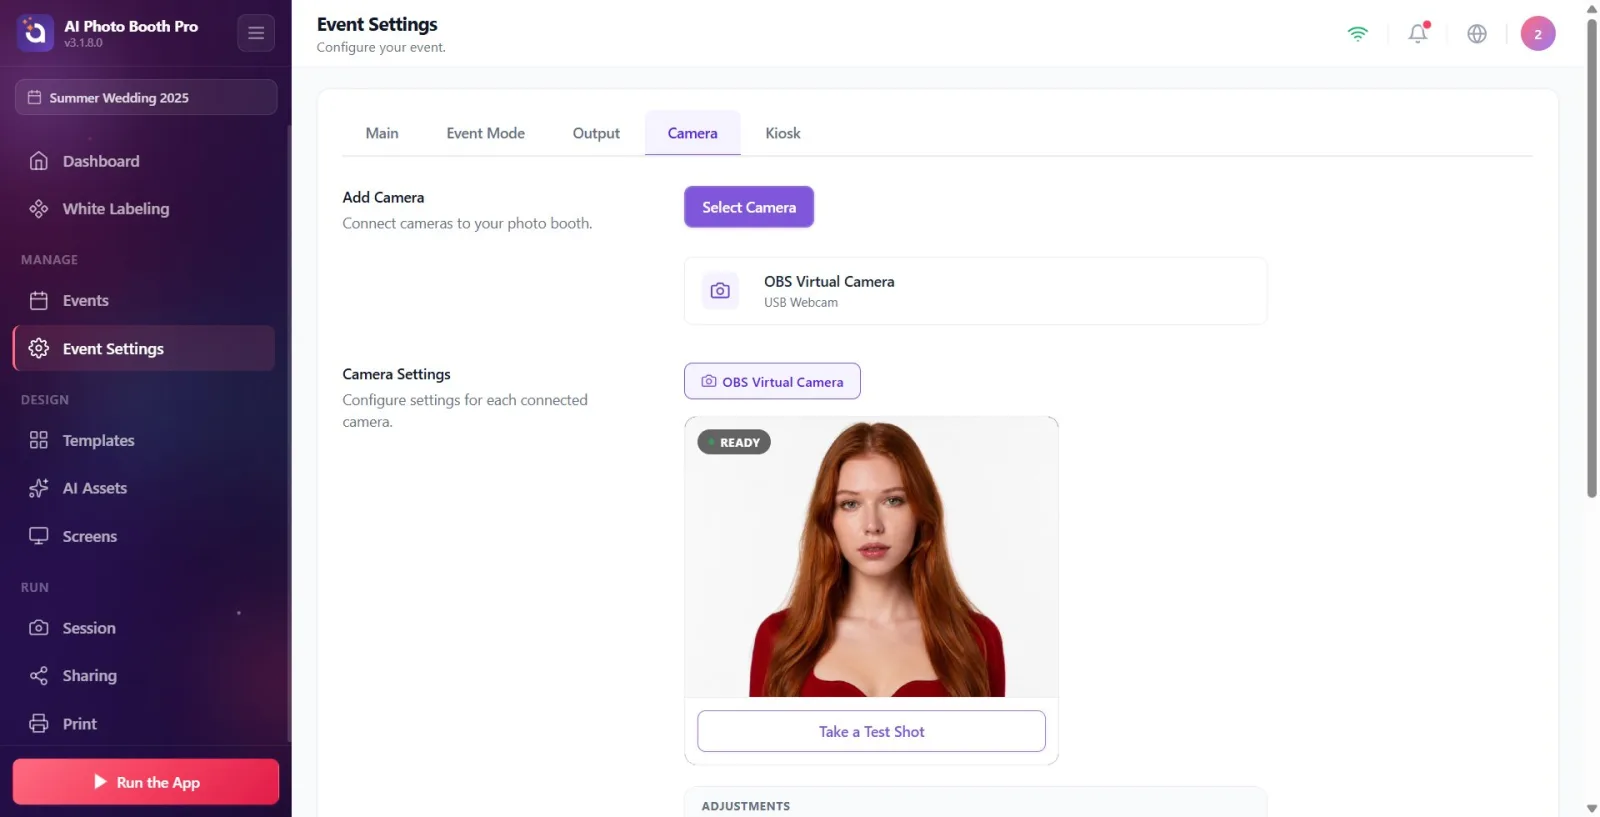
Open Event Settings from Settings and click the Camera tab from the top tab strip (tab order: 'Main' · Event Mode · Output · Camera · Kiosk). The tab shows two sections: Add Camera at the top, Camera Settings at the bottom. (The onboarding tour comes directly to this screen via the '/eventsettings?tab=camera' link.)
🔎 Elements on the screen: Top tab strip: Camera tab (label: Camera); two main sections: Add Camera and Camera Settings.
Step 2 · Open the camera adding window with Select Camera
Settings → Event Settings → 'Camera' (Add Camera window)
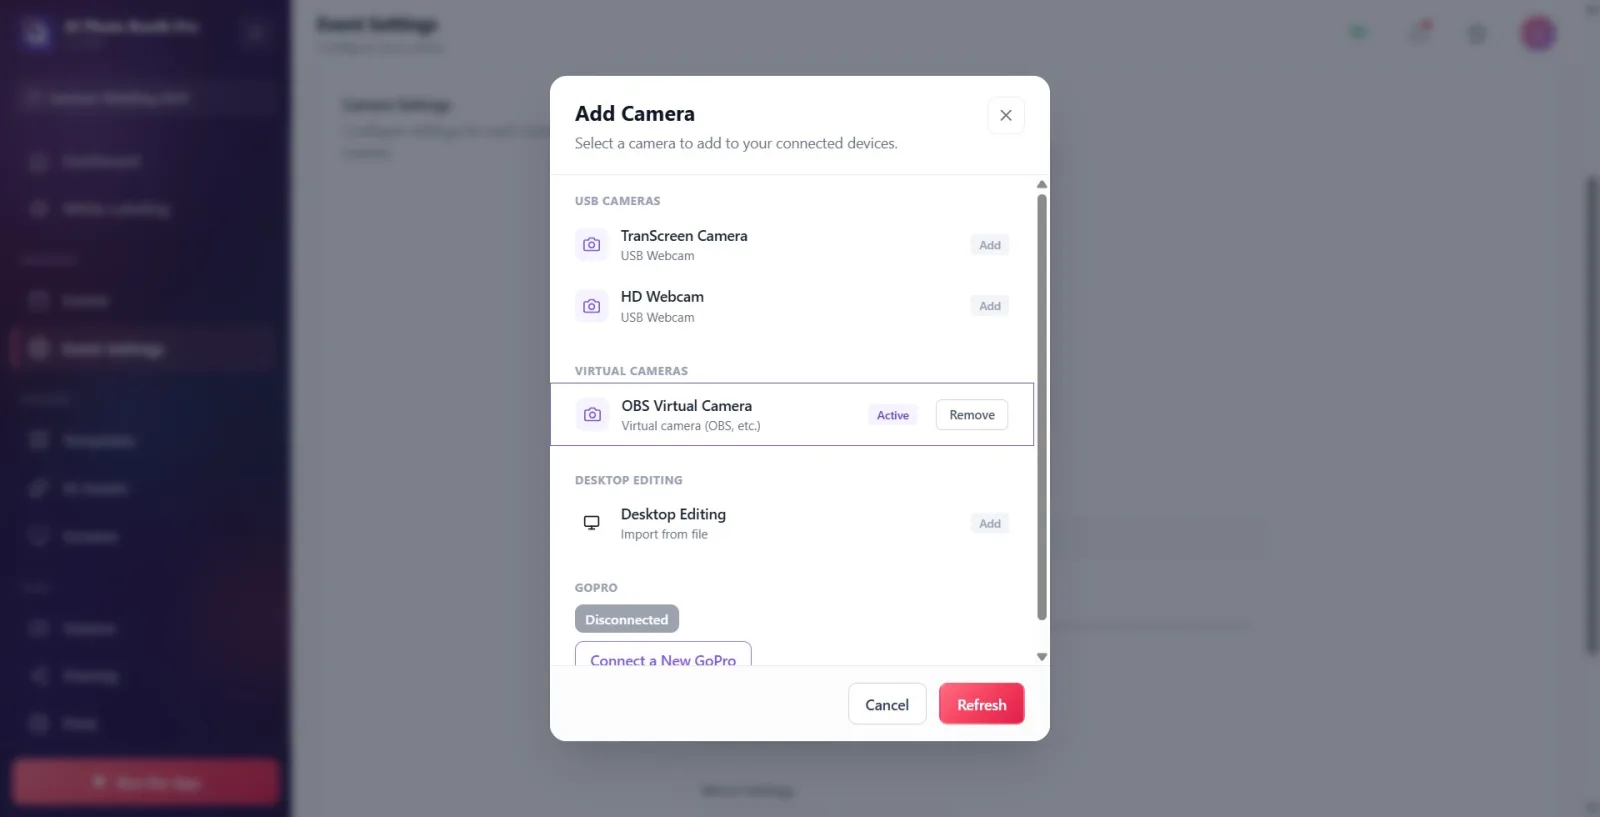
Click the purple Select Camera button in the Add Camera section. A window titled Add Camera opens; The subtitle is Select a camera to add to your connected devices.. The window lists all connected cameras, grouped by type.
🔎 Elements on the screen: title Add Camera + description Connect cameras to your photo booth.; Select Camera button; opened modal title Add Camera, subtitle Select a camera to add to your connected devices.
Step 3 · Select camera from the list and add
Settings → Event Settings → 'Camera' (Add Camera window)
Click on the camera row you want from the groups in the window. Clicking both adds that camera to the list and makes it active (shown in the live preview). Groups: Built-in Cameras (detail Built-in Camera), USB Cameras (webcams with detail 'USB Webcam', DSLRs with detail USB Camera (DSLR)), Virtual Cameras (OBS/ManyCam etc., detail with Virtual camera (OBS, etc.)) and Desktop Editing (detail with Import from file — camera import from file instead). The badge to the right of each row indicates the status: Active (currently used), Added (listed but not active), or Add (not yet added).
🔎 Items on the screen: Groups: Built-in Cameras / USB Cameras / Virtual Cameras / Desktop Editing; row badges: Active, Added, Add; Remove button on added rows.
Step 4 · Connect GoPro (Windows only)
Settings → Event Settings → 'Camera' (Add Camera window · GoPro)
In Windows the 'GoPro' section always appears at the bottom of the 'Add Camera' window (detail 'GoPro · Bluetooth'). For a new GoPro, press the 'Connect New GoPro' button — the app scans for Bluetooth. If the connection is lost or needs to reconnect to WiFi, the 'Reconnect' button appears. The colored status label in the section shows the connection stage live (initially Disconnected); During extended periods of connection, a live recording/event log streams at the bottom. (The GoPro section does not appear on platforms other than Windows.)
🔎 Items on the screen: GoPro group title; colored status label (e.g. Disconnected); Connect a New GoPro button; conditional Reconnect button; live log dump.
Step 5 · Close window / refresh list
Settings → Event Settings → 'Camera' (Add Camera window)
If a newly installed device does not appear in the list, press the Refresh button at the bottom — the cameras will be scanned again and the Added/Active badges will be updated. To remove a camera from the list, use the Remove button in its row (if you remove the active camera, it will automatically switch to the next camera). When finished, close the window with Cancel (when you select a camera, the window closes automatically).
🔎 Items on the screen: Cancel and Refresh buttons under the window; Remove button on added rows.
Step 6 · Read connected camera status (offline / search — fixed camera)
Settings → Event Settings → 'Camera' (Add Camera · connected camera)
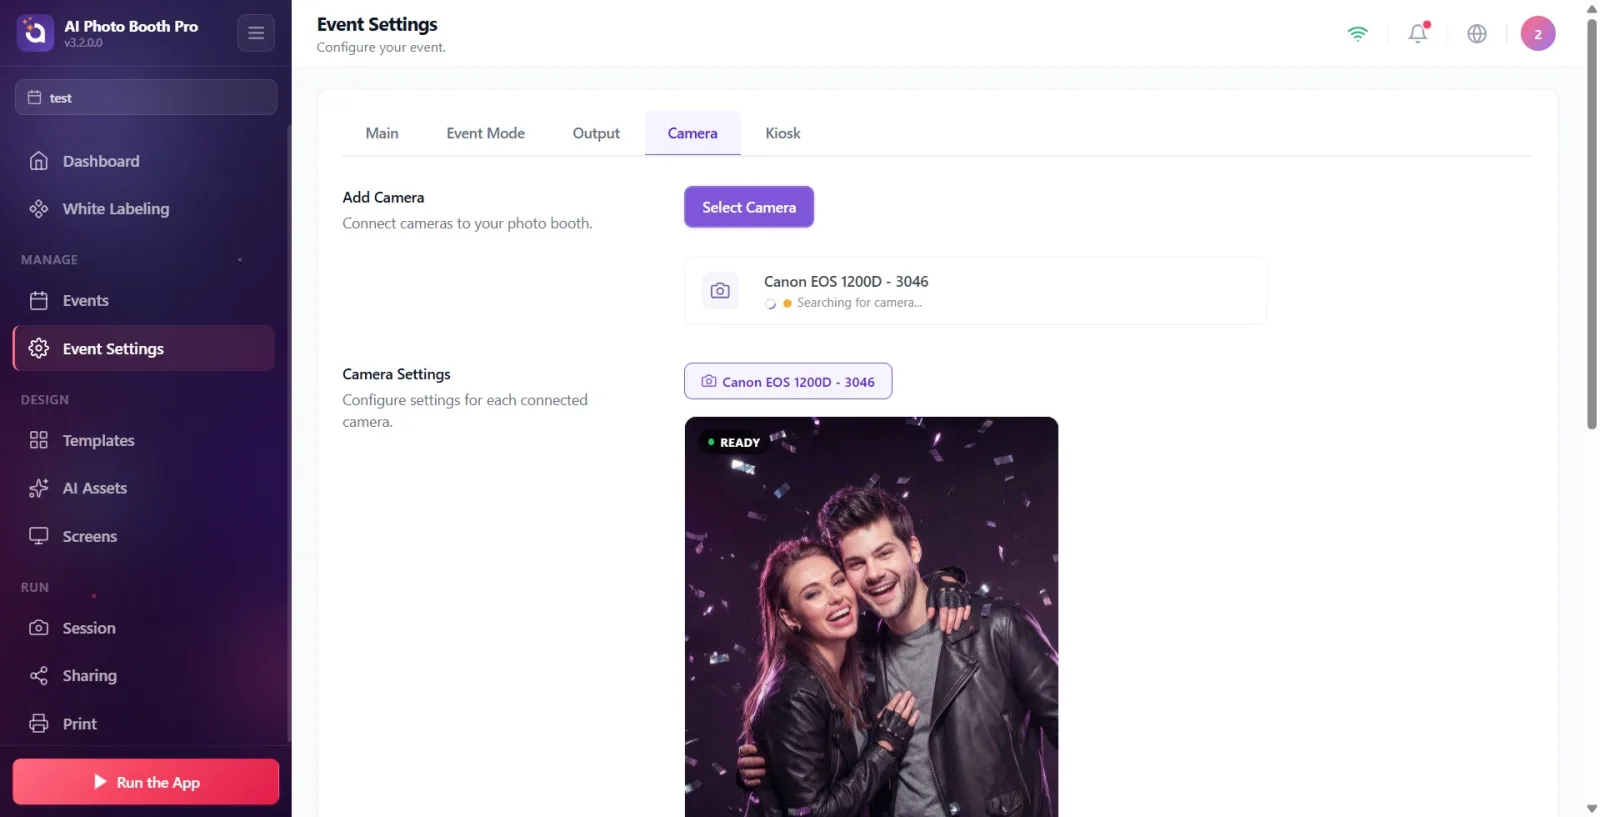
In the connected camera card under the Add Camera section, you'll see the selected camera, its name, and type (via the webcam / DSLR / GoPro / desktop icon). If no camera is selected, it says No Camera Selected. If the selected camera temporarily loses connection, the card remains 'stable' (does not jump to another camera): shows Offline with an orange dot; A spinning icon and Searching for camera... text appear as the app attempts to auto-reconnect. The preview continues automatically when the camera comes back.
🔎 Items on the screen: Connected camera card: type icon + camera name + detail; No Camera Selected if empty; offline orange dot + Offline; spinner + Searching for camera... during search
Step 7 · Examine the live preview and camera tab
Settings → Event Settings → 'Camera' (Camera Settings)
The Camera Settings section (description: Configure settings for each connected camera.) shows a tab with the name of the active camera and the live preview card below it. The Ready badge with a green dot in the corner of the card indicates that live streaming is running. If you added multiple cameras, to change the active camera, you open the Select Camera window in step 5 and click on another camera (the preview switches to the new camera).
🔎 Elements on the screen: Camera Settings title + description; camera tab (active camera name); live preview card; Ready badge (green dot).
Step 8 · Take a test photo
Settings → Event Settings → 'Camera' (Camera Settings)
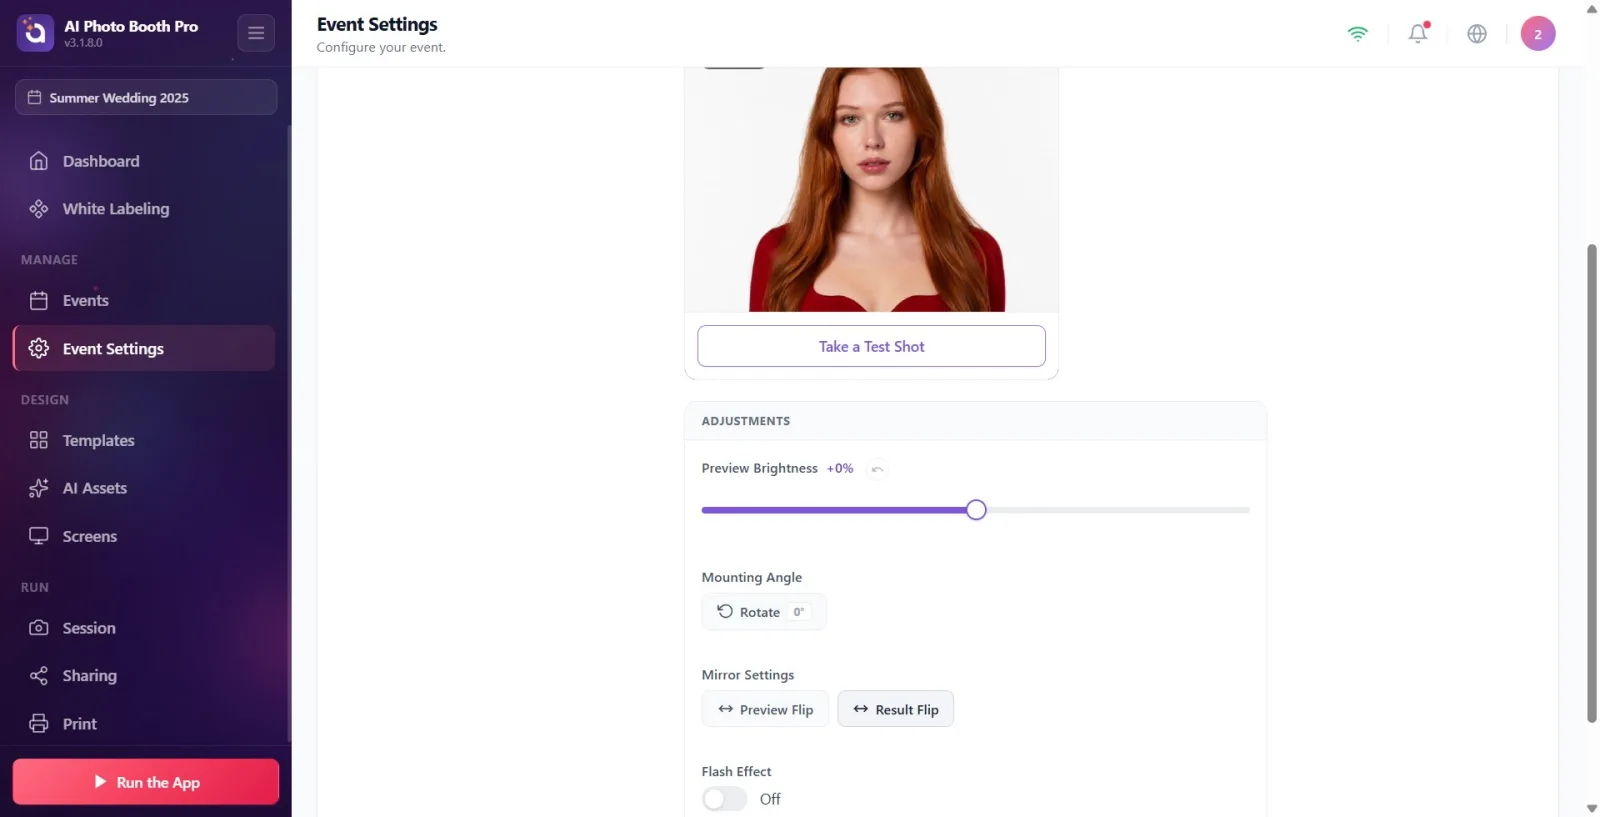
Press the Take a Test Shot button below the preview. A fixed 3-second countdown begins (ring + digit), the shutter sound plays; If Flash Effect is on, the light frame stays on at the preview edge throughout the shooting. After shooting, the photo freezes in preview and the button changes to Retake—press Retaketo try again. This is the quickest way to verify framing, lighting and colors before actual shooting.
🔎 On-screen items: Take a Test Shot button (inactive while shooting); countdown ring + digit; Retake button after shooting.
Step 9 Adjustments — Preview Brightness
Settings → Event Settings → 'Camera' (Adjustments)
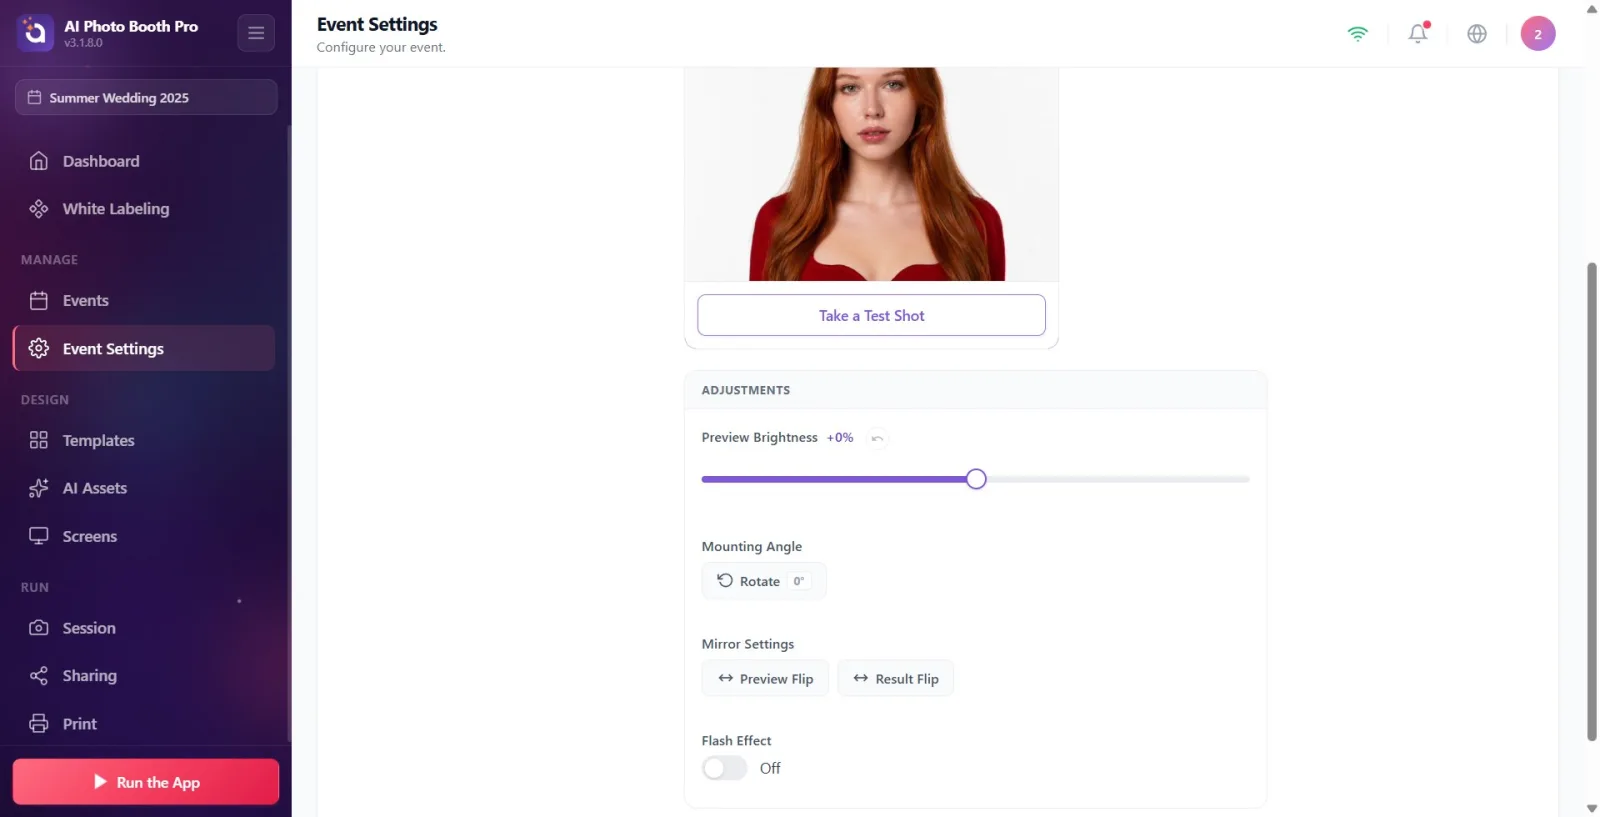
Lighten/darken the preview by dragging the Preview Brightness slider in the Adjustments panel. The percentage value next to the label is displayed instantly (e.g. '+0%'). The Reset button with the refresh circle icon returns the value to 0 (inactive if the value is already 0). Brightness is stored separately and permanently for each camera; It doesn't reset when you switch tabs/camera.
🔎 Elements on the screen: Adjustments panel title; Preview Brightness label + percentage indicator; slider; Reset button (round, with arrow icon).
Step 10 · Adjustments — Link Angle (Rotate)
Settings → Event Settings → 'Camera' (Adjustments)
If the camera is mounted horizontally/upside down, press the Rotate button in the Mounting Angle row. Each press rotates the image one step and the badge on the button shows the current angle: 0° → 90° → 180° → 270° → 0°. When the preview becomes portrait (portrait), the preview frame also changes to portrait format.
🔎 Elements on the screen: Mounting Angle label; Rotate button + angle badge (0°/90°/180°/270°).
Step 11 Adjustments — Mirror Settings (Preview Flip / Result Flip)
Settings → Event Settings → 'Camera' (Adjustments)
There are two separate buttons on the Mirror Settings row: Preview Flip only reflects the live preview on the screen horizontally (mirror effect — so the guest sees themselves in a mirror); Result Flip determines the horizontal reflection of the recorded/printed photo. The active button is highlighted. The two are independent: you can mirror the preview and keep the result plain (or vice versa).
🔎 Elements on the screen: Mirror Settings label; Preview Flip button (hover when active); Result Flip button (hover when active).
Step 12 · Adjustments — Flash Effect
Settings → Event Settings → 'Camera' (Adjustments)
If you set the switch in the Flash Effect line to On, a soft edge-light will appear on the preview edge at the time of shooting; If you set Off this effect will be disabled. This screen-flash effect is applied both in the test shot here and in the real shot.
🔎 Elements on the screen: Flash Effect label; On/Off switch (On / Off).
Step 13 · DSLR Advanced Settings (only on supported DSLR)
Settings → Event Settings → 'Camera' (Advanced Settings)
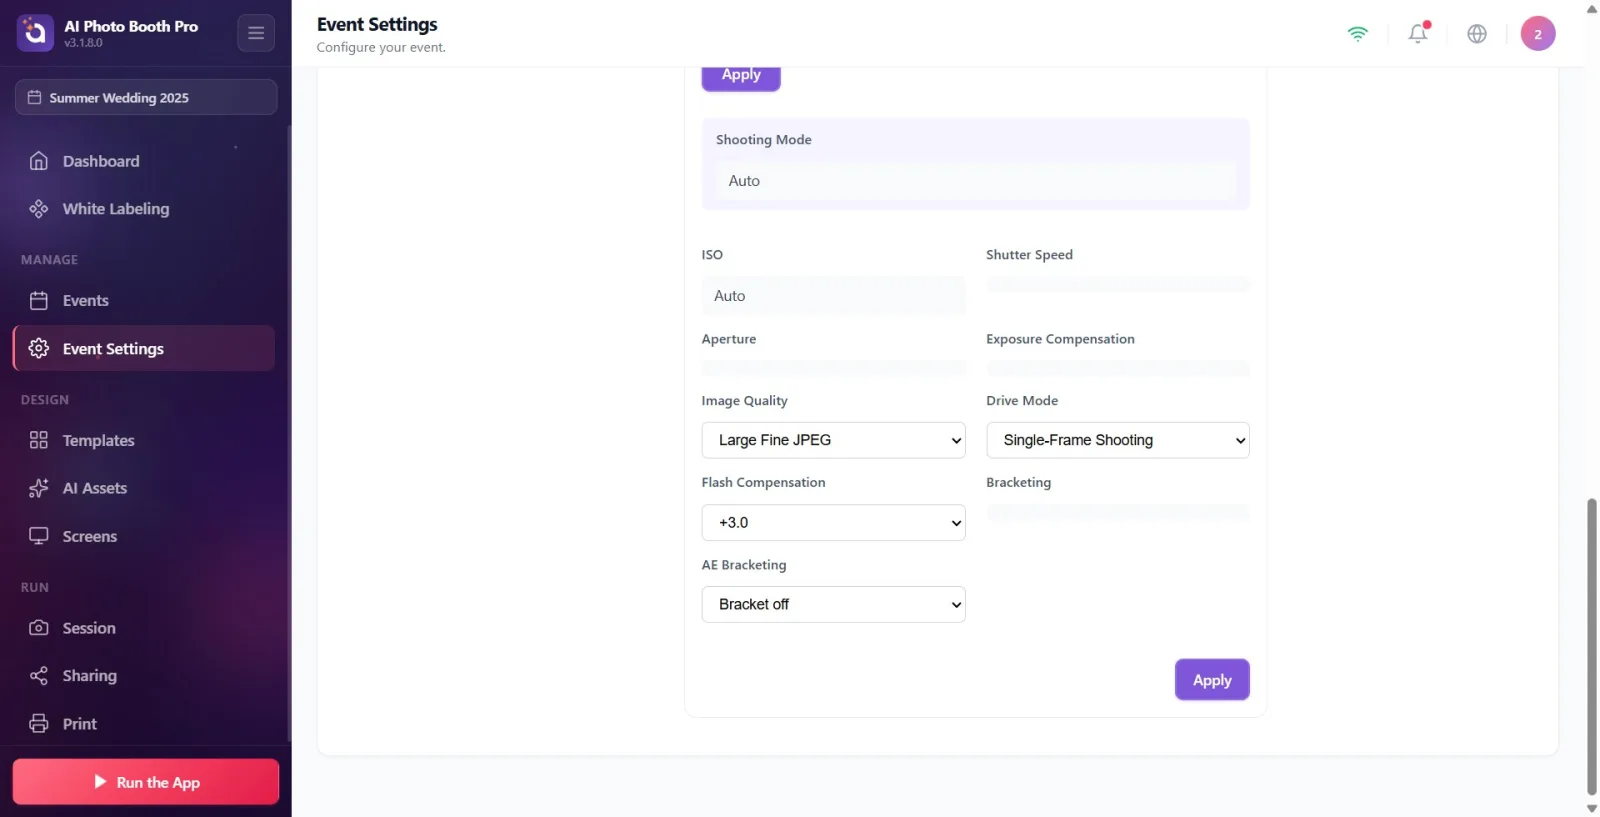
If the active camera is a adjustable DSLR, the Advanced Settings panel appears under Adjustments (the battery percentage may also appear in the header). From here, you select the shooting mode and values such as ISO, Shutter Speed, Aperture, White Balance, Exposure Compensation, Focus Mode, Image Quality, Metering Mode from drop-down menus. Any value you select will first be 'draft' (the menu will show its difference from the current value in the camera with an orange border and a 'camera: X' label); press Apply to write to the camera — the button shows the number of pending changes (e.g. 'Apply (3)') and says Applying settings... as it is being applied. With some cameras (e.g. consumer Nikon bodies) physical changes to the camera are not automatically reflected; In this case, refresh the values from the camera with the Read Status button, or automatically refresh every few seconds by turning on the Auto Read switch.
🔎 On-screen elements: Advanced Settings title + battery badge (Camera battery); mode dropdown (hover line); ISO/Shutter/Aperture/White Balance etc. drop-down menus; Read Status button; Auto Read key; Apply button (with pending number); Applying settings... indicator.
Step 14 · DSLR — Set Settings with AI (optional, 2 credits)
Settings → Event Settings → 'Camera' (Camera Settings DSLR)
After first taking a test photo on the DSLR camera, the Set Settings with AI button appears under Retake (next to it the '2 Credits' label). This button makes the artificial intelligence analyze the frame you took (Analyzing settings…) and automatically writes the values it recommends, such as ISO / shutter / aperture, into the draft; also shows a general comment (light/composition) at the top. Suggestions don't apply directly — inspect, leave what you want, and type into the camera with Apply. If the credit is not enough, the credit purchasing screen opens.
🔎 On-screen elements: Set Settings with AI button + '(2 Credits)' label; Analyzing settings… during analysis; AI hint icon in menus; AI comment strip at the top (closed by Dismiss).
The logic of each line in the tab: first ADD + ACTIVE the camera from the Select Camera window, then preview + fine-tune with the settings in the Camera Settings at the bottom.
Take a Test Shot is the fastest way to verify framing/lighting/color before actually shooting; In DSLR it is also a prerequisite for AI recommendation (test shooting required first).
The camera is 'fixed': if the selected camera temporarily disconnects, the application does not jump to another camera, it displays Offline + Searching for camera... and tries to reconnect automatically.
Preview Flip (screen mirror) and Result Flip (saved photo) are independent — if you want the guest to see themselves as a mirror but the output is plain, just turn on Preview Flip.
Brightness is stored separately for each camera and is persistent; It doesn't disappear when you change tab/camera.
On a DSLR, the values you choose are sketch first (orange edge + 'camera:X'); You must press 'Apply' for it to be processed into the camera.
On some DSLRs, such as the consumer Nikon, physical translations on the body are not immediately reflected on the screen — refresh with Read Status or turn on Auto Read.
If high resolution/RAW is selected on a DSLR, a yellow warning card appears (transfer slows down); Lower resolution (Small) or JPEG is recommended for faster streaming.
For virtual camera (OBS), first start streaming with Start Virtual Camera in the source app; Otherwise, the camera appears connected but no image appears.
Desktop Editing is not a camera; mode to import photos from file instead of camera (Import from file).
Only adding the camera from the Select Camera window but not activating it: clicking on the line both adds and activates it; A camera with a Added badge is inactive and will not appear in the live preview.
Deny when camera permission is requested: if there is no permission the app falls into Desktop Edit mode (Camera permission denied. Switched to Desktop Editing mode.) and the actual camera does not open.
Ignoring 'Camera unavailable' error: camera must be connected and not disconnected (check cable/USB).
'Another app is using the camera' error: trying again without closing the other app holding the webcam (Zoom, camera app, etc.).
Trying to connect without starting the broadcast on OBS/virtual camera: 'Virtual camera is installed but not broadcasting' warning appears; Launch the virtual camera in the source application and try again.
On a DSLR, changing the value from the drop-down menu and not pressing 'Apply': the change remains in the draft, not written to the camera.
Calling Set Settings with AI without taking a test shot: the button is activated only after a test shot and costs 2 credits; suggestions are not automatically applied, Apply is required.
Searching for the GoPro/virtual camera section outside of Windows: GoPro and Virtual Cameras appear only in Windows.
Forget Result Flip and turn on only Preview Flip (or vice versa): the preview appears mirrored but the printed photo remains flat — choose the correct button according to the desired behavior.
Related topics
Camera & OBS Setup Event Settings → Kiosk Event Settings → Output
