













Before this: How to Set Payments Tab?
If you want to charge guests for prints or downloads, you no longer need to connect your own Stripe account. While Activation King payment infrastructure is selected, guests pay through Activation King; your earnings are added to the balance in your Activation King account and are withdrawn from the web panel. This article explains how to choose the provider and how to pair the card reader. Other settings such as prices, currency and when payment is requested are in the How to Set Up the Payments Tab? article.
- In the Session → Payments tab, turn on the Payments switch; select Activation King payment infrastructure from the Payment Provider list.
- For new events this option comes selected by default. Events you created earlier stay on Stripe; you can change them if you want.
- The guest scans the QR code on the payment screen and pays from their phone, or taps their card on the card reader.
- A commission at the rate shown on screen is deducted from each payment; Stripe fees are also deducted from the net amount. Earnings accumulate in your balance and are withdrawn from the web panel.
- You register the card reader once, with the pairing code shown on the reader's screen.
Step by step
Step 1 · Choose the provider
Session → Payments
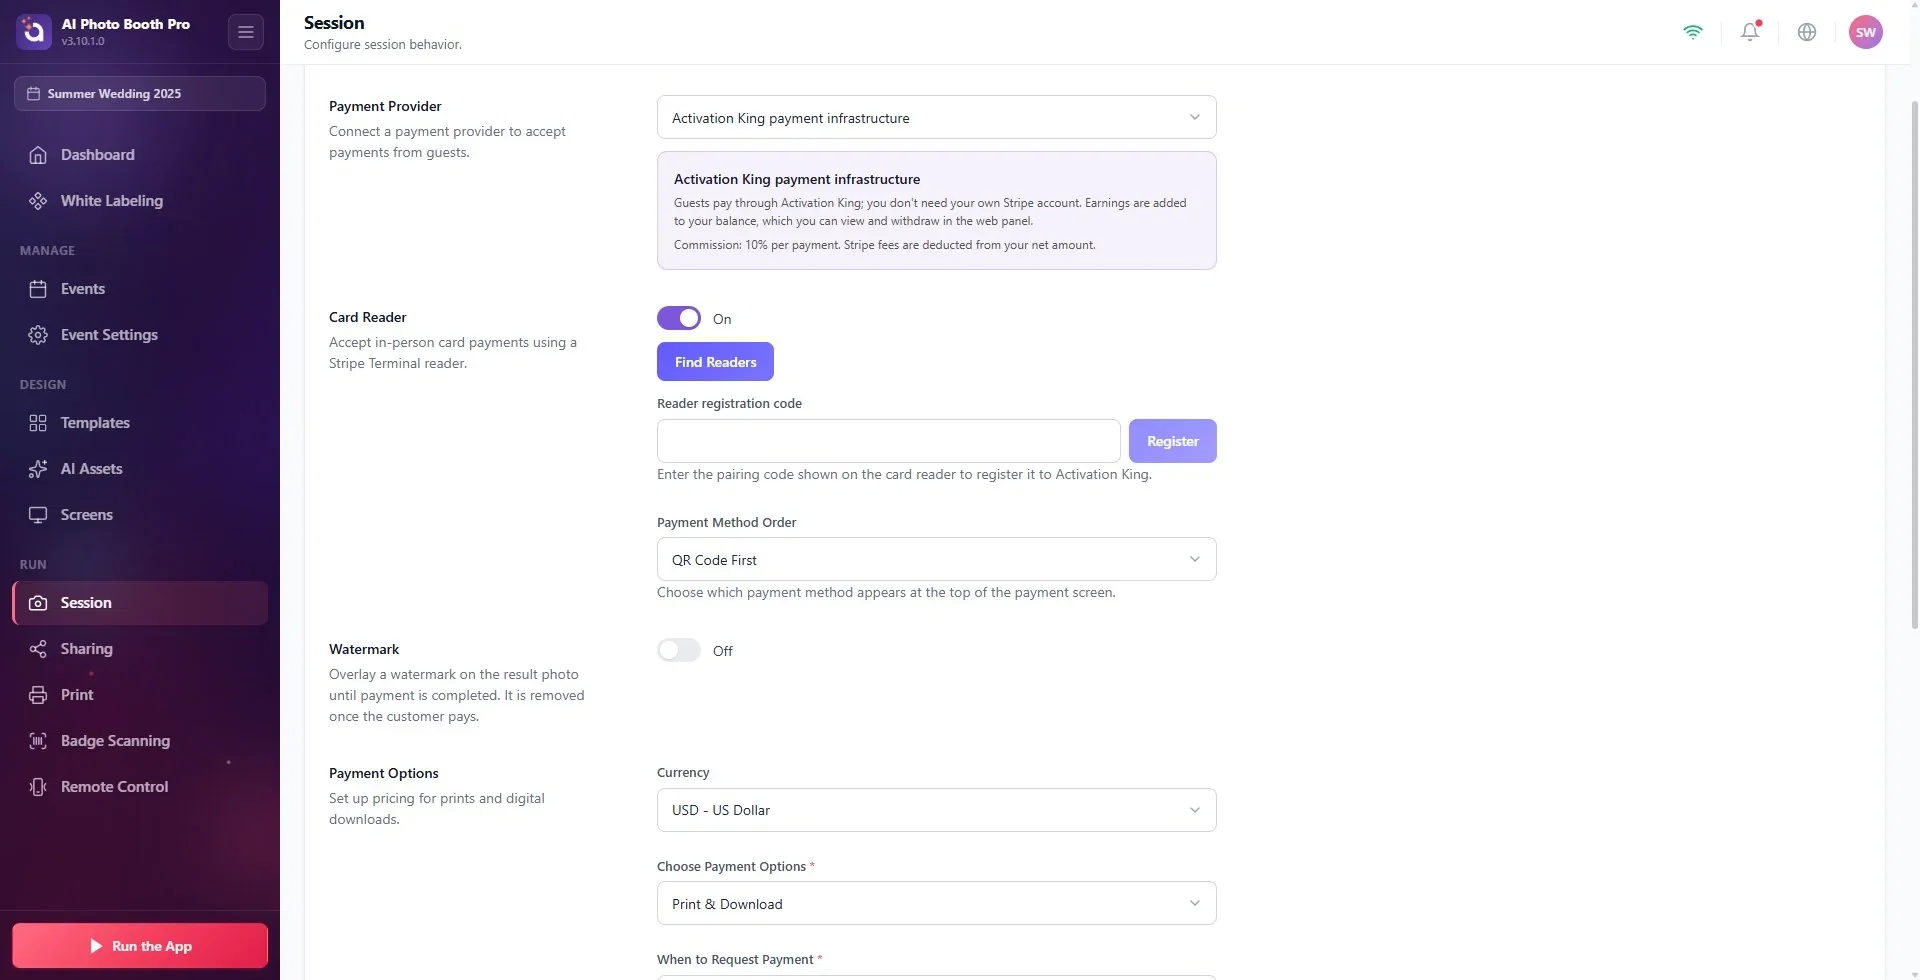
Turn on the Payments switch (description: 'Let guests pay for prints and downloads.'). The Payment Provider list that opens below it has two options: Activation King payment infrastructure and Stripe Payment. Select Activation King payment infrastructure.
When you select it, a card appears below it: 'Guests pay through Activation King; you don't need your own Stripe account. Earnings are added to your balance, which you can view and withdraw in the web panel.'
Step 2 · Check what the card says
The line at the bottom of the card tells you the status:
| On the card | Meaning |
|---|---|
| 'Commission: …% per payment' | The infrastructure is active; guests can pay. The rate comes from the server according to your account. |
| 'Activation King payments are not active yet. Until they are, guests cannot pay with this option.' | This infrastructure has not been activated for your account yet. Until it is, no payments can be accepted; contact support or use Stripe Payment. |
| '… is not supported by Activation King payments. Choose another currency.' | The currency you selected is not available in this infrastructure. Change the Currency in the same tab. |
| 'Could not reach Activation King payments. Check your internet connection.' | The information could not be retrieved; check the connection and open the tab again. |
Step 3 · Register the card reader (optional)
Session → Payments → Card Reader
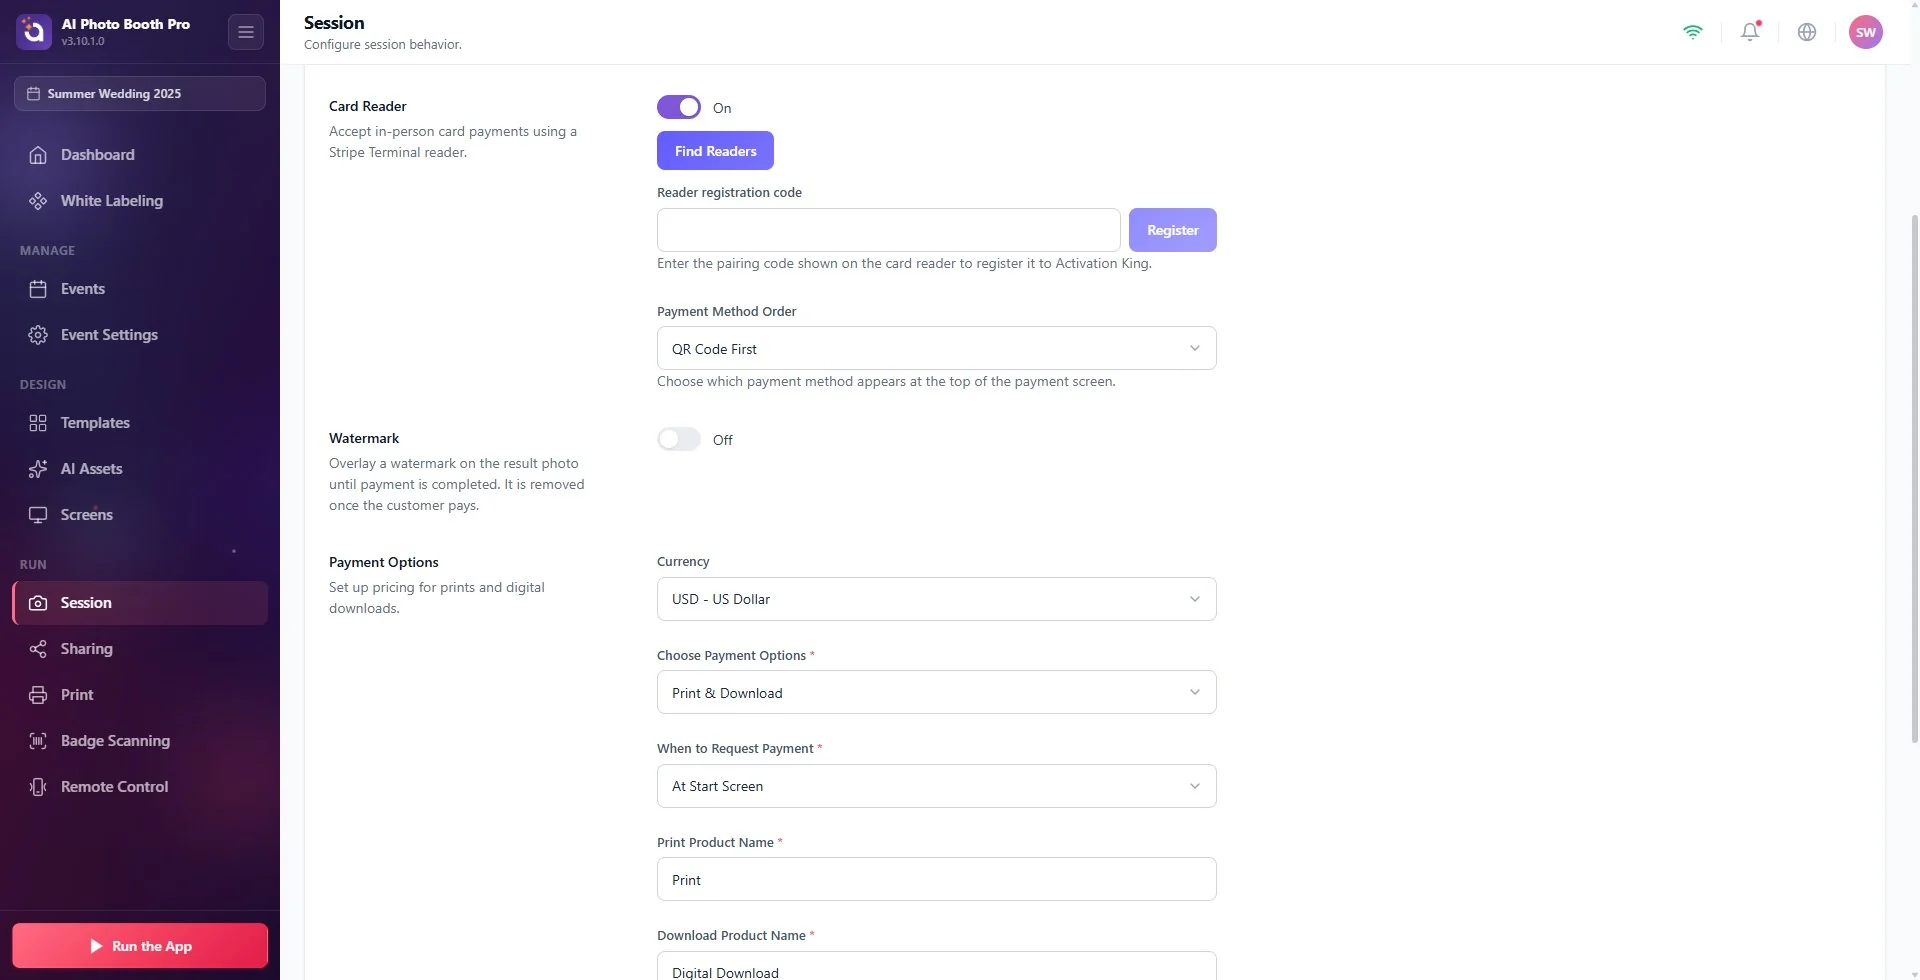
While the infrastructure is active, the Card Reader section is visible (description: 'Accept in-person card payments using a Stripe Terminal reader.'). Turn on the switch, then:
- Keep the reader on and display a pairing code on its screen (from the reader's own menu).
- Type this code into the Reader registration code field and press Register.
- The reader is registered to your account and selected automatically. You can select a reader you registered earlier from the list with Find Readers. The selected reader's name, status (online) and ID are shown.
If both QR and card reader are on, use Payment Method Order to choose which one appears at the top of the payment screen: QR Code First or Card Reader First.
If registration fails:
- 'Add a billing address in the web panel (Dashboard > Addresses) before registering a card reader.': if there is no billing address in the Activation King web panel, the reader cannot be registered. Add the address and try again.
- 'The card reader could not be registered. Check the code. …': the code may be wrong or expired. If the reader was previously registered to another Stripe account, remove it there first, then get a new code from the reader.
Removing a registered reader from your account or transferring it to another account cannot be done from the app; as the screen says, contact support. With Change reader you can select another reader for this event.
Step 4 · How does the guest pay?
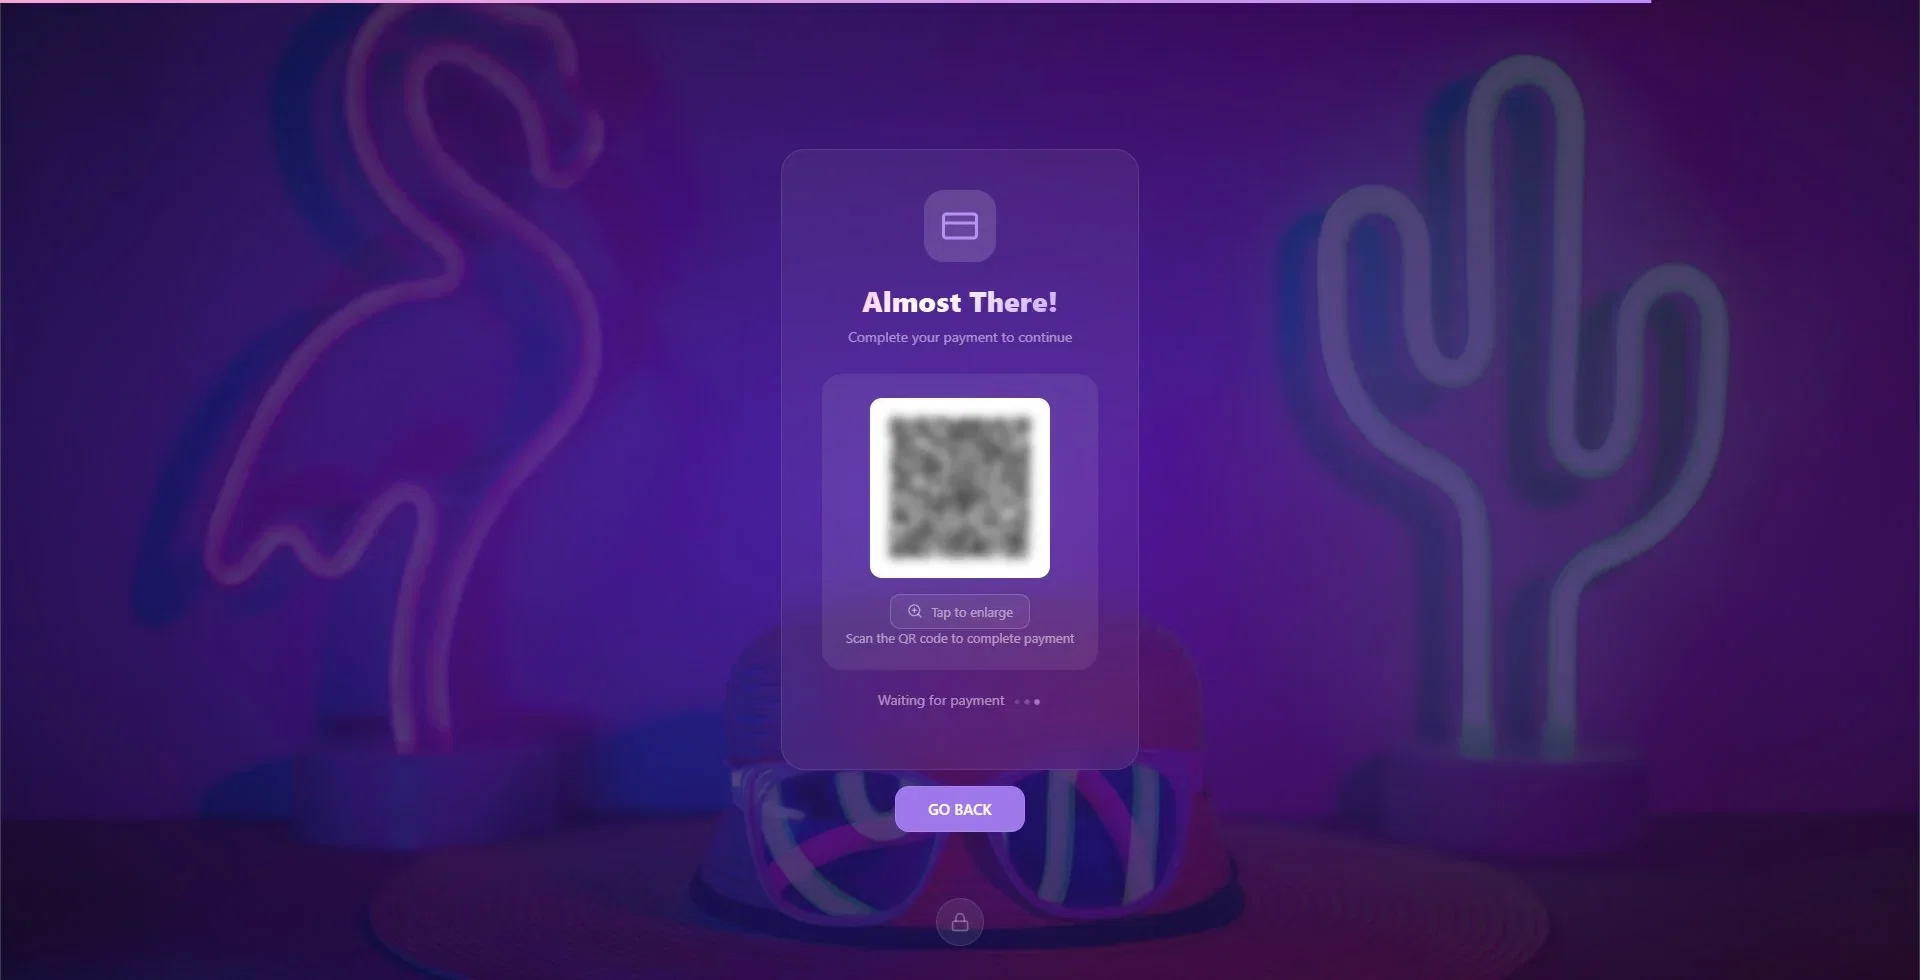
At the step where payment is requested (before printing or before downloading, depending on the setting), the payment screen opens:
- QR code: the guest scans it with their phone and pays on the page that opens. The booth detects the payment by itself and the flow continues.
- Card reader: the guest taps their card on the reader.
- Remote control: if the guest is controlling the booth from their phone, a Pay on your phone button appears on their phone at the payment screen.
If the session closes because of a timeout before the guest finishes paying, the pending payment is cancelled; the QR no longer accepts payment.
Earnings and commission
- A commission at the rate shown on the card is deducted from each payment; Stripe's transaction fees are also deducted from the net amount.
- Earnings accumulate in the balance of your Activation King account. You see the balance in the web panel and withdraw it from there.
- If you choose Stripe Payment, payments go directly to your own Stripe account; in that case you need to connect your account with Connect with Stripe.
Assuming Activation King is the default for an old event: events created earlier stay on Stripe. Check the provider event by event.
Trying to register a reader without adding a billing address: first add an address in the web panel under Dashboard → Addresses.
Trying to register a reader that is registered to another account directly: first remove it from the old account, then register it with a new pairing code.
Going to an event with an unsupported currency: if the card shows a warning, guests cannot pay. Change the Currency.
Related topics
How to Set Up the Payments Tab? How to Control the Booth from a Phone? (Remote Control) How to Make Print Settings?
