
Before this: How to Create an Event?
AI Face Swap is an AI feature that replaces a guest's face with stock character images. The operator creates galleries (character collections) or adds them to the event from the Settings > AI Assets > AI Face Swaps tab, uploads character (target) images to each gallery, selects which face will change in multi-faced images, and if desired, skips the guest's selection and applies a random character with Surprise Effect. Two key concepts: Gallery = theme collection (e.g. 'Superheroes'); Character/Target = a single face image in the gallery. This feature requires Pro AI or above plan.
- Pro AI or higher subscription must be active — otherwise the Pro AI or higher required lock banner will appear instead of the tab
- An event must be created and selected (galleries are always added to the selected event)
- Internet connection required — character images are uploaded to the server and face detection is done on the server
- Character images to be uploaded must be ready (PNG, JPG or WEBP; maximum 10MB each; recommended cover 640x400px)
step by step
Step 1 · Open AI Face Swap tab
Settings → AI Assets → AI Face Swaps
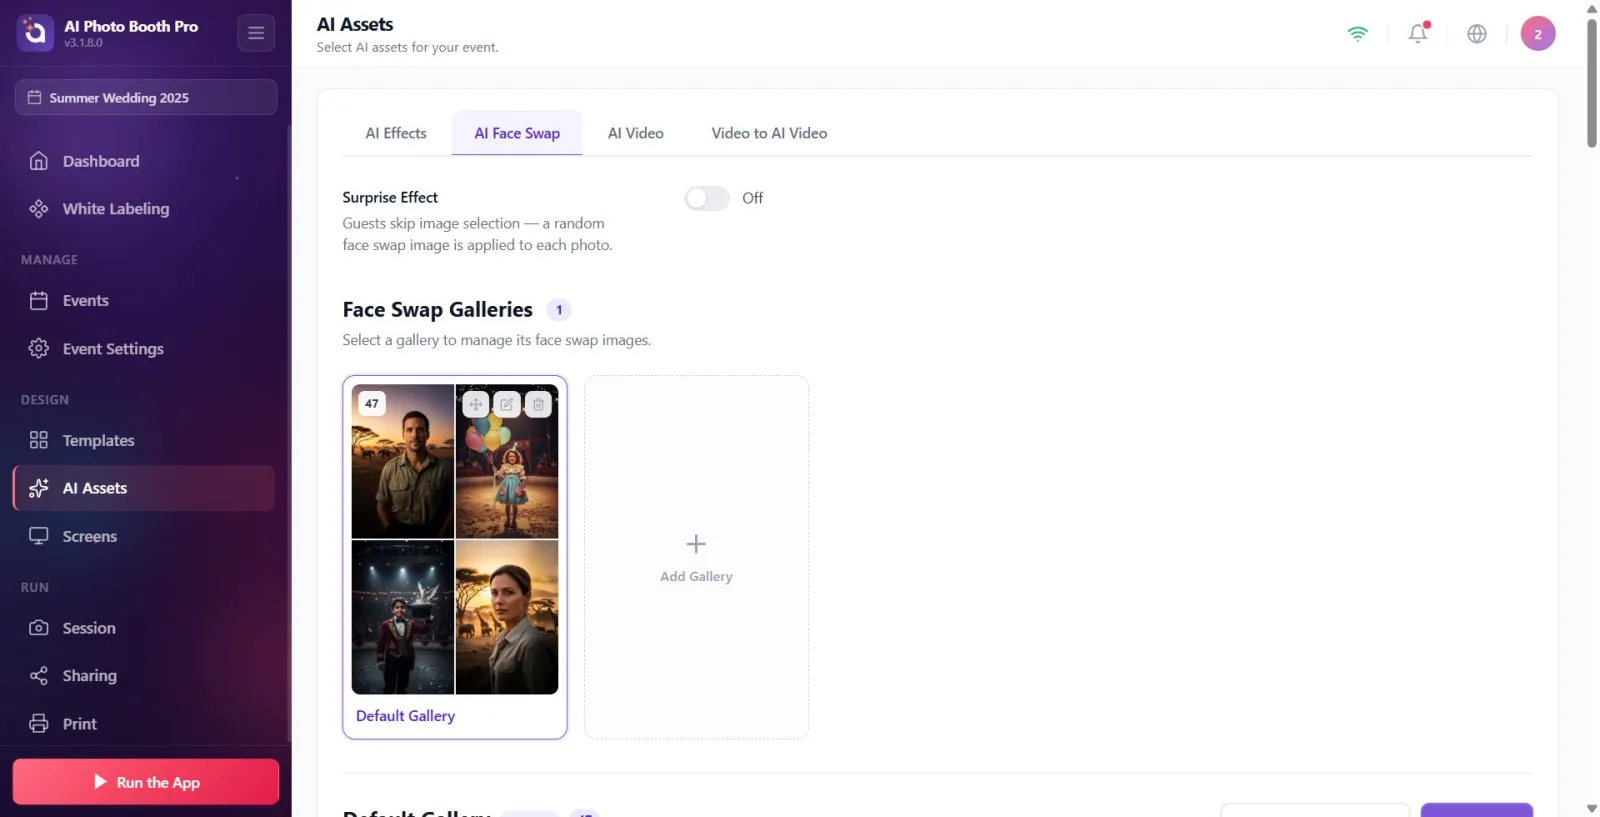
Open the AI Assets page from the left menu. Click the AI Face Swaps tab from the top tab strip (AI Effects and AI Video are adjacent tabs). If your plan is insufficient, the Pro AI or higher required lock banner and 'Upgrade to Pro AI' button will appear instead of the tab content — in which case you'll need to upgrade the plan first.
🔎 Elements on the screen: Tab strip: AI Effects / AI Face Swaps / AI Video; plan-locked banner + Pro AIa Upgrade button if locked.
Step 2 · Set Surprise Effect (optional)
AI Face Swaps → Surprise Effect (upper section)
Use the toggle in the Surprise Effect section at the top of the tab. When on, the button text shows On, when off, it shows Off. When it is on, the guest will not see the gallery/character selection screens in the booth; A random face swap image is applied to each photo ('Guests skip image selection — a random face swap image is applied to each photo'). When it is off, the guest chooses the character himself.
🔎 Elements on the screen: Surprise Effect title + description; toggle switch + On / Off tag.
Step 3 · Get to know the Galleries section
AI Face Swaps → Face Swap Galleries
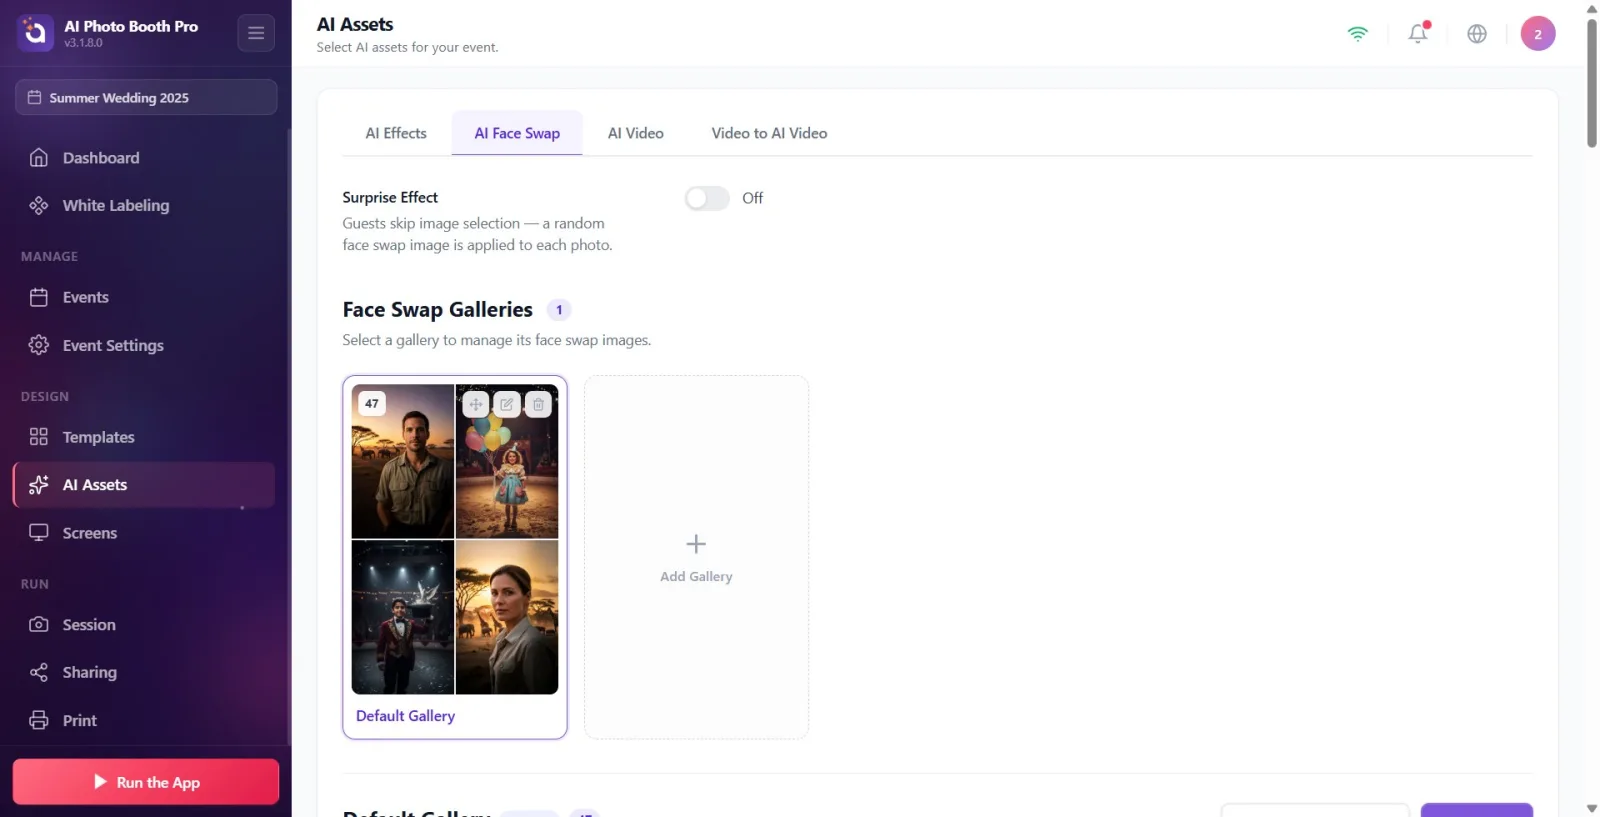
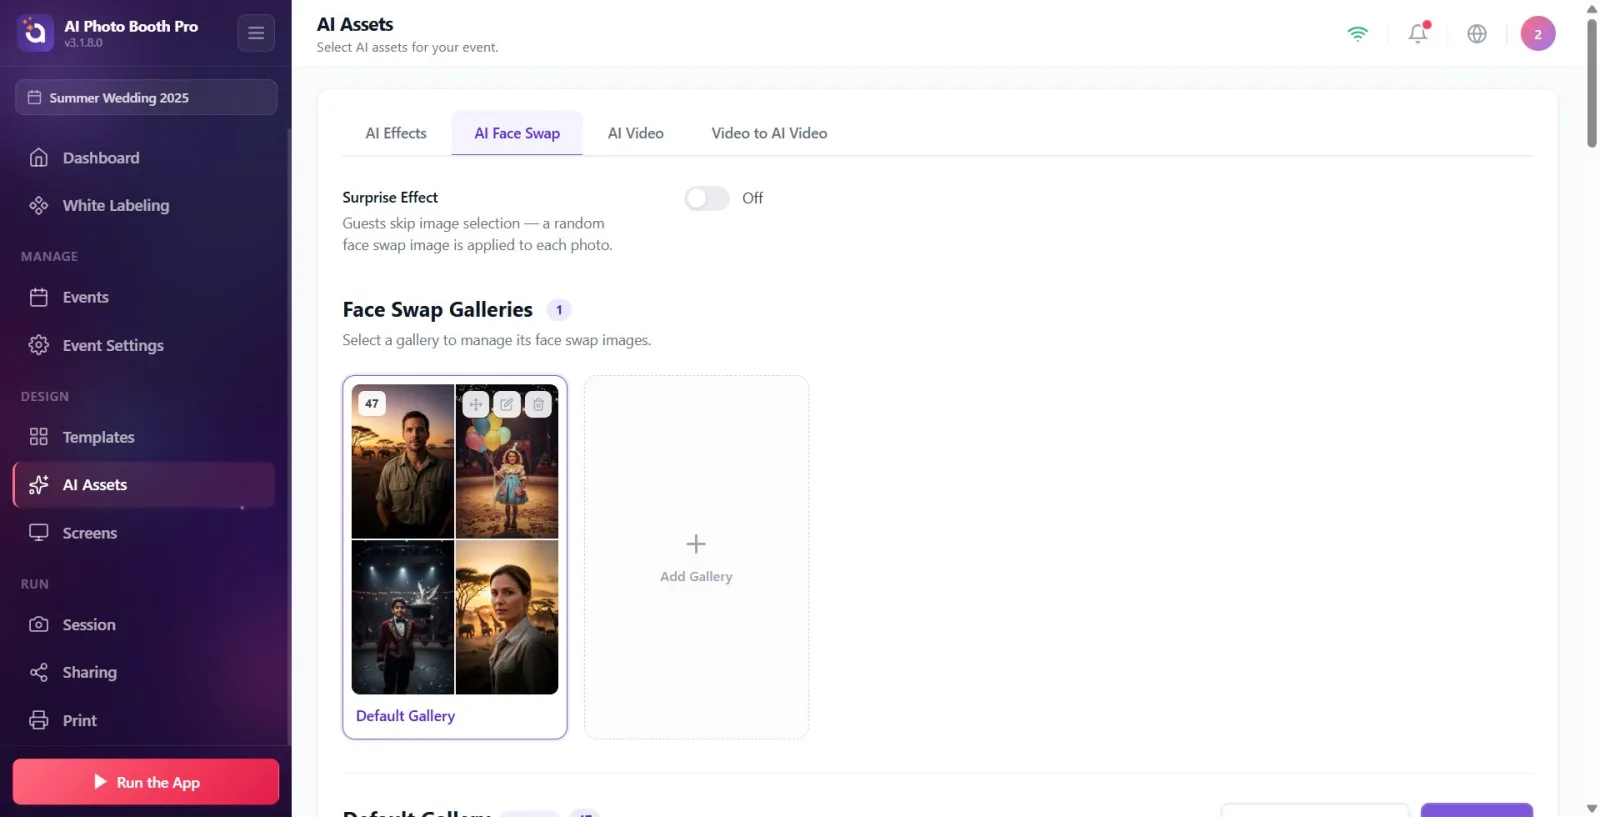
In the Face Swap Galleries section (Select a gallery to manage its face swap images.) the galleries attached to the event are listed as folder cards. Each card shows the gallery's cover image (if there is no cover, the mosaic of characters inside), the number of characters in the upper left, and three action buttons on hover: drag (reorder), Edit, Delete. The factory gallery also bears the Default badge. You can change the order by dragging the cards — this order also works in the booth.
🔎 On-screen items: Gallery folder cards (cover/mosaic + character count badge); hover operations: drag handle (Drag to reorder), Edit, Delete; Default badge; '+ Add Gallery' card; Importing... next to the counter while the import is in progress.
Step 4 · Choose method to add new gallery
AI Face Swaps → Add Gallery (selection step)
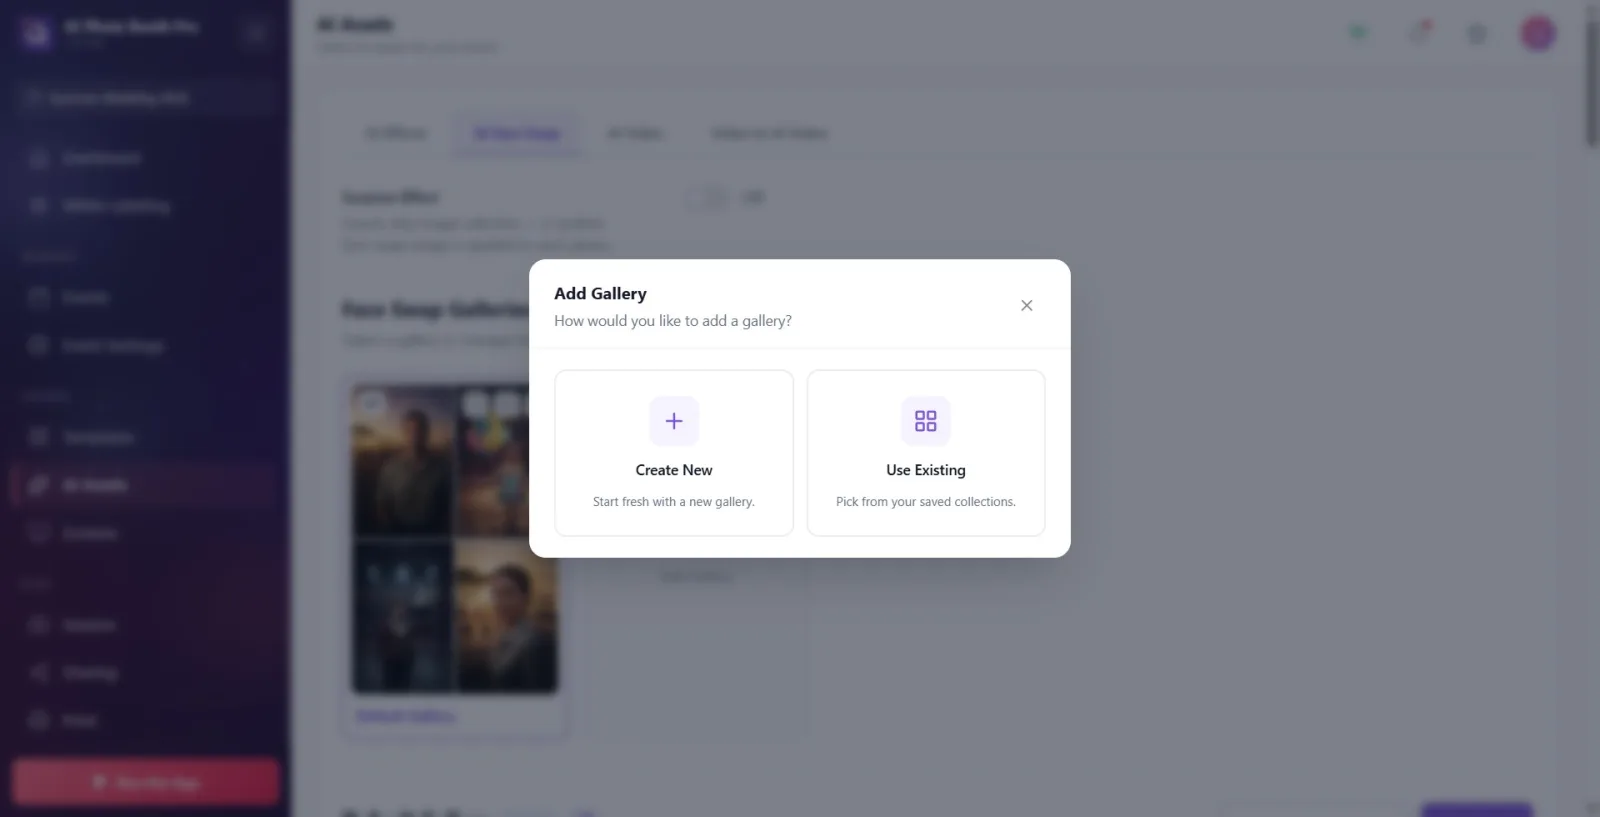
Click the '+ Add Gallery' card. In the window that opens, the question How would you like to add a gallery? appears and two options: Create New (new gallery from scratch) and Use Existing (select from saved collections). Choose one depending on what you want to do.
🔎 Elements on the screen: Modal title Add Gallery; two option cards: Create New (Start fresh with a new gallery.) and Use Existing (Pick from your saved collections.).
Step 5 · Create new gallery
Add Gallery → Create New Gallery
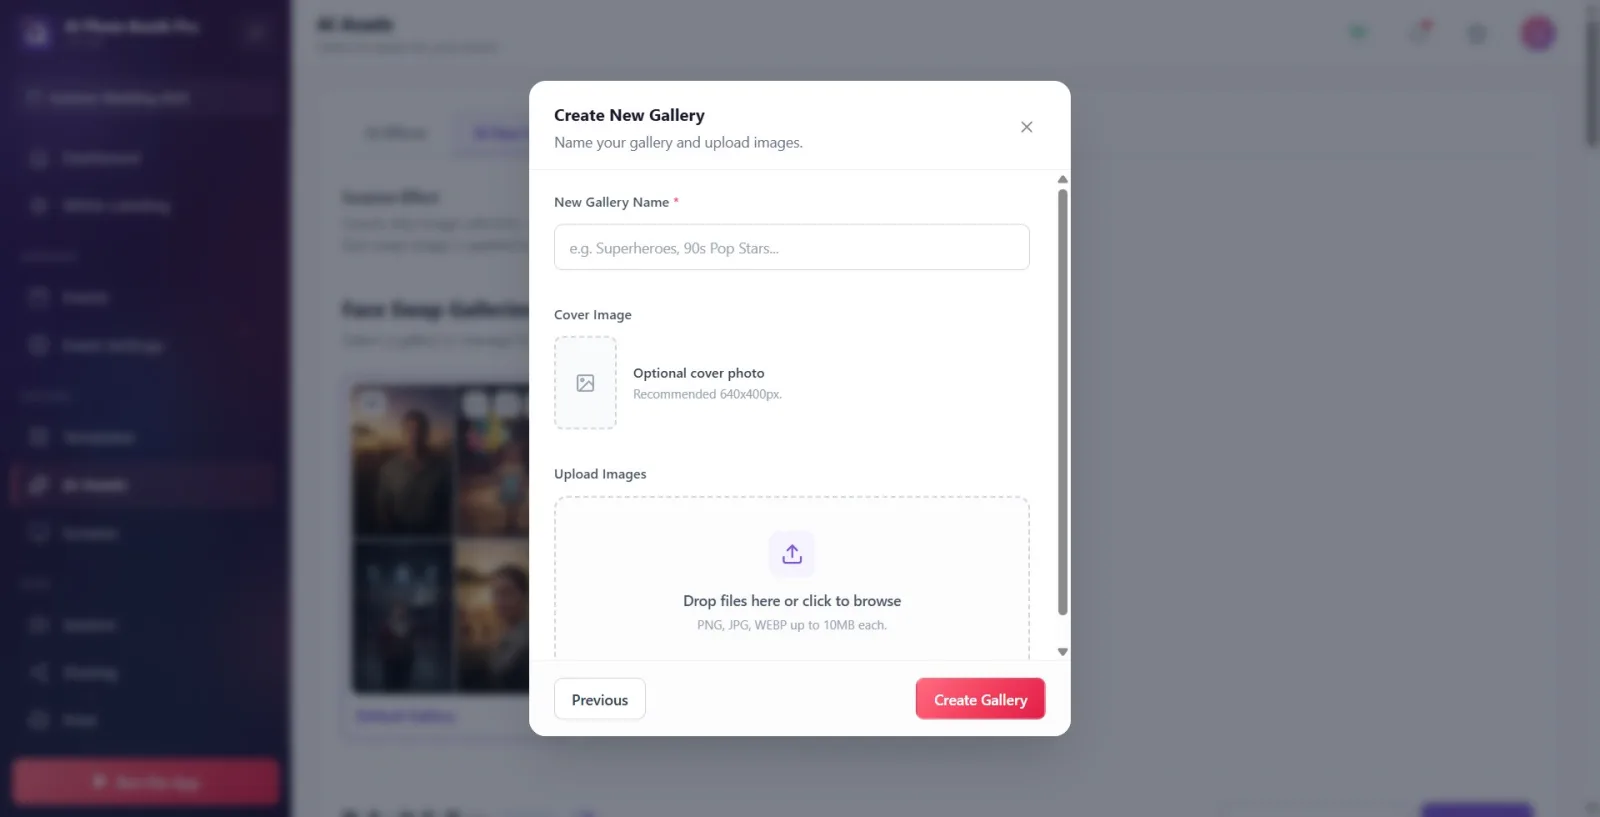
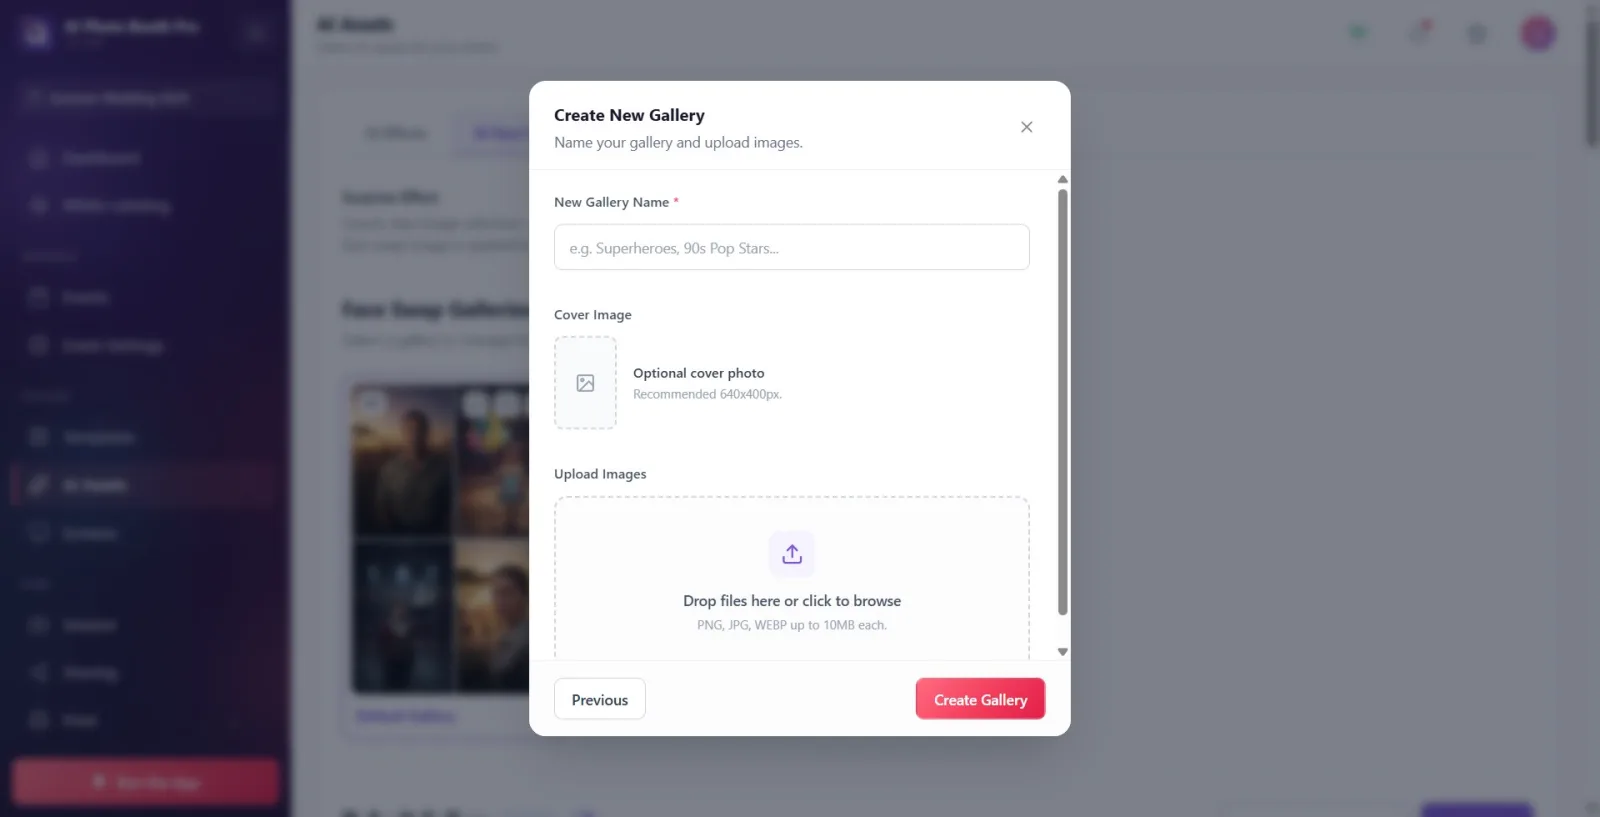
If you selected Create New, the Create New Gallery form opens (Name your gallery and upload images.). Fill in the New Gallery Name field (required; if you leave it blank, This field is required will appear; example placeholder: 'e.g. Superheroes, 90s Pop Stars...'). If you want, click on the 'Cover Image' preview and choose a cover ('Optional cover photo', recommended 640x400px). Click the 'Upload Images' drop box and select your character images. Finally, press Create Gallery — the gallery is added to the selected event and automatically selected.
🔎 Elements on the screen: New Gallery Name input (required *); Cover Image preview + Remove cover; Upload Images dropzone (Drop files here or click to browse, 'PNG, JPG, WEBP up to 10MB each.'); bottom buttons 'Previous' / 'Create Gallery'.
Step 6 · Add existing collection to event
Add Gallery → Your Collections
If you selected Use Existing, the Your Collections list opens ('Select one or more collections to add as a gallery.') — all your saved galleries. Tick the ones you want to add to the event (you can select more than one). Those already attached are passive with the Added badge; factory gallery badge Default, purchased packs carry badge Purchased. Once you've made your selection, press the 'Add Selected (N)' button; The selected galleries are added to the selected event.
🔎 On-screen items: Selectable collectible cards + badges: Added / Default / Purchased; selection check mark; bottom: Previous / 'Add Selected (N)' / 'Delete (N)' in red (if there is a deletable selection).
Step 7 · Select a gallery and open the character section
AI Face Swaps → (selected gallery) characters
In the Galleries section, click on a gallery card to select it. The character (target) management section for that gallery opens at the bottom of the card: gallery name + character count in the header, Edit Gallery (also Restore Default Gallery in the default gallery) buttons on the right. Episode description: 'Each picture represents a character whose face guests can change. Drag to sort or tap face to enable/disable.'
🔎 Items on screen: Selected gallery title + Default badge (if default) + character counter; Edit Gallery (+ Restore Default Gallery if default) in the top right.
Step 8 · Add character (target) image
AI Face Swaps → selected gallery (add character)
To add characters, click the Insert Image card in the top left (the local file selector will open, you can select multiple) or drag-and-drop images directly into the field. Each uploaded image is first quickly imported (spinning icon in the upload line, then a check mark), then turned into a character with face detection on the server. When processing, gray skeleton cards appear as Loading; When ready, the real card takes its place.
🔎 Items on the screen: Insert Image loading card + Drop files here or click to browse; pending load line (spinner → checkmark); gray skeleton (ghost) cards.
Step 9 · Enable/disable face boxes (polyface)
AI Face Swaps → character card (face boxes)
If a character image has multiple faces, a box appears above each face. By tapping the box, you make that face Will be swapped (green) or Will be skipped (gray) — only active (green) faces will place the guest's face. The legend at the top of the section is the guide: 'Multiple face images: tap to switch. At least one face must remain active.' If you try to hide the last active face, 'At least one face must remain active for face replacement.' warning appears. If no face is found in the image, a 'Face not detected in this photo' notification appears.
🔎 Elements on the screen: Face boxes on the card image (green=enabled / gray=disabled); legend: Will be swapped (green example) / Will be skipped (gray example) + 'Multiple face images: tap to change...' description.
Step 10 · Name, sort or delete character
AI Face Swaps → character cards
You can give the character a display name (Enter display name...) in the text box below each card — this name can be displayed in the booth. Sort cards by dragging them; Removes that character from the gallery with the trash can (Delete) icon on the card.
🔎 Items on the screen: Enter display name... input under card; drag handle + Delete (trash) button on the card.
Step 11 · Edit gallery (name, cover, images)
AI Face Swaps → Edit Gallery (modal)
To bulk edit the gallery name, cover, or images, press the Edit icon in the gallery card or the Edit Gallery button in the section header (Update gallery details and manage images.). In the window that opens, change the name (mandatory), select/change cover (No cover set → Click to change cover., Remove cover), remove existing images or add new image with '+ Add'. Confirm with Save Changes, cancel with Cancel.
🔎 Elements on screen: Edit Gallery modal: ad input (required *), Cover Image preview + Remove cover, images storyboard with counter + '+ Add'; bottom: Cancel / Save Changes.
Step 12 · Remove gallery from activity
AI Face Swaps → gallery card → Delete
To remove a gallery from this event, press the trash (Delete) icon on the gallery card and select Delete in the Are You Sure? confirmation. This action removes the gallery from the selected event only; The collection remains in your library and can be added again with Use Existing. If you want to permanently delete from the library, use the red Delete button in 'Use Existing → Your Collections' instead (factory Default and Purchased collections cannot be permanently deleted).
🔎 On-screen items: Delete button on gallery card; confirmation modal Are You Sure? + Cancel / Delete.
Step 13 · Restore default gallery to factory setting
AI Face Swaps → default gallery → Restore
When you select the default gallery, the Restore Default Gallery button appears on the right. This resets the gallery to the original factory character set (restores deleted/replaced factory characters). Press Are You Sure? + 'This will reset the default gallery to the original factory settings. Do you want to continue?' approval comes; If you say 'Yes', the full-screen 'Processing...' screen and the 'Restoring images X/N' progress counter will open, all images will be re-downloaded from the server (35 characters may take ~30-90 seconds).
🔎 On-screen elements: Restore Default Gallery button (in default gallery only); confirmation No / Yes; action overlay: Processing + 'Restoring images X/N' + close (X).
Step 14 · Verify guest experience in Booth
Booth (guest screen)
Once setup is complete, the flow in the booth is as follows: IF 'Surprise Effect' is OFF, the guest first selects a gallery ('Select Face Swap Gallery' screen; if there are multiple galleries at the event), then selects a character/photo from that gallery, and upon selection, a short Select Next confirmation appears. If Surprise Effect is ON, these selection screens are skipped and a random character is applied to each shot. The titles of these screens can be customized in Settings > Design > Screen Texts.
🔎 Items on the screen: Booth gallery selection screen (Select Face Swap Gallery); character/photo selection grid; Select Next confirmation animation after selection.
Purchased Face Swap packages automatically appear on this screen with the Purchased badge in the Use Existing → Your Collections list; Adding to the event is done from here with Add Selected. The purchase itself is not on this screen (there is no separate purchase button) — packages come ready to be purchased and applied on the account/subscription side and cannot be permanently deleted.
Gallery = theme collection (e.g. 'Superheroes'); character/target = a single face image in that gallery. The guest first chooses the gallery, then the character.
When Surprise Effect is on, the guest makes no selections — ideal for speed, but guest control is lost; Leave it off for controlled flow.
Gallery sorting (drag-and-drop) determines the display order in the booth — most popular gallery first.
In a polyhedral character, only the faces marked Will be swapped (green) change; Make the faces you don't want in group photos Will be skipped (gray).
Character images are rendered on the server; After installing, wait until the gray skeleton cards disappear and the real cards arrive — internet required.
If you don't put a cover, the gallery shows a mosaic of the first characters in it; The recommended size for a clear cover is 640x400px.
Downloadable formats are PNG, JPG and WEBP; Each file must be at most 10MB.
Mistaking the Deletei on the gallery card for permanent deletion from the library: actually it just removes the gallery from this event (even though the confirmation text says 'from your library', the collection remains in the library). Permanent deletion is with the red Delete in 'Use Current → Your Collections'.
Trying to disable all faces on a polyhedral character: at least one face must remain active, otherwise At least one face must stay enabled for face swap. warning appears.
Uploading an image with no face or clear face: the server cannot detect a face (No face detected on this photo) and the character is not rendered — use a clear, frontal face image.
Trying to use the tab without the Pro AI plan: Pro AI or higher required lock appears instead of content.
Leaving the gallery name blank and pressing Create Gallery: the name is required, gives This field is required error.
Wondering why the gallery/character selection screen doesn't appear in the booth when Surprise Effect is on: selection screens are intentionally skipped when in this mode.
Underestimating Restore Default Gallery: resets the gallery to the factory set and redownloads all images (may take minutes) — use only when you want to bring back factory sprites.
Related topics
Add AI Effect AI Video AI Assets Screen Texts (Booth Titles)
