
Before this: How to Create an Event?
How to Connect to Canon/Nikon DSLR Booth
This guide describes connecting a Canon or Nikon DSLR camera to the booth via USB cable and using it in the app: first the physical preparation and connection of the camera (non-app), then detection/selection, live preview and Advanced Settings (ISO / Shutter Speed / Aperture, Read Status, Set Settings with AI) in the app. Full control of the DSLR is native to Windows; On iOS/Android, DSLR only does live preview + shooting, the advanced settings panel is not visible.
- Windows PC (DSLR advanced control — ISO/aperture/shutter, Read Status, AI — works on Windows only; Canon EDSDK / Nikon PTP desktop SDKs)
- Canon or Nikon DSLR + USB cable supporting data transfer (not charging only)
- A fully charged battery (live preview + tethering drains battery quickly)
- A lens attached to the camera and an SD card (for streaming footage)
- An event must be created and open for editing (the Event Settings screen should appear)
step by step
Step 1 · Prepare the camera physically (battery, lens, SD card)
Camera hardware (non-app)
Fully charge the battery and insert it into the camera (battery drains quickly because live preview stays on all the time and tethering draws power — a low battery can suddenly cut off DSLR live view). Remove lens cap, insert lens. Also insert the SD card for streaming footage. Secure the camera on a stable tripod/mount.
Step 2 · Turn on the camera and put it in proper capture/USB mode
Camera hardware (non-app)
Turn on the camera and put it in a capture mode — playback or leave it in video-only mode. If you are going to do advanced exposure control (ISO/shutter/aperture), choose Manual (M) mode; P/Av/Tv also works. Select MTP/PTP (connect to computer) if the USB connection type can be set in the menu — 'Mass Storage' mode will not work for tethering. On Nikon, you can set the USB setting from the menu, on Canon the connection is generally automatic.
Step 3 · Extend or turn off automatic sleep/shutdown
Camera hardware (non-app)
Turn off the camera's 'Auto power off' / sleep time or set it to the longest value possible. The USB connection drops when the camera goes to sleep; In the app, camera Offline appears and waits to reconnect. Loosen power management so it stays on all the time throughout the kiosk.
Step 4 · Connect to Windows PC via data-enabled USB cable
camera hardware → Windows PC (non-application)
Connect the camera's USB port to your Windows PC's USB port with a data-transferring USB cable (most cheap cables only charge, not carry data — if there's no connection, replace the cable first). Windows recognizes the camera as a portable device (WPD). Run the booth on a Windows PC, as advanced DSLR control is only available on Windows.
Step 5 · Close other apps that are locking the camera
Windows (non-app)
Close any applications that hold the camera, such as Canon EOS Utility, Nikon shooting software, Windows 'Photos' import wizard. These programs lock the MTP/PTP channel and cannot open the booth camera — you will see an error in the application such as 'Another application is using the camera'. Only the booth should use the camera at the same time.
Step 6 · Open Camera tab in the app and press Select Camera
Settings → Event Settings → 'camera'
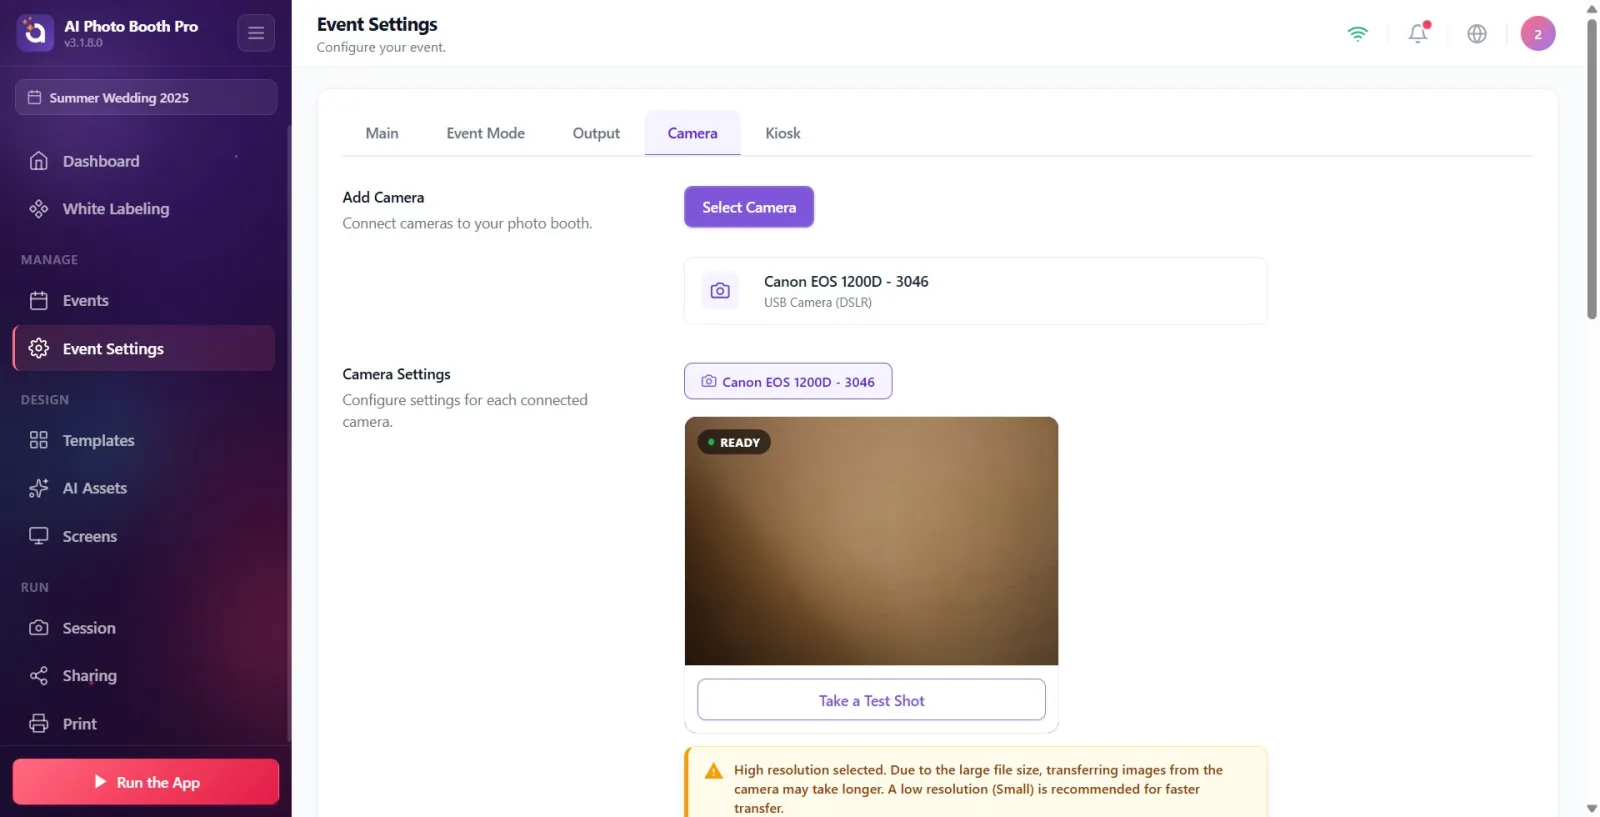
Open Event Settings from Settings and switch to the Camera tab from the tabs at the top. Click the purple Select Camera button in the Add Camera section — a window titled Add Camera opens (subtitle: Select a camera to add to your connected devices.) and groups connected devices by type.
🔎 Items on the screen: Camera tab; Add Camera header; purple Select Camera button; The popup title is Add Camera.
Step 7 · Find and add DSLR under 'USB Cameras'
Settings → Event Settings → 'Camera' (Add Camera window)
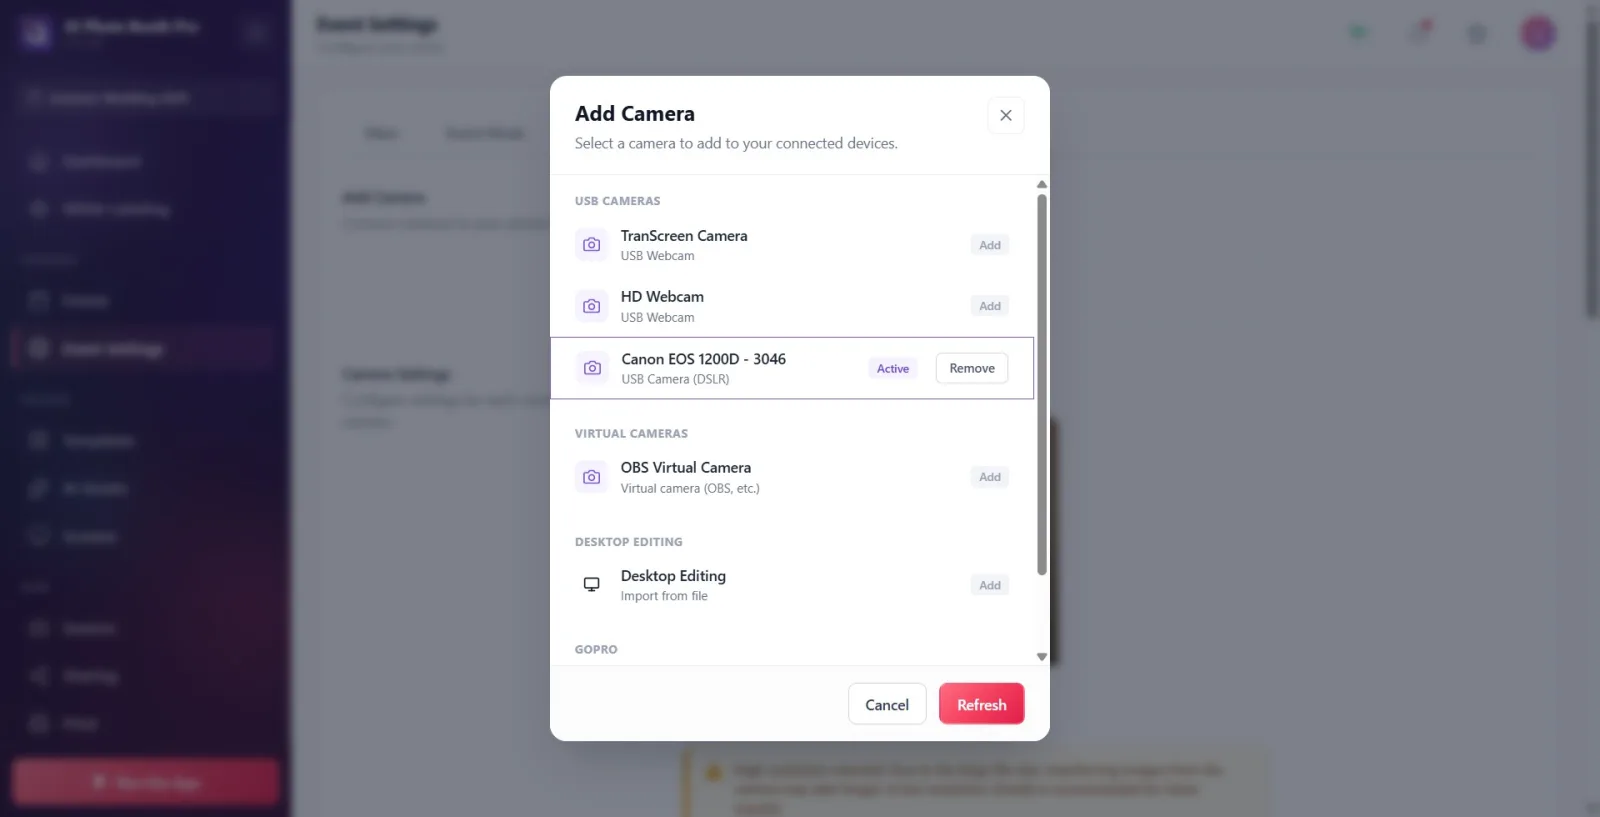
In the window that opens, look for the USB Cameras group. The DSLR is listed here with detail USB Camera (DSLR) and brand+model name (e.g. 'Nikon D3500 - 8585' or 'Canon EOS ...'). Click the row — this both adds the camera to the list and makes it active; The badge on the right of the row becomes Active. If the camera is not visible, press the Refresh button at the bottom (also check cable/mod/app lock). When a camera is selected, the window closes automatically; If you want, you can also turn it off with Cancel.
🔎 Items on the screen: USB Cameras group title; DSLR line (brand+model + detail USB Camera (DSLR)); badges Active / Added / Add; child buttons Cancel and Refresh; Remove in the added line.
Step 8 · Verify connected camera card and live preview
Settings → Event Settings → 'camera'
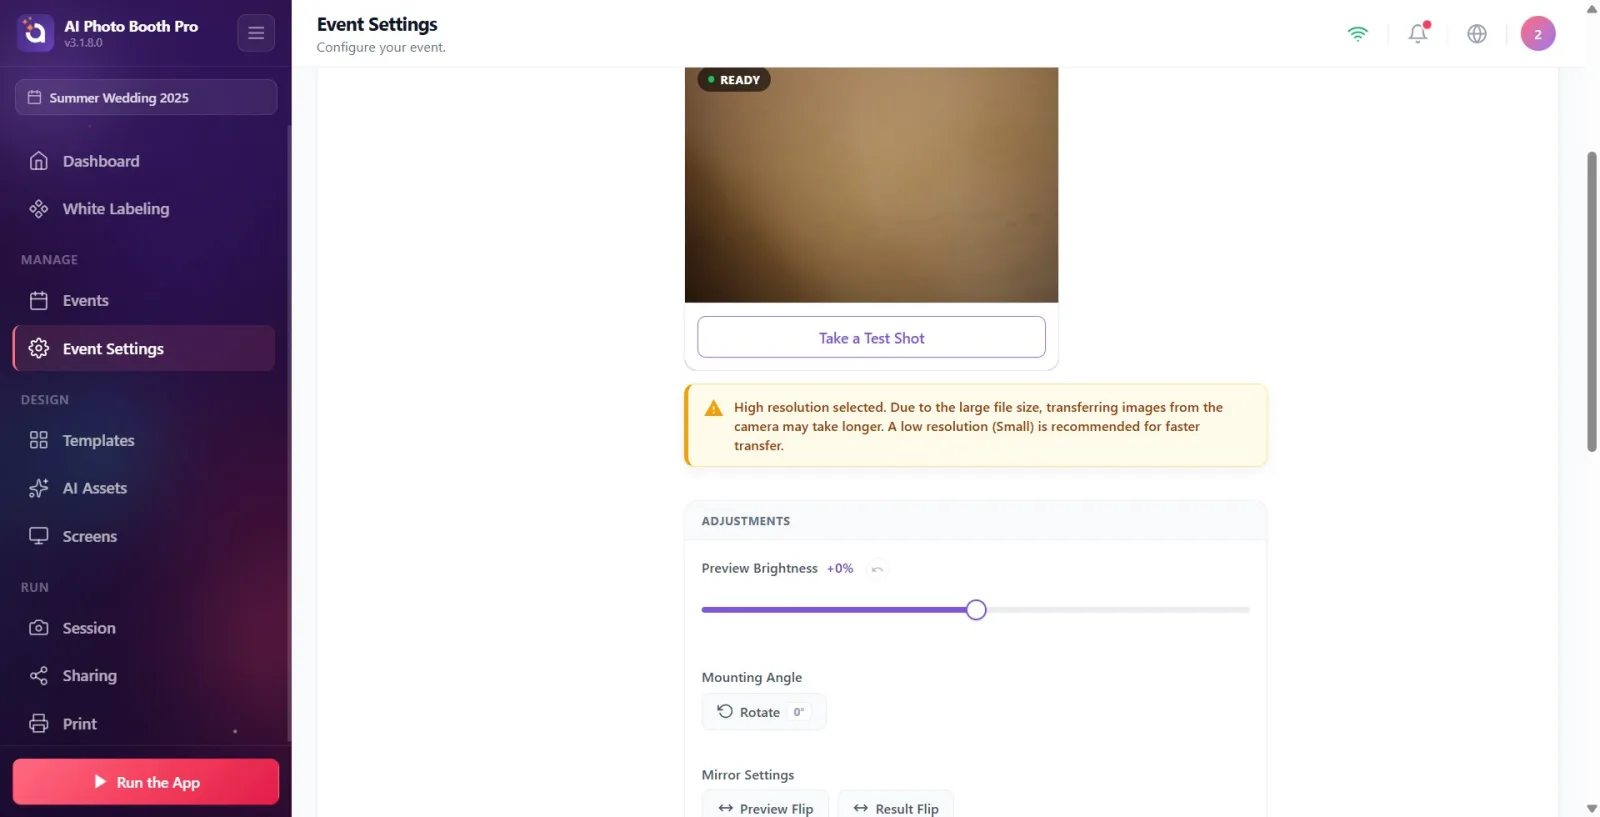
The DSLR icon, camera name and type appear on the connected camera card under Add Camera (No Camera Selected if empty). In the Camera Settings section below, there is a tab named active camera and the live preview card below it; The Ready badge with a green dot in the corner indicates that the live stream is running. If the camera is temporarily disconnected (sleep/cable) the card remains 'fixed': it shows Offline with an orange dot and Searching for camera... with a spinning icon, when it comes back the preview resumes automatically.
🔎 Items on the screen: Connected camera card (DSLR icon + name); Camera Settings header; live preview card + Ready badge; orange dot + Offline / Searching for camera... when offline.
Step 9 · Take a test photo (verify focus/exposure)
Settings → Event Settings → 'Camera' (Camera Settings)
Press the Take a Test Shot button below the preview — a fixed 3-second countdown begins, the shutter fires, and the photo freezes in the preview; The button returns to Retake. This is the quickest way to verify framing, actual lens focus and exposure (ISO/shutter/aperture result) before shooting. Also, on a DSLR, the prerequisite for the 'Adjust Settings with AI' feature is a test shot.
🔎 Items on the screen: Take a Test Shot button; 3 sec countdown ring; Retake button after shooting.
Step 10 · Set ISO/Shutter Speed/Aperture from DSLR Advanced Settings panel (Windows only)
Settings → Event Settings → 'Camera' (Advanced Settings)
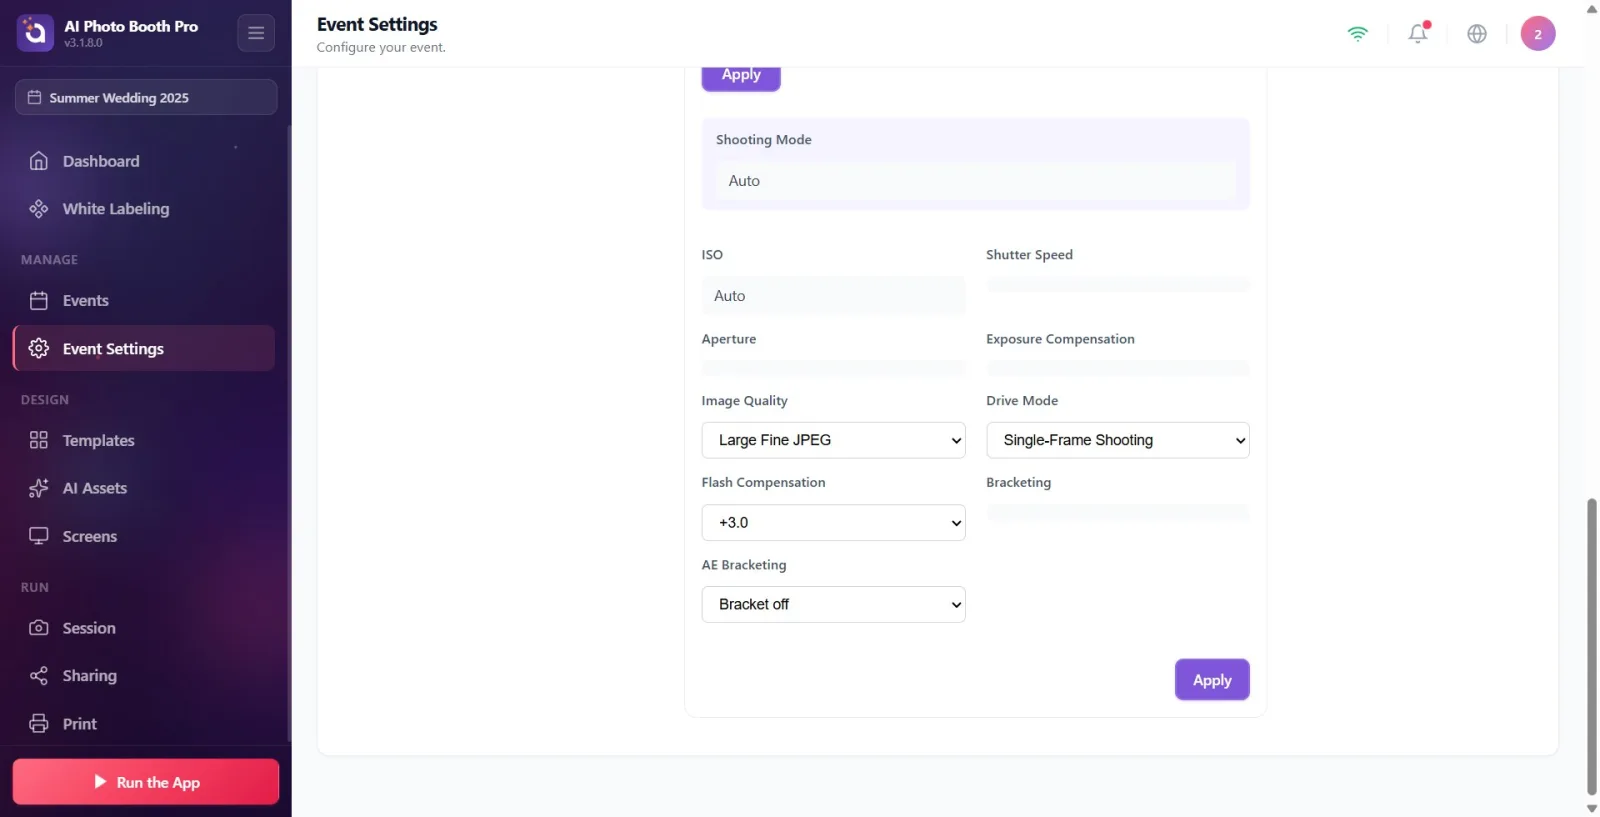
In Windows, if the connected Canon/Nikon DSLR offers adjustable features, the 'Advanced Settings' panel appears below the 'Adjustments' panel (camera battery percentage may also appear in the title). Select Shooting Mode through ISO, Shutter Speed, Aperture, White Balance, Exposure Compensation, Focus Mode, Image Quality and Metering Mode from the drop-down menus. Each value you select is drafted first — the menu is marked with an orange left border and a '· camera: X' label that indicates its difference from the current value in the camera. Press Apply to write to the camera; The button shows the number of pending changes (e.g. 'Apply (3)') and says Applying settings... when applying. Note: This panel does not appear at all on iOS/Android (mobile DSLR only does live preview + shooting).
🔎 On-screen elements: Advanced Settings title + battery badge; Shooting Mode menu; ISO / Shutter Speed / Aperture / White Balance / Exposure Compensation / Focus Mode / Image Quality / Metering Mode drop-down menus; orange border for outline + '· camera: X'; 'Apply(n)' button; Applying settings... indicator.
Step 11 · Sync body settings with 'Read Status' / 'Auto Read' on Nikon
Settings → Event Settings → 'Camera' (Advanced Settings)
On Nikon bodies (especially entry-level models such as the D3500), changes made with the physical wheel on the camera may not be automatically reflected in the application. Press the Read Status button to refresh the values from the camera — the live preview pauses for 2-3 seconds (the Reading status... overlay appears) and the current values are read. If you want a constant refresh, turn on the Auto Read switch (it reads every few seconds). This button/switch is not visible on Canon bodies because the values are already reflected automatically.
🔎 Items on the screen: Read Status button; Auto Read key; Reading status... preview overlay. (Appears on Nikon only.)
Step 12 · Optional: Set Settings with AI (2 Credits)
Settings → Event Settings → 'Camera' (Camera Settings DSLR)
After taking a test photo on the DSLR, the 'Adjust Settings with AI' button appears under 'Retake' (next to it '(2 Credits)'). Press — the application has the AI analyze the shot you took (Analyzing settings…) and writes the values it recommends, such as ISO/shutter speed/aperture, directly into the sketch; shows a general comment about the light/composition at the top. Suggestions are not applied automatically — review, leave what you want, and type it into the camera with Apply. If the credit is not enough, the credit purchasing screen opens.
🔎 On-screen items: Set Settings with AI button + '(2 Credits)'; Analyzing settings… during analysis; AI hint icon in menus; AI comment banner at the top (closed by ×).
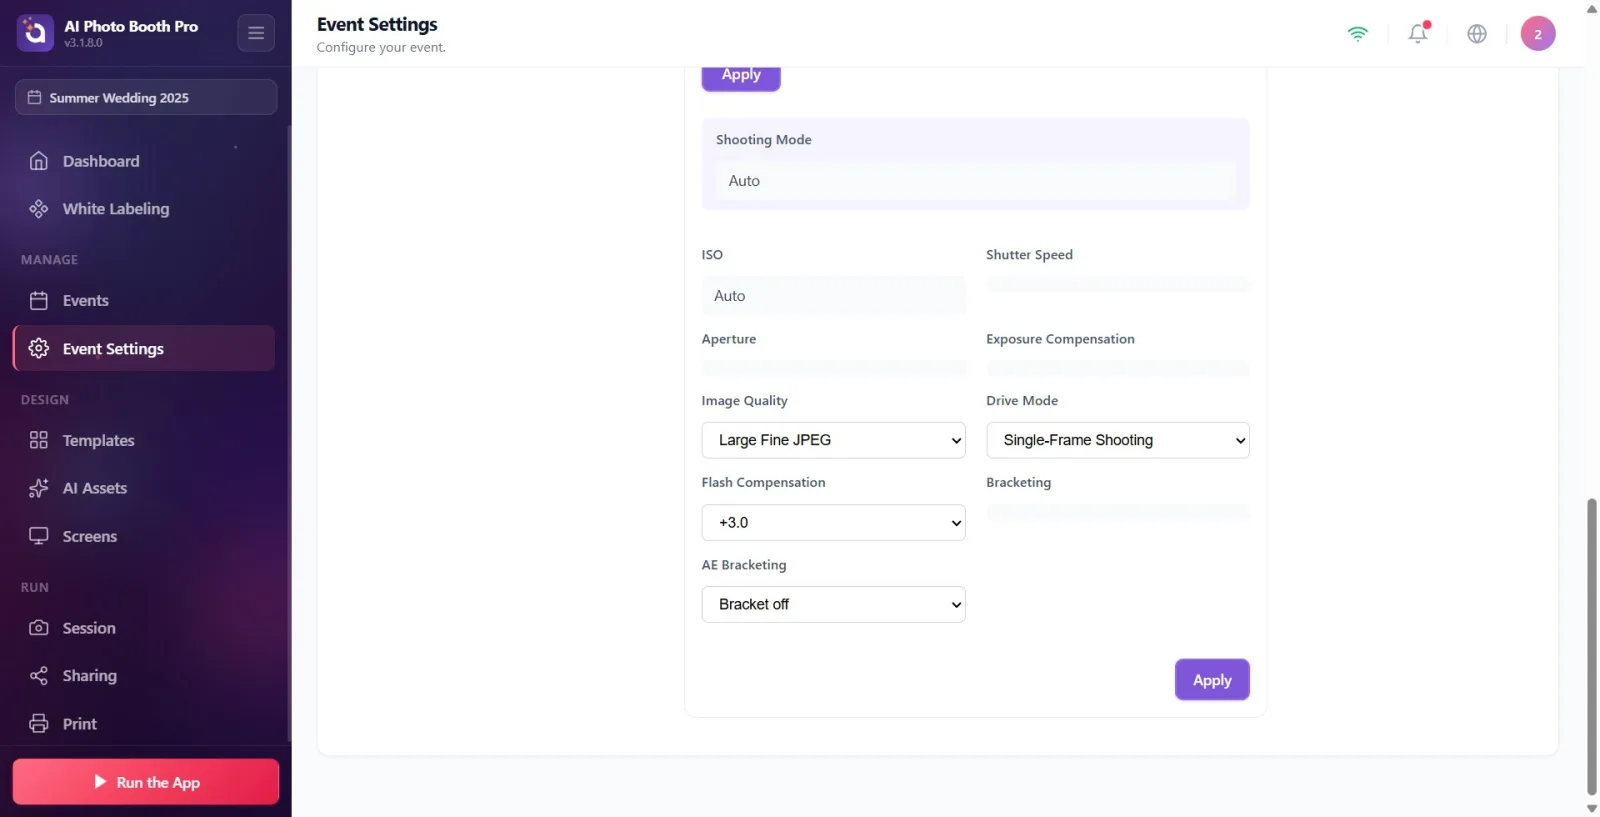
Full control of the DSLR (ISO/aperture/shutter, 'Read Status', 'Determine Settings with AI') is native to Windows. On iOS/Android, a DSLR can be connected and live preview + capture, but the 'Advanced Settings' panel will not appear.
In the application, the DSLR is listed in the USB Cameras group with the detail USB Camera (DSLR); Clicking on the row both adds it and makes it active.
The values you choose in Advanced Settings are draft first (orange edge + '· camera: X'); You must press 'Apply' for it to be processed into the camera.
Canon automatically reflects the value change (push event); Nikon — especially entry-level bodies like the D3500 — may not reflect, refresh with Read Status or turn on Auto Read.
If the camera is temporarily disconnected (sleep/cable), the application does not jump to another camera; Shows Offline + Searching for camera... and automatically reconnects — the preview continues automatically once the connection is restored.
Keep battery charged: live preview + tethering drains battery fast; Low battery may cut off DSLR live view suddenly. Watch the battery percentage in the panel title.
Choose low resolution (Small) and JPEG for fast and smooth transfer; at high resolution/RAW the app shows a yellow warning card (file large, transfer from camera slows down).
Leaving the camera in playback or video-only mode: switch to a capture mode (M/Av/Tv/P); Otherwise it won't connect or the live preview won't come.
Leaving the USB type 'Mass Storage': for tethering the USB mode on the camera must be MTP/PTP (connect to computer).
Using a charging-only (non-data) USB cable: camera invisible; Try with a data supported cable.
Leaving camera sleep/auto-off on: when the camera sleeps, the connection drops and the preview switches to Offline; turn off/extend sleep time.
Leaving Canon EOS Utility, Nikon software, or Windows Photos import open: locks MTP/PTP channel, cannot open booth camera — close these applications.
Changing the value from the menu in Advanced Settings and not pressing 'Apply': the change remains in the draft, not written to the camera.
Changing the value with the Nikon body wheel and waiting for the application to update instantly: Read Status must be pressed or Auto Read must be on.
Expect fast streaming in high resolution/RAW: large files transfer slowly from camera; yellow warning pops up — choose low resolution (Small) + JPEG for faster.
Searching for 'Advanced Settings' / 'Read Status' / AI on iOS/Android: these are only available on Windows; On mobile, DSLR only does live preview + shooting.
Related topics
Event Settings → camera Camera & OBS Setup Camera Problems
