
Before this: How to Create an Event?
How to Add and Use Ready AI Effect?
The application allows you to select ready-made AI effects from the server (Editor effects, Default effects) and effects from your own library from a catalog and add them to your active event. This document explains the steps of adding ready-made effects from the library, displaying them in the active list, sorting, renaming, favoritening and removing them. (CREATING special effects from scratch — Create New button and Show me how guide — is the subject of a separate document.)
- An event must be created and selected (active) — effects are always added to the currently selected event
- The account must be on a subscription that can access AI features (Pro AI or higher); If not, Pro AI or higher required lock warning appears on the page.
- Internet connection — library catalog and effect cover images are downloaded from the server
Step by step
Step 1 · Open the AI Assets page
Settings → AI Assets
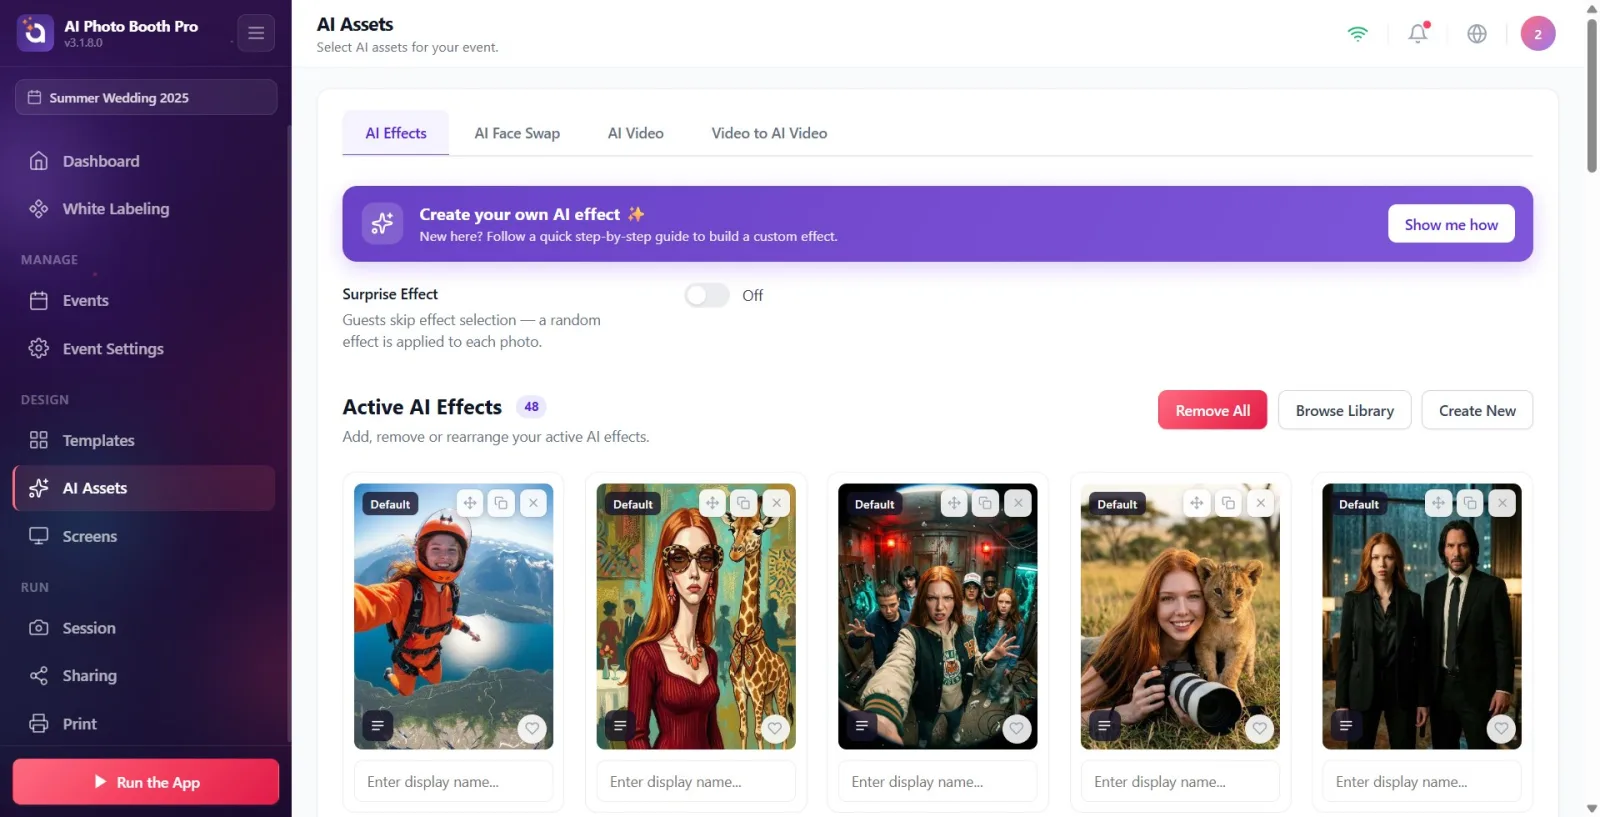
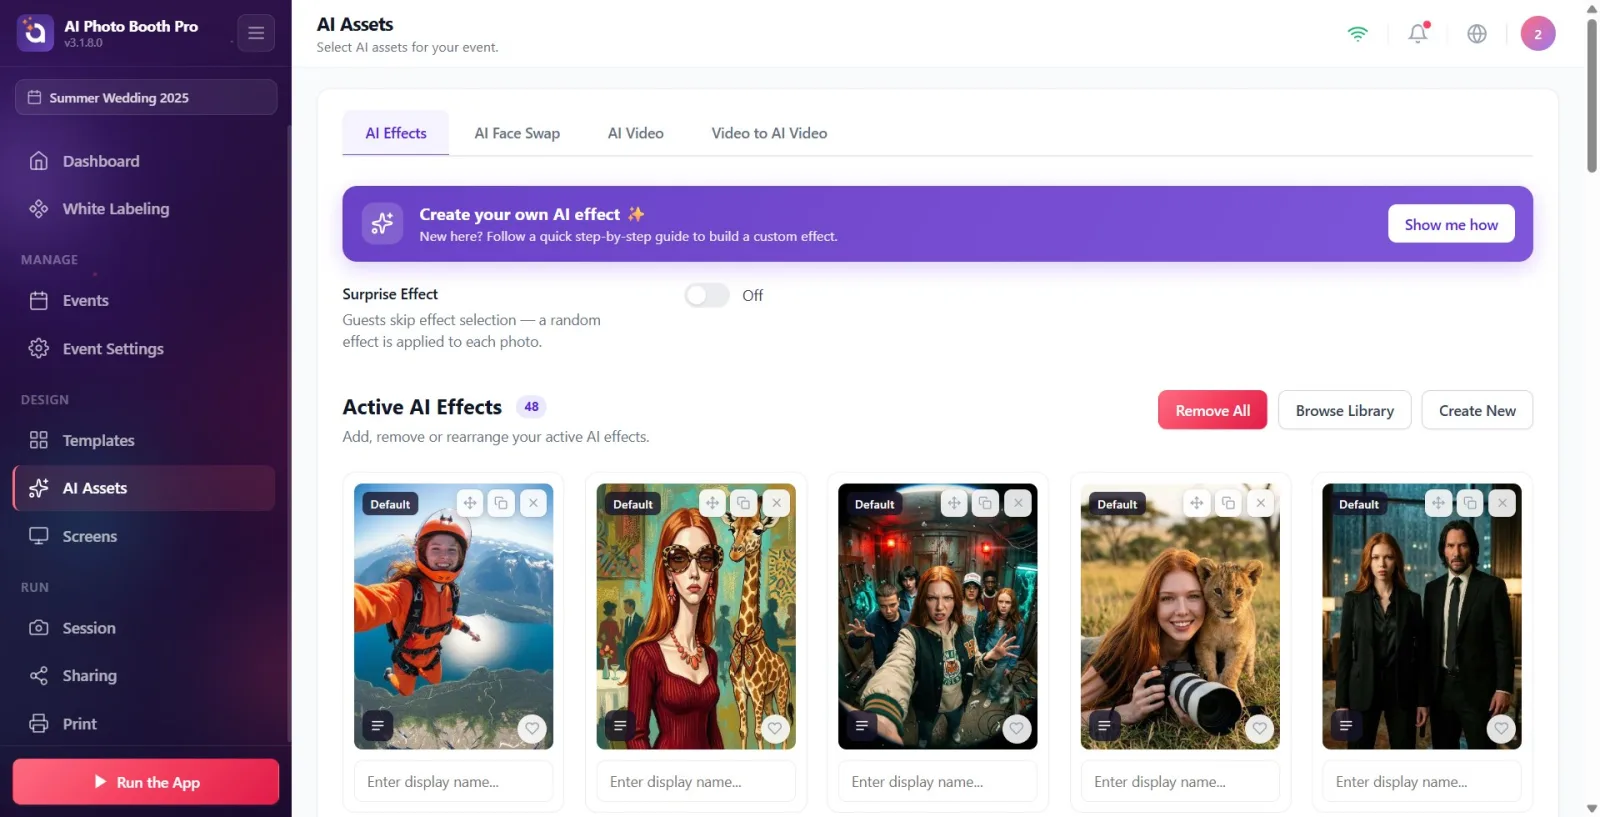
Click the AI Assets menu item in the left sidebar. The page opens; Select AI assets for your event. is written as a description at the top.
🔎 Elements on the screen: AI Assets nav element in the sidebar; page title AI Assets.
Step 2 · Make sure you are in the AI Effects tab
AI Assets → AI Effects
There are three tabs at the top of the page: AI Effects, AI Face Swaps, AI Video. Click the AI Effects tab on the left (default is the open tab; the app remembers the last tab you used). Note: If the subscription is not enough, the Pro AI or higher required lock card and the Pro AIa Upgrade button appear instead of the tabs.
🔎 Items on the screen: Tabs: AI Effects, AI Face Swaps, AI Video. If locked: Raise Pro AI or higher required + Pro AIa'.
Step 3 · Get to know the Active AI Effects section and buttons
AI Assets → AI Effects
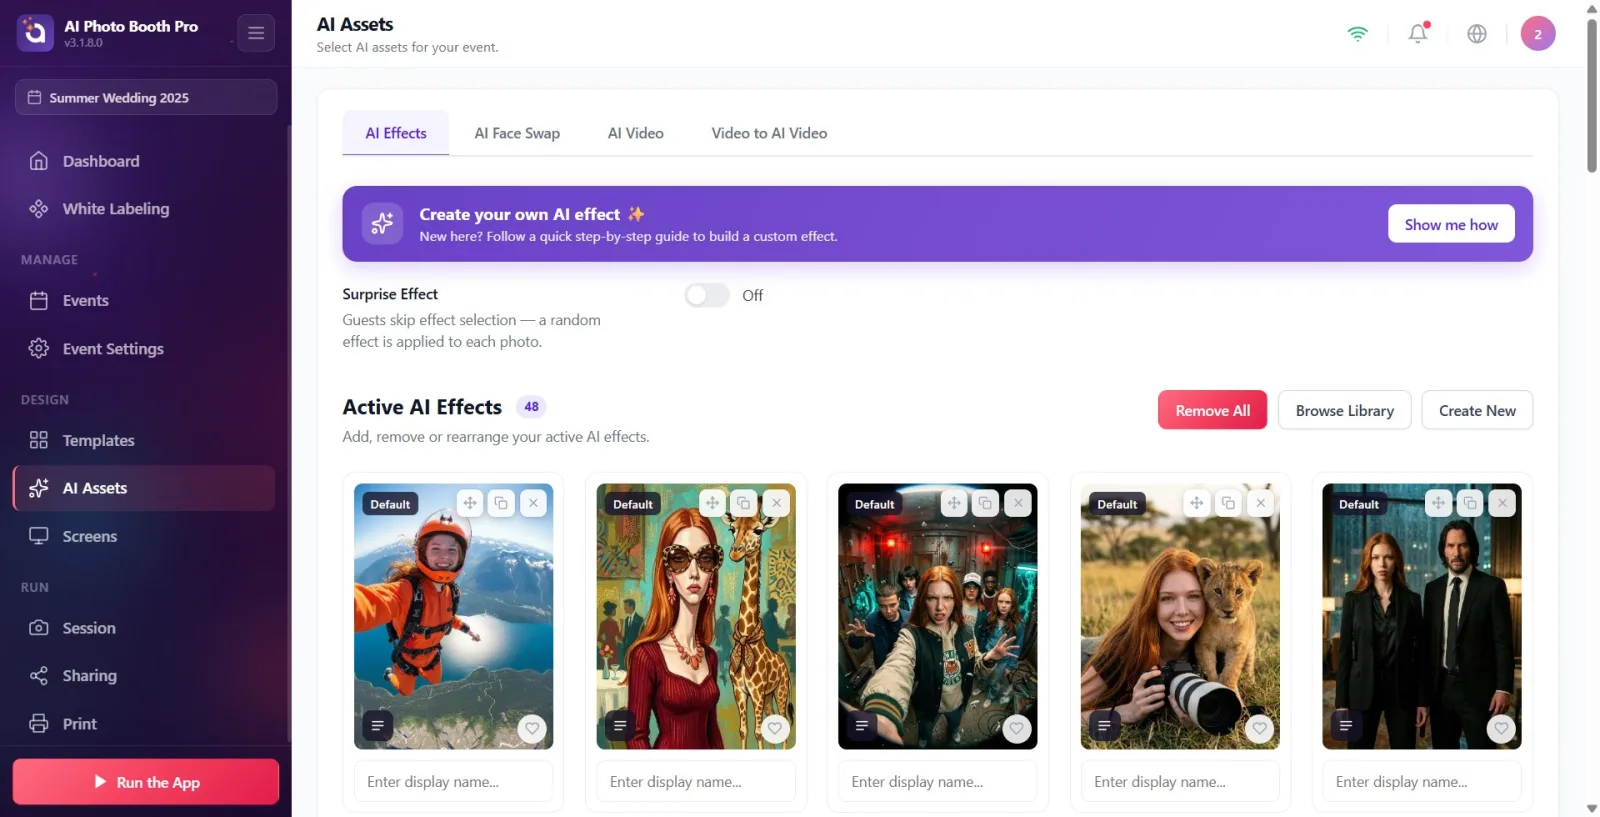
Under the tab, find the section titled Active AI Effects; description 'Add, remove or rearrange your active AI effects.' writer. The badge next to the title shows how many active effects are currently in the event. There are three buttons in the top right: Remove All (only visible when there is at least one active effect), Browse Library and Create New. Browse Library is used to add preset effects. (The top purple Create your own AI effect ✨ stripe and Create New button are for special effect rendering — out of scope of this documentation.)
🔎 On-screen elements: Active AI Effects title + number badge; Remove All, Browse Library, Create New buttons on the right; Create your own AI effect ✨ / Show me how guide strip at the top.
Step 4 · Open library modal (Browse Library)
AI Assets → AI Effects
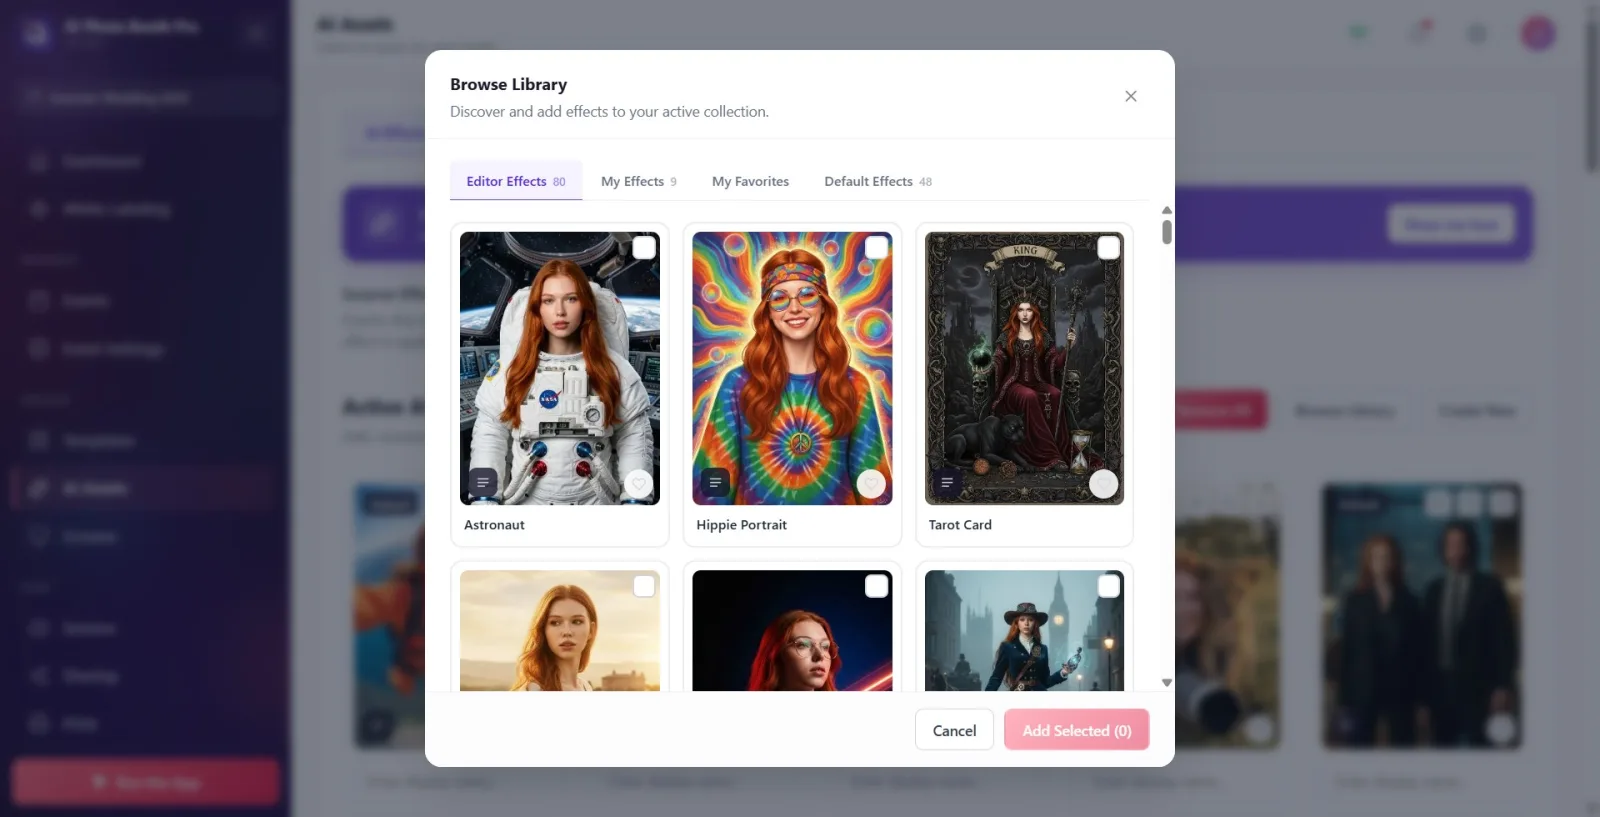
Click the Browse Library button. A modal titled Browse Library with a sub-description of Discover and add effects to your active collection. opens. At first startup, the Editor Effects tab is selected, and since the catalog is pulled from the server, the cards may show Loading for a moment.
🔎 Elements on the screen: Browse Library modal; title + Discover and add effects to your active collection. caption; close (X) button at top right.
Step 5 · Navigate through library tabs
AI Assets → AI Effects → Browse Library
There are four tabs at the top of the modal: Editor Effects (the ready-made catalog provided by the application), My Effects (effects you create), My Favorites (the ones you mark with a heart) and Default Effects (premade effects that come automatically to the event). Usually look at the Editor Effects or Default Effects tab for the ready-made effect you are looking for. The number next to each tab represents the total number of effects; The phrase 'Importing X/Y...' that appears while the content is downloading shows how many are ready.
🔎 Elements on the screen: Tabs: Editor Effects, My Effects, My Favorites, Default Effects; qty/Importing... indicator next to the tab.
Step 6 · Select the effects you want to add
AI Assets → AI Effects → Browse Library
Click on an effect card to select it; The check mark in the corner of the card fills up and the card becomes 'selected'. You can choose multiple cards. Effects already in this event have the Added (English, meaning Added) badge in the corner; these cannot be selected because they are already attached. If an empty list appears, No effects to show here appears if there is no effect, and Loading appears if the content is downloading.
🔎 On-screen items: Effect card; tick mark in the corner when selected; Added badge on attached ones; No effects to show here / Loading in the empty state.
Step 7 · (Optional) Review or favorite the prompt
AI Assets → AI Effects → Browse Library
On the card you are undecided on: If you click on the list icon (Promptu') at the bottom left, you can read the text command (Prompt) of the effect, and turn it off with the X (Dismiss) at the top right. If you click the card's heart button (Favorite), the effect will be added to the My Favorites tab (this will NOT add it to the event, it will just mark it). However, the My Effects tab also has a pencil (Edit) button above its effects.
🔎 Items on the screen: On the card: Promptu View' icon → 'Prompt' window ('Close'); 'Favorite' heart button; only the 'Edit' pencil icon in 'My Effects'.
Step 8 · Add selected to activity (Add Selected)
AI Assets → AI Effects → Browse Library
Click the 'Add Selected (N)' button at the bottom of the modal — N is the number of effects you selected. When there is no selection, this button is dimmed and unclickable. When you click it, the effects you selected are added to the event and the modal closes. If you decide not to add it, close it with Cancel (or the X in the top right) — then your selection will not be applied.
🔎 Items on the screen: Bottom bar: 'Add Selected (N)' button (inactive when N=0), Cancel button; only 'Delete (N)' button on the left in the My Effects tab.
Step 9 · Wait for the added effects to appear in the active gallery
AI Assets → AI Effects
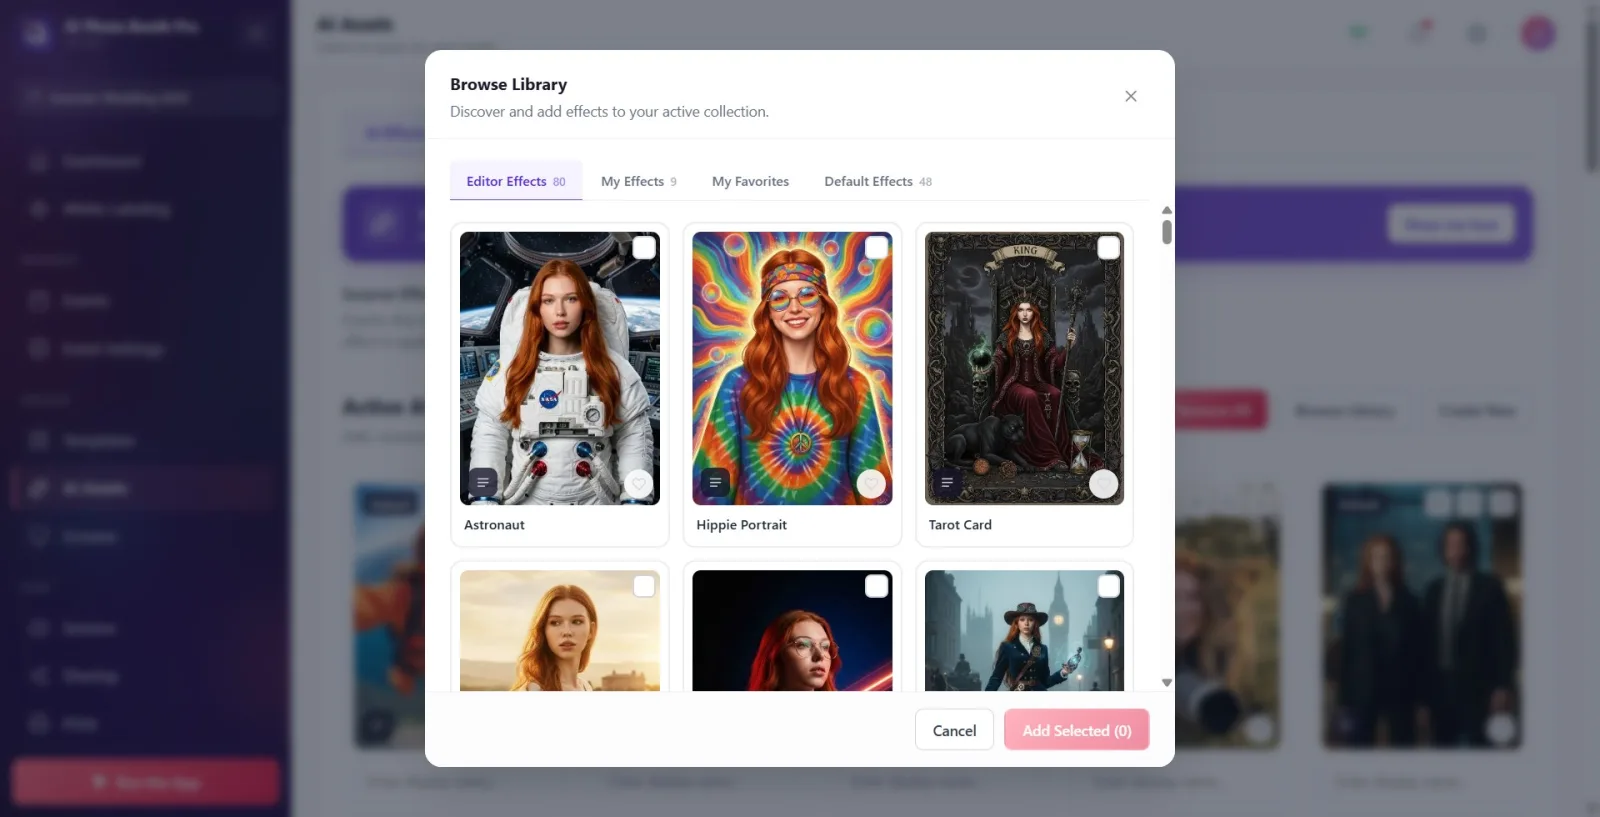
When the modal closes, return to the Active AI Effects gallery. While the cover images of the newly added effects are downloaded from the server, gray skeleton boxes appear in place of the cards and the 'Importing X/Y...' indicator appears in the title. When the download is finished, the cards sit with their real covers and the badge shows only the active number. This is normal; It may take a few seconds.
🔎 On-screen elements: counter badge + Importing... (animated ellipsis) in gallery header; Gray skeleton cards for effects that haven't landed yet.
Step 10 · Recognize actions on active effects card
AI Assets → AI Effects
Each effect card in the active gallery has the following tools: move handle (Drag to reorder), edit button (Edit pencil icon in own effect, Edit & Clone copy icon in ready/default effect), remove button (Remove — X), heart (Favorite) and Promptu View' if present. There is a text box ('Enter Display Name...') at the bottom of the card. The 'DefaultorLibrary' badge appears in the corner of the preset/default effects.
🔎 On-screen items: On-board: drag handle, Display Edit / Edit & Clone, Remove, Favorite, Promptu'; corner badge 'Default' / 'Library'; undercard 'Enter Display Name...' box.
Step 11 · Reorder effects (drag-drop)
AI Assets → AI Effects
Drag a card by its four-way arrow handle (Drag to reorder) to the desired location and drop it. The sequence is specific to this event and is saved automatically; Effects are presented to guests in this order.
🔎 On-screen items: Four-arrow transport handle on the card (Drag to reorder).
Step 12 · Change the display name of an effect
AI Assets → AI Effects
Click in the Enter display name... box at the bottom of the card and type a new name. This name is just the name that appears in this activity (names the activity-effect link); It does not change the actual name of the effect in the library. The change is saved automatically.
🔎 Items on the screen: Enter display name... text box under the card.
Step 13 · Remove a single effect from the activity
AI Assets → AI Effects
Click the Remove (X) button on the card. In the confirmation window that opens, the title is 'Delete
🔎 Items on the screen: Remove (X) button on the card; confirmation window: 'Delete
Step 14 · Remove all effects at once (optional)
AI Assets → AI Effects
Click the Remove All button to the right of the title to vacate all active effects in the event. In the confirmation window the title is Remove all effects? and the message is 'All active effects in this event will be removed. You can add it again from your library later.' interest. Confirm with 'Delete'. This does not affect the library either; The effects come from the event alone.
🔎 Items on the screen: Remove All button; confirmation window: Remove all effects? + description + Delete / Cancel.
Step 15 · (Optional) Turn on Surprise Effect
AI Assets → AI Effects
Move the switch in the Surprise Effect section at the top of the tab to the On position. Description 'Guests skip the effect selection — a random effect is applied to each photo.' When this is on, the guest does not select any effects; A random one of the active effects you added will be applied. When off, the guest chooses their own effect from the list.
🔎 Elements on the screen: Surprise Effect title + on/off switch (On / Off) + description text.
Addition logic: ready-made effects you choose from the library are added to the SELECTED EVENT at that moment. You'll need to add it separately for a different event.
Remove (deactivates, stays in the library) and permanent deletion from the library are different. You can always add back the effect you removed with Browse Library.
The Editor Effects and Default Effects tabs are ready-made effects offered by the application; My Effects is what you created, My Favorites is what you marked with a heart.
Effects already added to the library have the English Added badge and cannot be selected again — because they are already in the event.
The selection is only valid when the modal is open; Nothing is added until you press the 'Add Selected (N)' button. If you close it with Cancel or X, the selection disappears.
Enter display name... under the card changes the display name for this event only; The original name of the effect in the library is preserved.
If you edit a preset/default effect, the button is Edit & Cloneand creates a COPY; only your own effects are edited in place with Edit.
'Importing X/Y...' and gray skeleton cards are normal when landing cover images; wait a few seconds.
Favorite (heart) does NOT add an effect to the event; It just collects it in the My Favorites tab, making it easy to quickly add it from there.
Thinking that you deleted the effect with Remove: Remove only removes the effect from the event, not from the library. Permanent deletion is only possible with the 'Delete (N)' button in the My Effects tab of the library modal and cannot be undone.
Thinking that cards will be added automatically when you select them: selection alone is not enough, the 'Add Selected (N)' button must be pressed.
Trying to select an effect with a Added badge (already attached): these cards cannot be selected because they are already present in the event.
Mistaking the 'Importing X/Y...' indicator as an error: it is normal when the covers are coming down. However, if the meter remains stuck for too long (e.g. '9/10'), suspect a pull problem.
Thinking that the Edit & Clone button on the preset/default effect will replace the original: it actually creates a copy, the original preset effect remains as is.
Thinking that when you change the name under the card, the name of the effect in the library will also change: only the display name in this event changes.
Trying to add effects without selecting an event: effects are added to the selected event; An event must be created and selected first.
Expecting the guest to be able to select an effect when Surprise Effect is on: when this mode is on the selection is skipped and the random effect is applied.
Related topics
Creating AI Effect AI Assets AI Face Swaps AI Video
