
Printing mostly works in Windows and is managed in two places: the left menu 'Run → Print' settings page (add printer, tweak, behavior, limits) and the Print button on the post-capture booth results screen. This document explains typical symptoms such as no printout, wrong size, offline printer, 2 inch cutout, and button not appearing at all, with causes/solutions verified from real code.
- event-creation
- print-settings
step by step
Symptom: 'Print' button does not appear at all in Booth results screen
Print — Printing Behavior
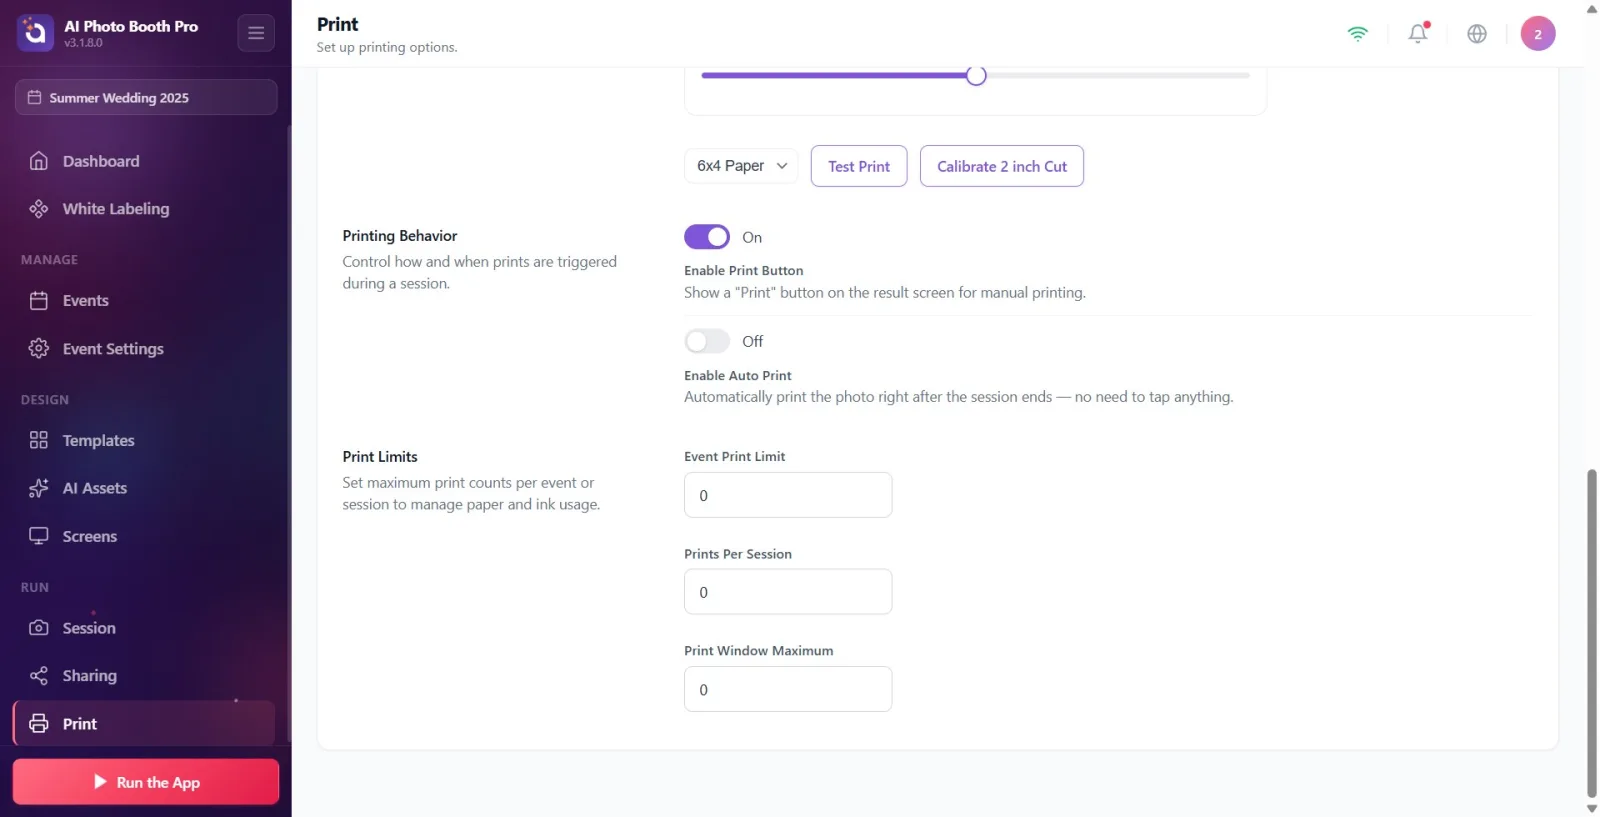
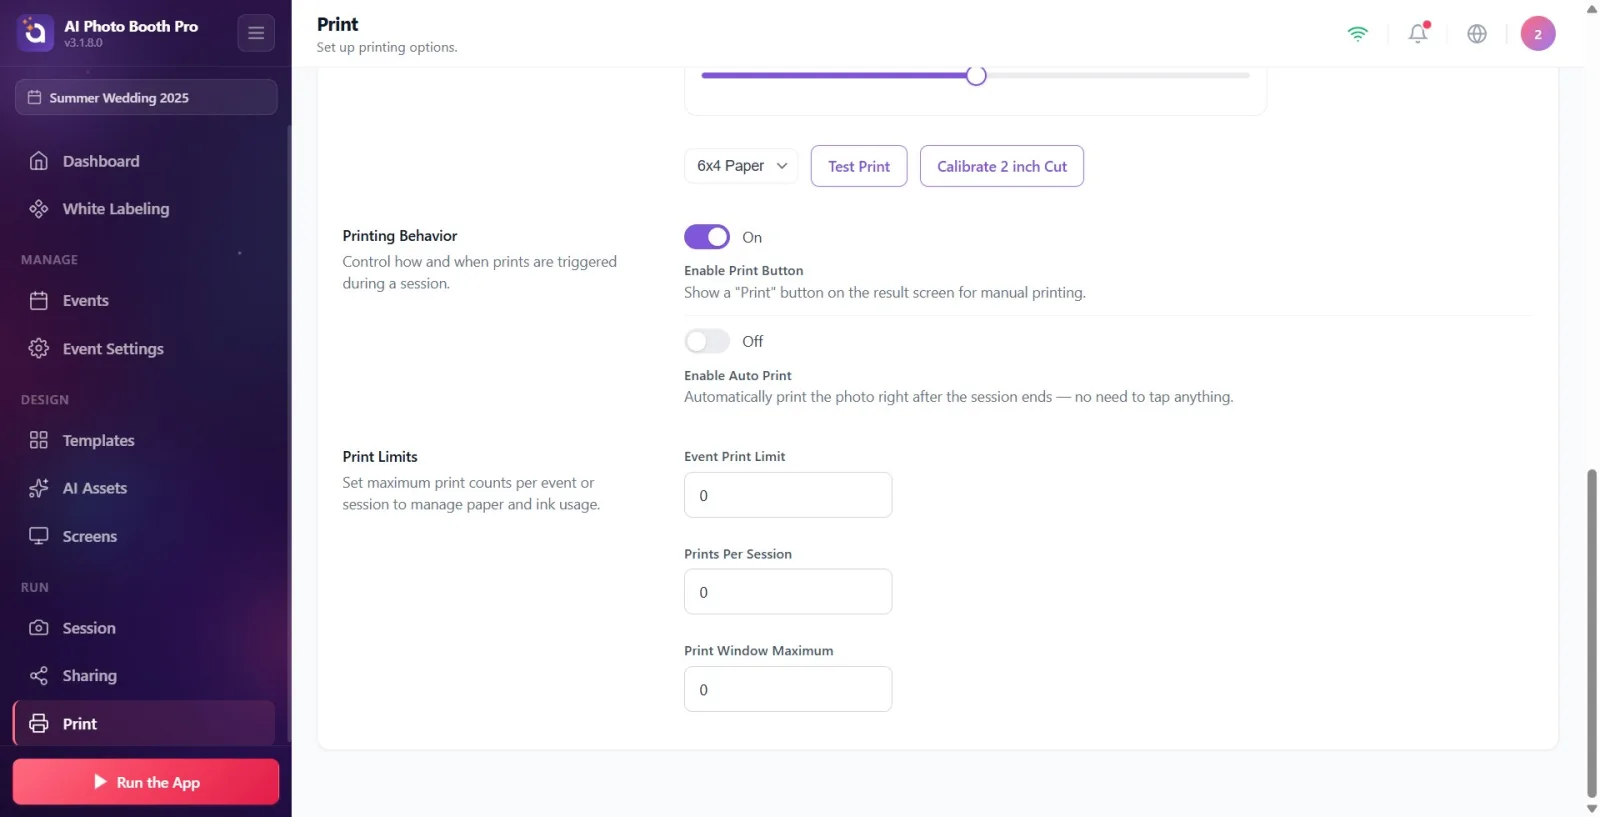
Reason: The print button in Booth only appears if three conditions are met simultaneously (code: SharingPageBlazorViewModel.IsPrintVisible) — (1) result rendering is complete (printable), (2) 'Enable Print Button' (PrinterEnabled) is on, (3) event printing limit is not reached. The most common reason is the second item: this setting is derived once when CREATING the event and defaults to OFF in pure video type events (Video360 / Glambot); Comes ON for events with printable output (photo/GIF/boomerang). Solution: In the left menu 'Run → Print' → Printing Behavior section, turn ON the Enable Print Button switch. When the switch is on, guests are presented with a manual Print button on the results screen.
🔎 Elements on the screen: Printing Behavior title; Enable Print Button on/off switch; status text On/Off; description 'Show a "Print" button on the results screen for manual printing.'
Symptom: 'Print' button does not open even in the event that takes photos/GIFs
Print — Printing Behavior
Cause: Enable Print Button is no longer reactive (decided 2026-06-29) — it is only set once when creating the event, it will not be opened automatically if you change the shooting mode afterwards (e.g. add a photo to the video event). So, if pure video was initially selected and then photos were added, the switch still remains off. Solution: Turn ON the switch manually. If you want to turn it off (the default is on in photo+video combined activity), you can turn it off here again — the decision is up to the operator.
🔎 Items on the screen: Enable Print Button key; On/Off status text.
Symptom: Print button shows 'Limit Exceeded' or button does not appear at all
Print — Printing Limits
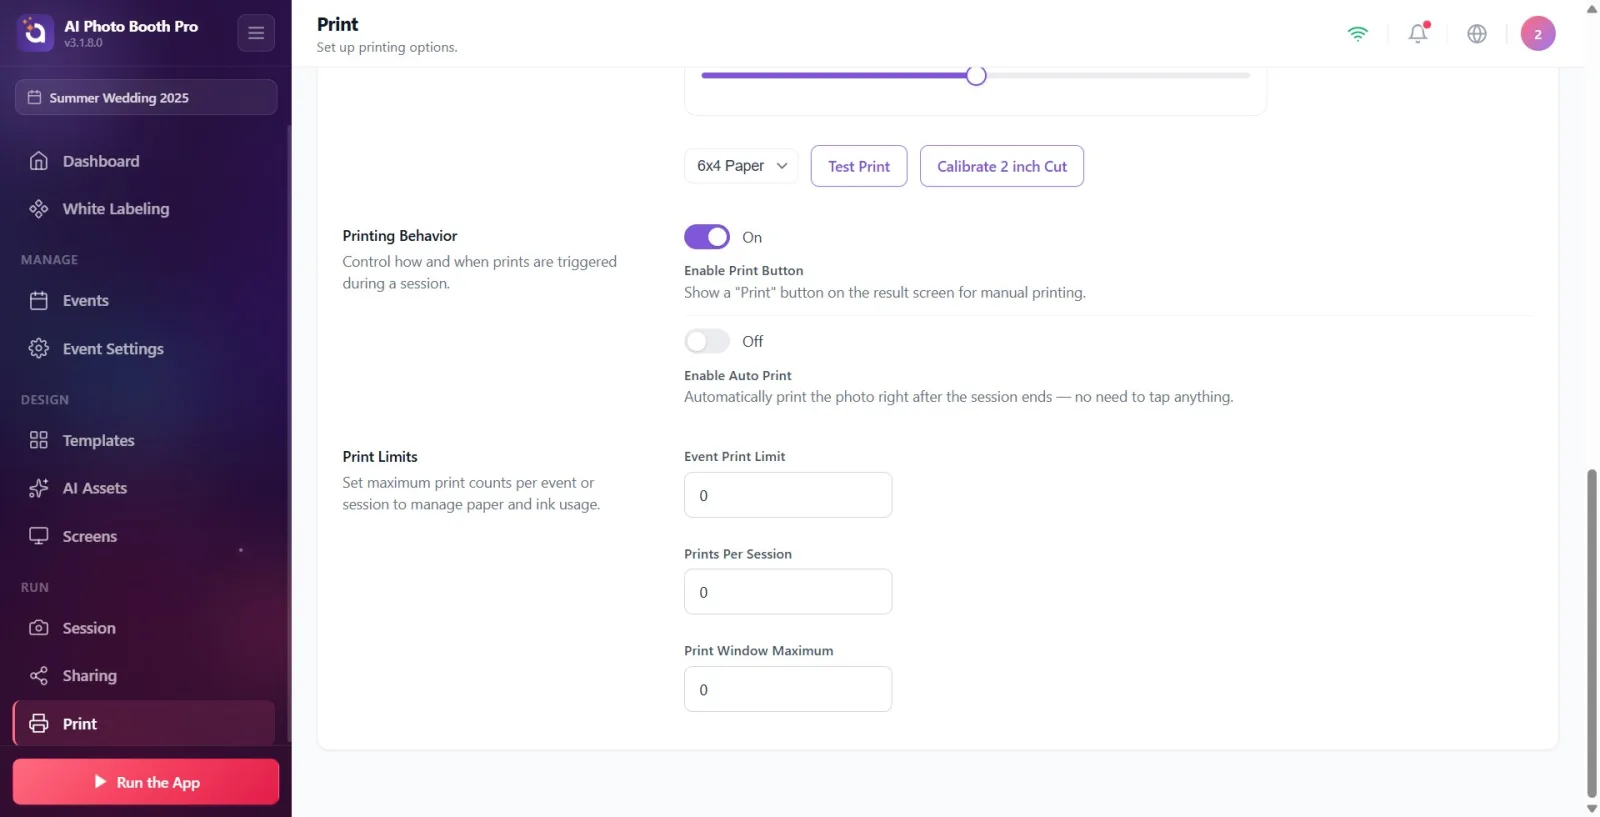
Cause: Print limit exceeded. The code implements two different behaviors: When the ACTIVITY limit is reached, the button is completely HIDDEN (IsPrintVisible=false), and when the SESSION (admin) limit is reached, the button remains but is deactivated with the text Limit Exceeded (LimitExceeded). Limit fields are considered 'unlimited' if left less than 1 or blank (code: value < 1 → int.MaxValue). Solution: In the 'Printing Limits' section, increase the 'Event Printing Limit' and 'Prints Per Session' values; If you want completely unlimited, leave 0 (or blank). If Print Window Maximum is less than 1, the default is 5.
🔎 Items on the screen: Print Limits section; Event Print Limit, Prints Per Session, Print Window Maximum number boxes; 'Limit Exceeded' sticker on the booth.
Symptom: Printing starts but no output comes (no printer added)
Print — Add Printer
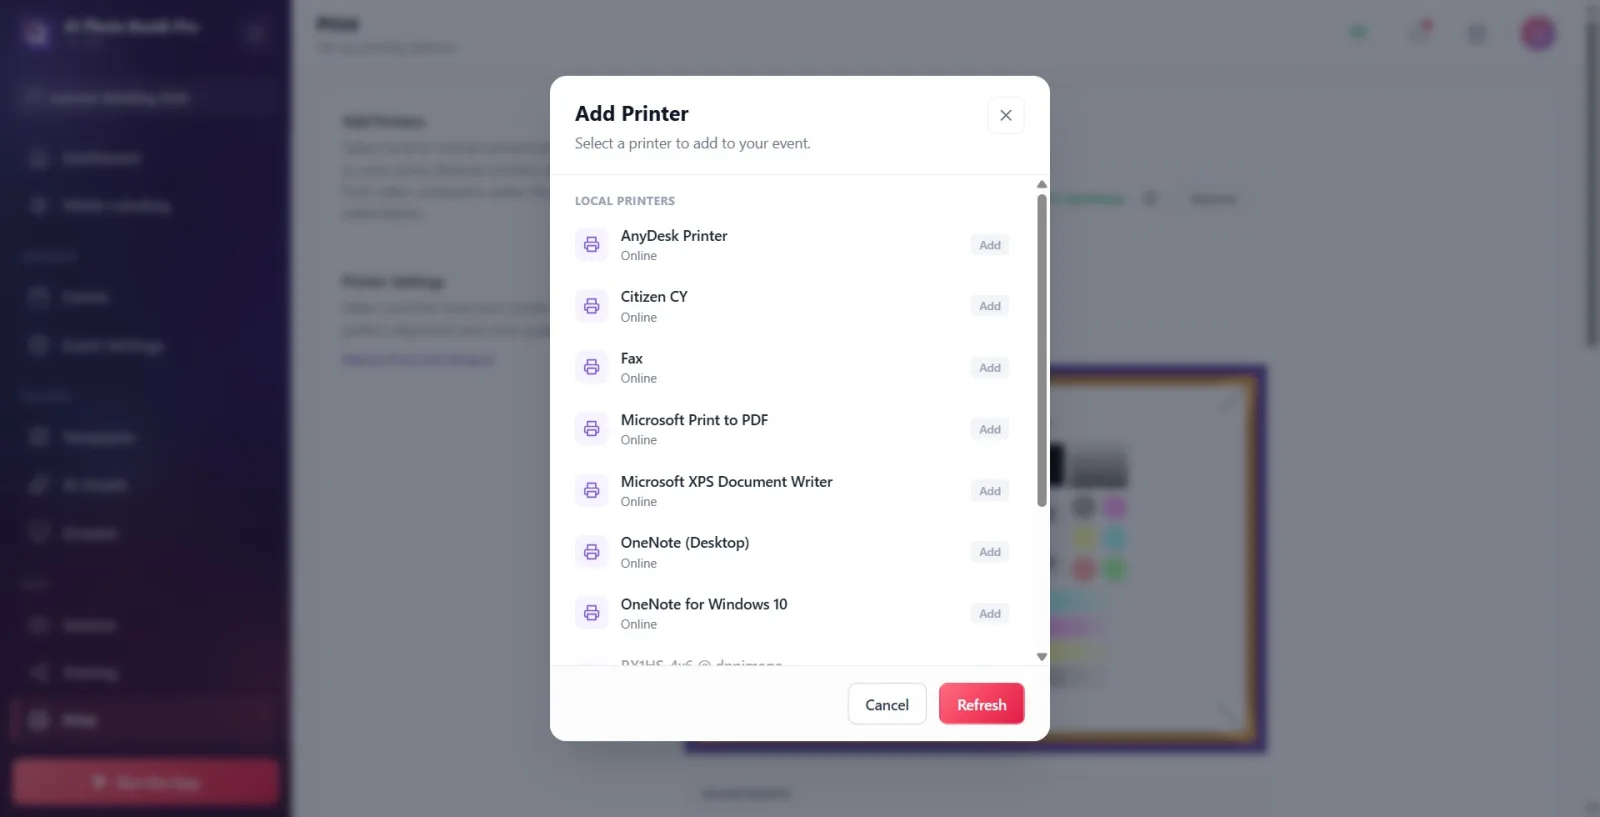
Cause: If no printer is added to the event, the print job fails immediately — the code 'NoPrinterSelected' / 'No printer selected.' If the code marks Failed (GeneratePrintJob), automatic printing also does not print silently. Solution: Click the purple Add Printer button in the Add Printer section, click on the printer from Local Printers or Remote Printers in the window that opens and change it to Added. If the list is empty, No printers found appears — connect the printer and press Refresh.
🔎 Items on the screen: Purple Add Printer button; Local Printers/Remote Printers, Add/Added badge in modal; No printers found if empty; Refresh.
Symptom: Printer appears 'Offline' / 'Printer Offline' warning on printing
Print — Add Printer
Cause: The selected printer is offline (code: printerSuitable = CurrentPrinter.IsOnline || IsOnlineStation false). In this case, the booth button goes into error state Offline and when you try to press it, the warning Printer Offline / The selected printer is not available appears (the payment flow is never entered — money is taken and the inability to press it is prevented). The system checks every 5 seconds; When the connection is lost/resumed, 'Printer is offline. Please check your usb cable.' or for WCM 'check the WCM connection.' notification drops. Solution: Check cable on local USB printer, network connection on WCM/wireless printer; Then press Refresh in the printer adding window. Read the colored status text in the connected printer row (Ready, Paper Out, Paper Jam, Busy, Printing, Door Open).
🔎 Items on the screen: Status dot + text on the connected printer line: Offline/Online/Ready/Paper Out etc.; booth warning Printer Offline — The selected printer is not available.
Symptom: The actual event print comes out at the wrong size
Print — Printer Settings
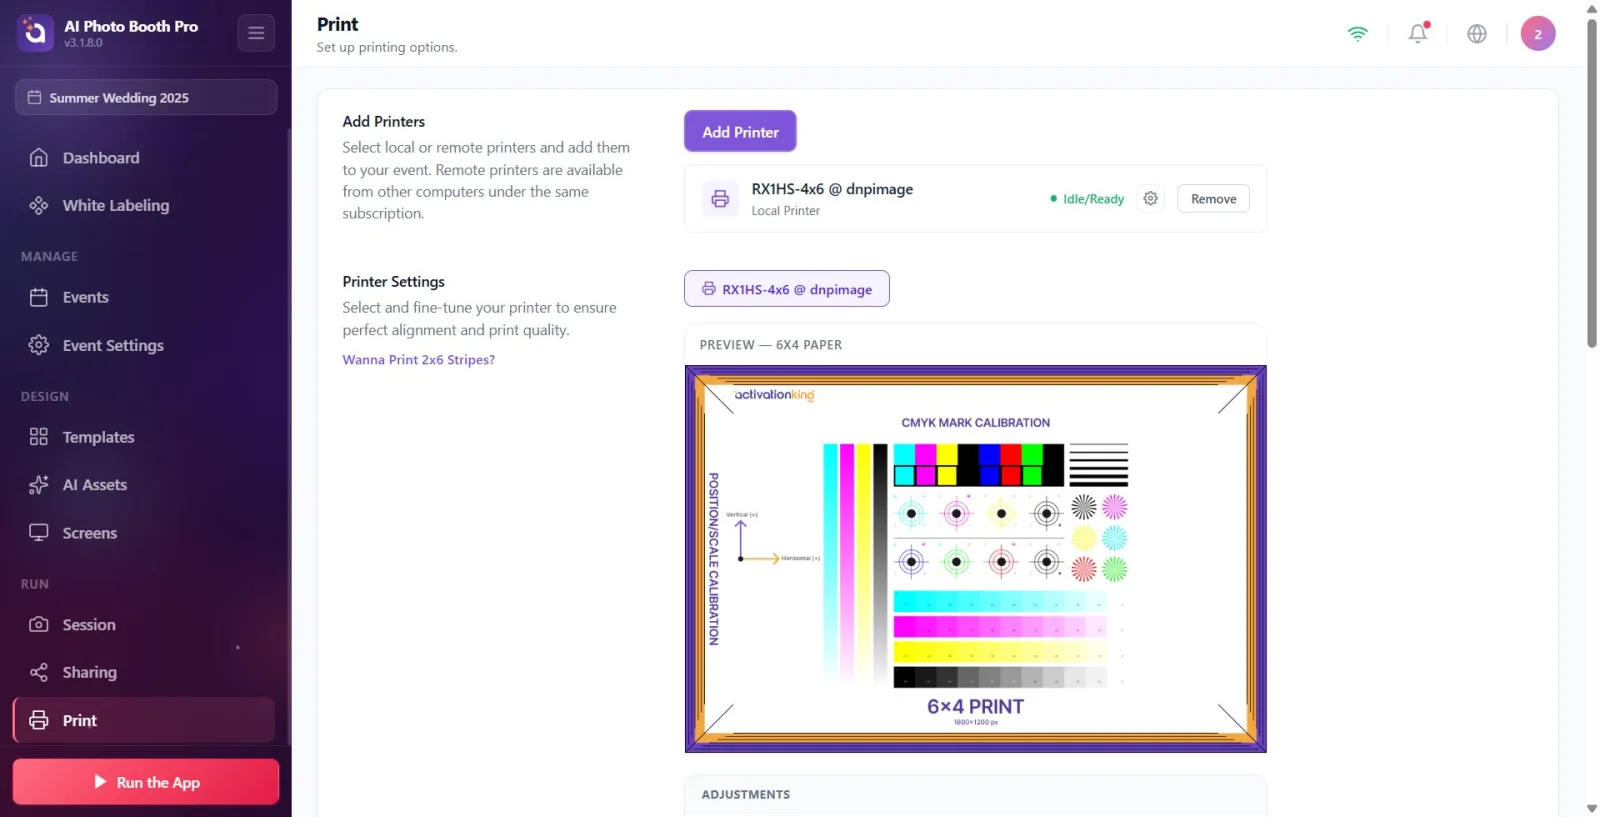
Reason: The actual guest print size comes from the size of the TEMPLATE USED (OutputSize/DeclaredSize) — NOT from the paper size menu in Print Settings. That menu is for preview and test printing only. If the template size is incorrect, the output will print in the wrong size. Solution: Select/edit the template in the correct output size. The 'Horizontal/Vertical Position' and 'Horizontal/Vertical Scale' sliders in the Printer Settings section are alignment/scale tweaks only (do not change the size); If the paper has white edges/bleeds, use those.
🔎 Items on the screen: Printer Settings section; Horizontal Position/Vertical Position (-20…+20), Horizontal Scale/Vertical Scale (80%…120%) sliders; paper size menu (test/preview only).
Symptom: Test print comes out the wrong size (e.g. 6x8)
Print — Printer Settings
Cause: In the test print, the paper size is selected from the drop-down menu under Test Print. If the size cannot be resolved (menu not selected) the print falls to the DNP CUPS driver default — usually 6x8 (code: declaredSize null → '-o media=' is not added). Solution: Select the correct size (6x4 / 4x6 / 6x6 / 6x8 / 8x6 Paper) from the paper size drop-down menu next to the 'Test Print' button, then try with Test Print → Print Test Page. The Preview box at the top shows the aspect ratio of the selected size.
🔎 Items on the screen: Paper size drop-down menu (6x4/4x6/6x6/6x8/8x6 Paper); Test Print button; Print File Viewer → Print Test Page.
Symptom: Normal (single frame) photo comes out sliced in half
Print — Printer Settings
Cause: The 2 inch cut (2x6 photo strip cut) is left open in the normal photo → the printer cuts the paper right in the middle, dividing the photo in half. Cutting only works correctly on 2x6 strip layout templates (code warning: 'only use with strip-layout template; photo will be sliced if left open in normal photo'). Solution: CLOSE the 2 inch cutout on normal photo templates; Use only 2x6 strip regular templates. The cut setting makes sense on DNP/Citizen thermal sublimation printers (detail in the '2 Inch Cut' document).
🔎 Items on the screen: 2 Inch Cut (Photo Strips) key; description 'Cuts the print into 2x6 photo strips. Open only in strip regular templates.'; 'Want to Print 2x6 Strips?' connection.
Symptom: 'Calibrate 2 inch Cut' says 'not supported' or won't calibrate
Print — Printer Settings
Reason: The Calibrate 2 inch Cut button appears only on Windows (on Mac the cut is automatic with CUPS, there is no concept of calibration). If there is no printer connected, 'No printer connected — it works when a printer that supports it is connected.', if the printer cannot perform hardware cutting, 'The connected printer does not support 2 inch cutting.' take out the toast; Your printer is ready for 2 inch cut. if already ready, Calibration cancelled. if the dialog is canceled. Solution: Connect a printer that supports cutting, such as DNP/Citizen; In Windows, select the correct printer in the 'Printer Settings' tab, click 'Calibrate 2 inch Cutting', open Cutter in the driver dialog and click Arrow. If the calibration is successful, the toggle is activated.
🔎 Items on the screen: Calibrate 2 inch Cut button (Windows only); toast messages: The connected printer doesn't support 2 inch cut., Your printer is ready for 2 inch cut., 'No printer connected — ...', Calibration cancelled.
Symptom: Test print said 'sent to queue' but no paper came out
Print — Print Output Previewer
Cause: The Test print sent to queue (TestPrintSentToQueue) message DOES NOT GUARANTEE that the print is released — the system waits for the result of the job for 30 seconds; If it does not return to Success/Failed within this time (especially while the remote station is uploading to the printer), it gives the information 'sent to the queue'. If the printer is offline or there is no paper, the result is Test print failed. Solution: Check the status (Paper Out, Paper Jam, Offline etc.) on the connected printer line; on the remote station printer, make sure that computer is online and connected to the internet; Fix the problem and try Print Test Page again.
🔎 Elements on the screen: Print File Viewer window; Print Test Page button; toast: Test print completed / Test print failed / Test print sent to queue.
Symptom: I tweaked (position/scale) but wrong printer fixed/none fixed
Print — Printer Settings
Reason: Fine adjustment (Horizontal/Vertical Position and Scale) values are stored SEPARATELY FOR EACH PRINTER and written to the currently SELECTED printer tab. If you move the slider while in the wrong tab, the setting will be processed to another printer. Values do not have a separate Save button; It is automatically saved ~0.25 sec after the drag is finished. Solution: First select the printer you want to set from the tabs in the Printer Settings section (active tab), then move the sliders; The Preview box at the top immediately reflects the change.
🔎 On-screen items: Printer selection tabs (each connected printer a tab, active one highlighted); Adjustments panel; live Preview box ('Preview — 6x4').
Symptom: Automatic printing is on but not printing / wrong number of copies
Print — Printing Behavior
Cause: Even if Enable Auto Print is on, if no printer is added, the end-of-session print will drop without a printer and not print (the code now prevents the crash without a printer, but produces no output). The number of copies is determined by the Auto Print Count slider from 1 to 5; This slider is not visible when the switch is off. Solution: First add at least one printer (must be online), then turn on Enable Auto Print and set Auto Print Count in the Printing Behavior section. Automatic printing prints as soon as the session ends, with no touch required.
🔎 Items on the screen: Enable Auto Print key; Auto Print Count slider visible when on (1…5); description 'Automatically print photo immediately after session ends...'
Three conditions must be met for the print button to appear in Booth: the resulting render must be complete, Enable Print Button must be on, and the event print limit must not be reached. If there is no button, check these three in order first.
Enable Print Button is derived once from the shot type when creating the event (pure video → off, photo/GIF/boomerang → on) and does not change automatically afterwards; You can always turn it on/off manually.
The actual guest print size comes from the TEMPLATE; The paper size menu in Print Settings is for preview and test printing only.
In print limit fields, a value less than 1 or empty means 'unlimited'; To set an actual limit, enter a positive number.
Calibrate 2 inch Cut and the OS printer settings gear icon appear only on Windows (and Mac) native printers; It is not available on remote stations and mobile devices.
Test print sent to queue does not mean that the output has arrived for sure — especially on a remote station printer, confirm the result from the printer status (Ready/Paper Out).
Create a pure video (Video360/Glambot) event and expect printing: Enable Print Button is off by default in these events — turn it on manually if you want printing.
Leaving the 2 inch cut open on a normal (single frame) photo: the photo is sliced in the middle. Use the cut only on 2x6 strip templates.
Printing without selecting the paper size menu in the test print: if the size is not specified, the DNP driver defaults to (usually 6x8) and the test prints the wrong size.
Being on the wrong printer tab when tweaking: values are written to the printer of the selected tab; choose the correct tab first.
Waiting for printing/automatic printing without adding any printer: if there is no printer selected, the job will fail with 'No printer selected' and no output will come.
Leaving the print limit as 0 or empty and thinking that 'I set a limit': A value less than 1 means unlimited.
Trying to print repeatedly while the printer is offline: It is necessary to fix the USB cable / WCM network connection and press Refresh in the add printer window.
Related topics
Print Settings 2 Inch Cut Creating an Event Sharing Settings
