
Before this: How to Create an Event?
What are Session Settings, General (Main) Tab How to Use?
On the session page, settings for a live shooting session are grouped into five tabs: General (footage flow, triggers, output folder, durations), 360 / Video (video codec, quality, effects, music), Survey, Disclaimer, and Payments. This document describes the General tab; See the 360 / Video tab documentation for video codec and quality settings.
- An event must be created and selected (active) — the Session page appears in the left menu only when an event is selected and all settings are applied to that event
- You must have access to the Settings screen and the Run group in the left menu
step by step
Step 1 · Open the Session page
Settings (left menu)
Find the group titled Run in the left menu of the Settings screen and tap the Session page with the camera icon underneath it. When the page is opened, the title appears as Session and the subtitle appears as Configure session behavior.. Note: The Session menu item is only listed when an event is selected; If it's not visible, first select an event from Event Management.
🔎 Items on the screen: Left menu → Run group → Session item with camera icon
Step 2 · Recognize the tabs and be on the General tab
Session
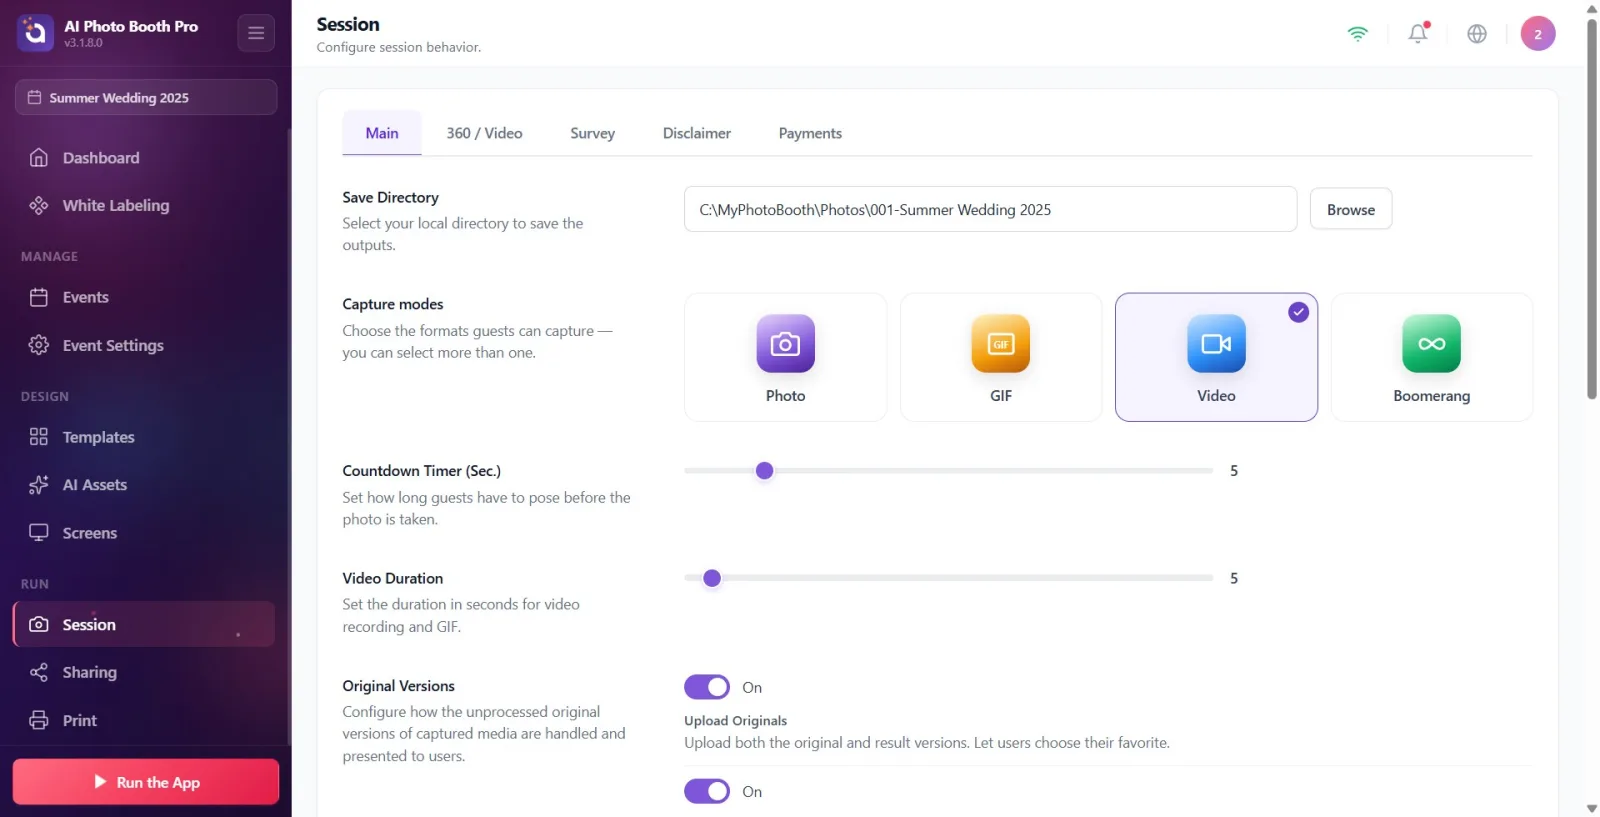
There are five tabs at the top of the session page: General (default) · 360 / Video · Survey · Disclaimer · Payments. This document describes the General tab. Important: video codec (Output Codec) and quality (Output Quality) settings are now in the 360 / Video tab, NOT General — video rendering technical settings have been moved there.
🔎 Items on the screen: Tab bar: General · 360 / Video · Survey · Disclaimer · Payments.
Step 3 · Changes are saved automatically
Session → General
There is no separate Save button on this page. When you drag a slider, toggle a toggle, or select a card, the change is instantly saved and applied to the currently selected event. The settings are event specific — when you select another event, that event gets its own values.
Step 4 · Save Directory — select output folder (Windows only)
Session → General
In the 'Save Directory' section (description: 'Select local directory to save printouts.'), which appears only on Windows, you can specify the local folder in which the results and originals will be saved. You can type the path directly into the text box (example: C:\MyPhotoBooth\Photos) or press the Browse button and select the folder. If you leave it blank, a folder will automatically be created based on the event name. On iOS and Android, this section is not visible (the system does not allow writing to the free folder).
🔎 Elements on the screen: Text box (path) + Browse button — Windows only
Step 5 · Select shooting mode (Photo / GIF / Video / Boomerang)
Session → General
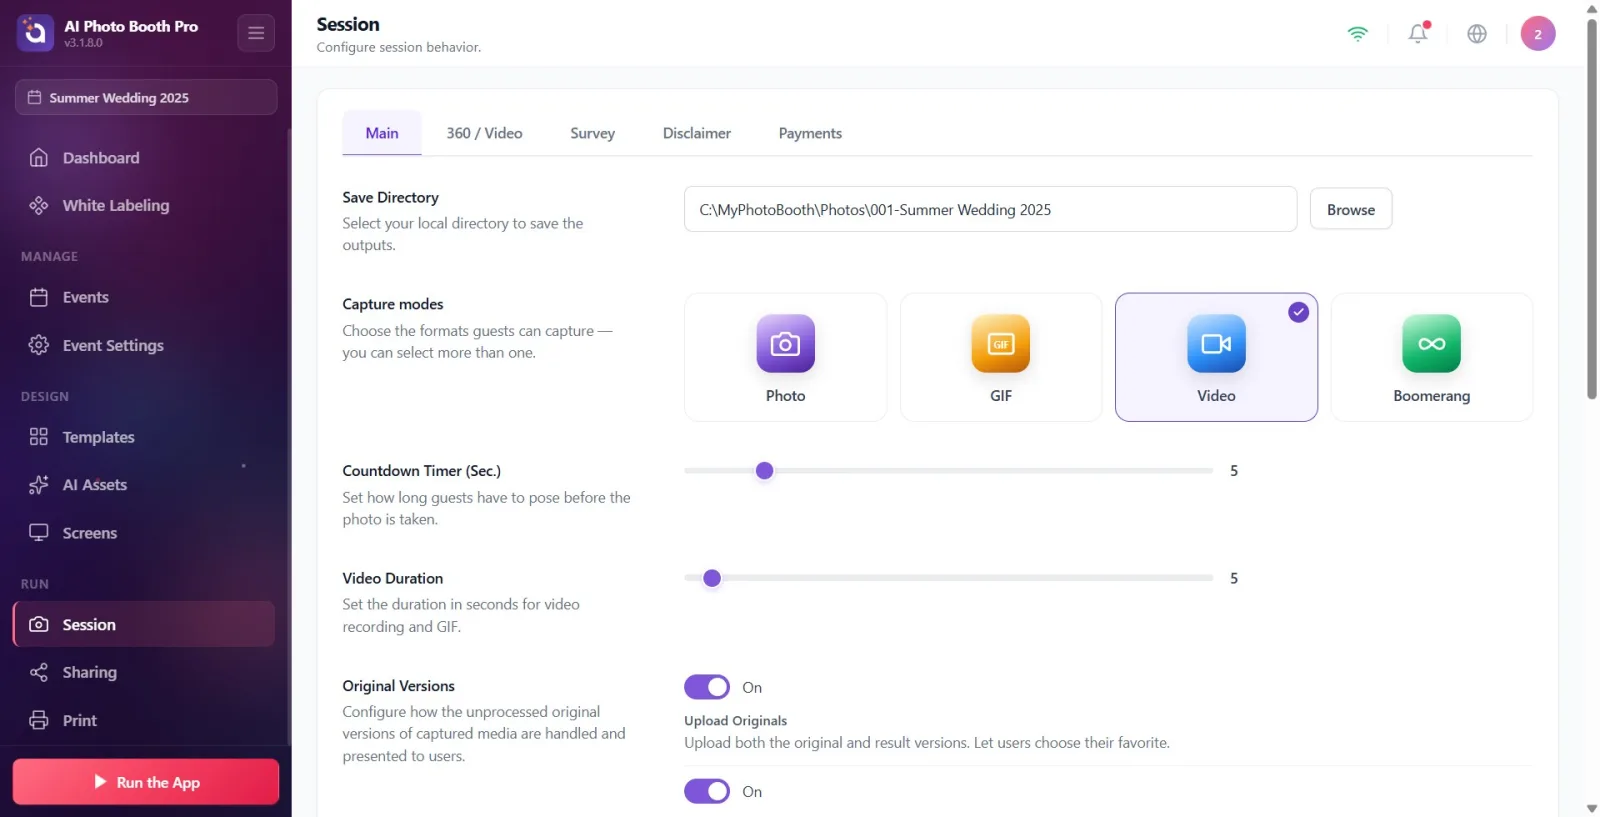
In the Capture modes section (description: 'Select formats that guests can capture — you can select more than one.') there are four cards: 'Photo', 'GIF', 'Video' and 'Boomerang'. By tapping on the cards, you can activate one or more of them at once; A check mark appears at the top right of the selected card. At least one format must always remain open — if you try to close the last open format, the At least one output format must be active. warning appears and will not be closed. These cards are common with the 'Event Mode' tab in Event Settings; Any changes you make in one will also appear in the other.
🔎 Items on the screen: Four multi-select cards: Photo (default on), GIF, Video, Boomerang
Step 6 · Set Countdown Timer (Sec.) time
Session → General
In the Countdown Timer (Sec.) section (description: 'Set the amount of time guests need to pose before the photo is taken.') drag the slider from 1 to 30 seconds. The number on the right represents the value you selected (default 5).
🔎 Items on the screen: Slider (1-30) + instantaneous value display
Step 7 · Set Video Duration
Session → General
In the Video Duration section (description: Set the duration in seconds for video recording and GIF.) drag the slider between 1 and 120 seconds (default 5). This value determines the length of both the video recording and the GIF.
🔎 Items on the screen: Slider (1-120) + instantaneous value indicator
Step 8 · Original Versions — load originals and allow printing
Session → General
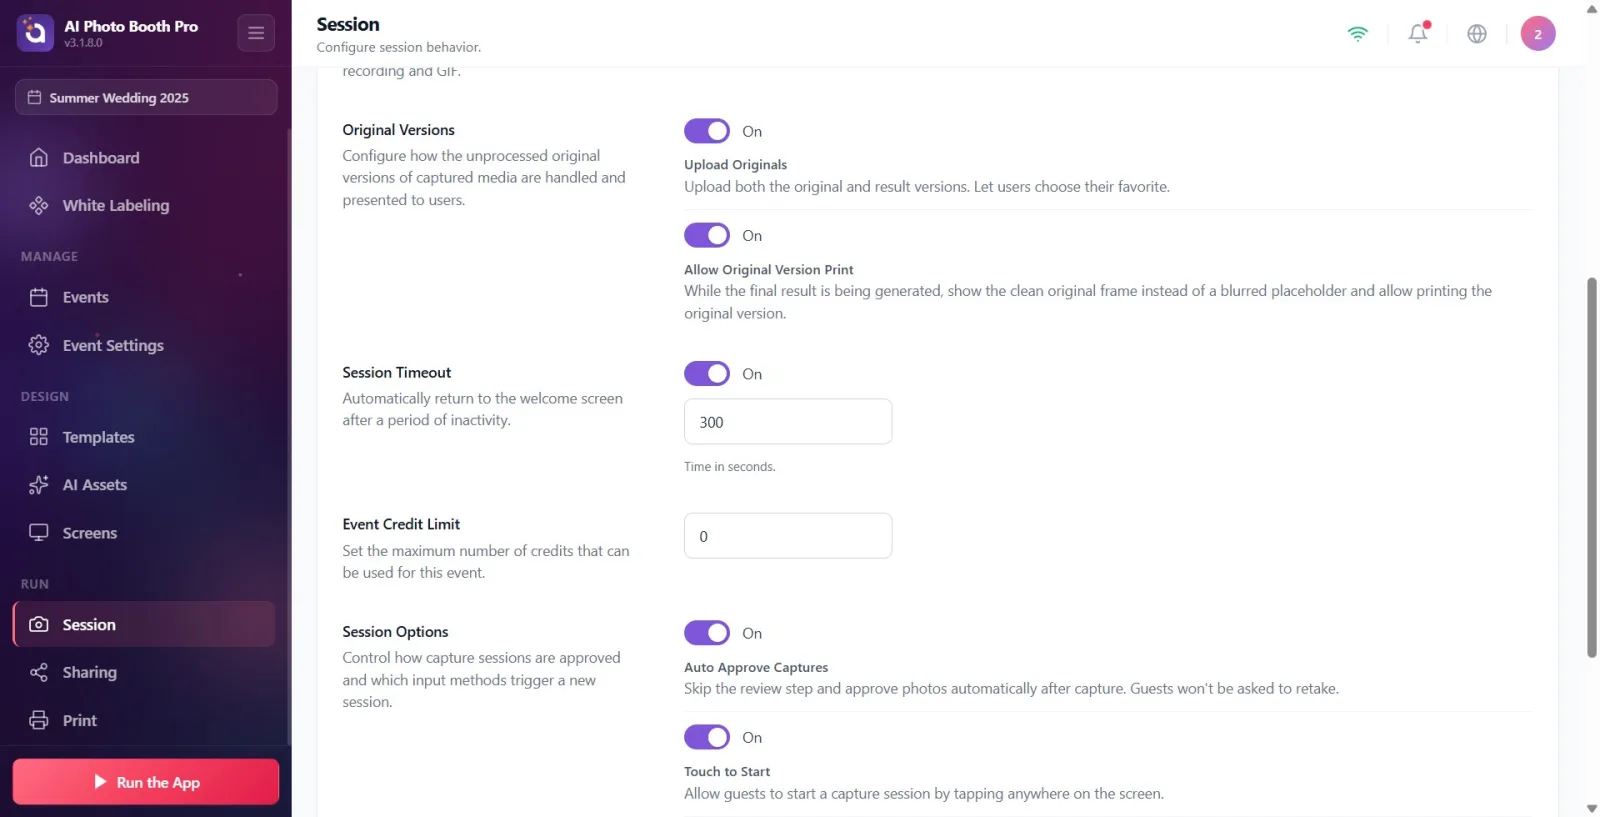
In the Original Versions section (description: 'Configure how the raw original versions of the footage are handled and presented to the user.') there is a 'Load Originals' switch (default on; 'Load the original and resulting versions. Let users choose the one they like the most.'). When this switch is on, a second switch appears below it: 'Allow Original Version Printing' (default on; 'Allows the output stages to be displayed properly rather than blurred while waiting for the result to be generated, and the original version can be printed.'). If you turn off 'Load Originals' the second key is hidden.
🔎 Items on the screen: Upload Originals key; Allow Original Version Print switch visible when open
Step 9 · Set Session Timeout
Session → General
In the Session Timeout section (description: 'Automatically return to the welcome screen after a certain period of inactivity.') the switch is on by default. When it's on, a number box appears below it entering seconds (default is 300) and the Time in seconds. tooltip appears. If the screen is not touched during the time you enter, the application automatically returns to the welcome screen.
🔎 Items on the screen: Session Timeout key; seconds count box when on (default 300) + Time in seconds. hint
Step 10 · Determine Event Credit Limit
Session → General
In the Event Credit Limit section (description: 'Set the maximum number of credits that can be used for this event.') enter the maximum amount of credits that can be spent on this event in the number box (default is 0). The value cannot be negative.
🔎 Items on the screen: Number box (min 0, default 0)
Step 11 · Session Options — set approval behavior (Auto Approve / Auto Approve)
Session → General
In the Session Options section (description: 'Set how shooting sessions are approved and which input methods start new sessions.') the first switch is 'Auto Approve Shots' (default off; 'Skip the evaluation step, automatically approve photos after shooting. Guests will not be prompted for retakes.'). When this is off, an 'Auto Approval' slider appears just below it (0-60 seconds, default 30; 'Automatically continue this many seconds after photo preview. Select Off to turn it off.'); If you set it to 0, the value will be Off. If you turn on Auto Approve Captures, the Auto Confirm slider will be hidden because the evaluation step is completely skipped.
🔎 Items on the screen: Auto Approve Captures switch (default Off); Auto Confirm slider visible when off (0-60 sec, default 30, 0=Off)
Step 12 · Session Options — select session launch triggers
Session → General
In the same Session Options section are three launch method switches: Touch to Start (default on; 'Allow guests to start a shooting session by tapping anywhere on the screen.'), 'F13 Key Trigger' (default off; 'Use the F13 key on your keyboard or a connected remote to trigger capture.'), and 'Space and S Key Trigger' (default off; 'Press Space or S to start a session. Useful for quick testing during event setup.'). Open one or more depending on your needs.
🔎 Items on the screen: Three switches: Touch to Start (On), F13 Key Trigger (Off), Space and S Key Trigger (Off)
Don't look for a separate Save button — any changes you make to the slider, switch, or card are instantly saved and applied to the currently selected event.
Leave H.264 if you are unsure about codec selection: Maximum compatibility with all devices. will provide and will open everywhere. HEVC (H.265) produces a smaller file with the same quality but only plays properly on modern devices.
HEVC (H.265) + Higher quality, larger size for best sharpness/size ratio; For fastest sharing, use the combination H.264 + Lower quality, smaller size.
Codec and Output Quality settings only affect video output — not still images.
'Capture mode' cards are common with the 'Event Mode' tab in Event Settings; When you change one, the other is also updated.
Your tab selection is remembered: the next time you open the Session page, the last tab you left off will appear.
Pulling the Auto Confirm slider to 0 makes it 'Off'; It is waited until the guest presses the 'Continue' button himself.
Not finding the HEVC option — The HEVC (H.265) card appears only if the device supports the HEVC codec. It's always listed on Windows, iOS, and macOS; On Android it is only listed if the device has a hardware HEVC encoder, otherwise only H.264 is shown.
Trying to play HEVC videos on older devices — as HEVC (H.265) says in the description, only modern devices support it; If the guest audience is mixed, H.264 is safer.
Make Output Quality to Higher quality, larger size and be surprised at the increase in file size/sharing time — ideal for archive/professional use, 'Low quality' is preferred for quick sharing.
Trying to close all capture formats — at least one format must remain open; otherwise At least one output format must be active. warning appears.
Looking for the Save Directory section on mobile — this section is only available on Windows; Not visible on iOS/Android.
Looking for the Auto Confirm slider when Auto Approve Captures is on — when auto-approval is on, that slider is hidden because the evaluation step is skipped.
Trying to save manually or not seeing the Session menu and thinking you can't adjust it — the menu item only appears when an event is selected; First choose the right activity.
Related topics
Session → 360 / Video Payments Print Settings
