
Before this: What is White-Label and How is it Used?
White-Label — Microsite How to Brand?
This flow describes the branding of the web microsite (Microsite tab), where guests scan the QR and access the photo gallery: ready-made themes or individual colors, Title/Copyright Text/Company Info texts, custom logo and extra background (image/video). All changes appear immediately in the top Screen Preview; settings are kept at the account level (applied to all your events' microsites) and White Labeling is only on in the 'Ultimate' plan.
- The active subscription must be the 'Ultimate' (Ultimate AI) plan — otherwise the Ultimate plan only lock banner will appear instead of the Microsite tab.
- The account must be logged in (branding data is saved in the account/WhiteLabel, not in ISettingsService).
- An event must be selected to open the real site with Preview Micro Site and have the empty Title fall into the event name.
- The logo (image) and/or extra background (image or video, max. 50 MB) files to be uploaded must be ready on the device.
step by step
Step 1 · Open the Microsite tab on the White Labeling page
Settings → White Labeling → Microsite
Open the White Labeling page from the left menu. Click on the Microsite tab from the top three tabs (Domain, App, Microsite). This tab contains the branding of the web microsite where guests scan the QR and access the gallery. Note: White Labeling is only available on the 'Ultimate' plan; If your plan is not suitable, the Ultimate plan only lock banner and the Ultimate AIa Upgrade button will appear instead of the tab content.
🔎 Items on the screen: Tab bar: Domain / App / Microsite. Ultimate plan only banner + Ultimate AIa Upgrade button in case of plan lock.
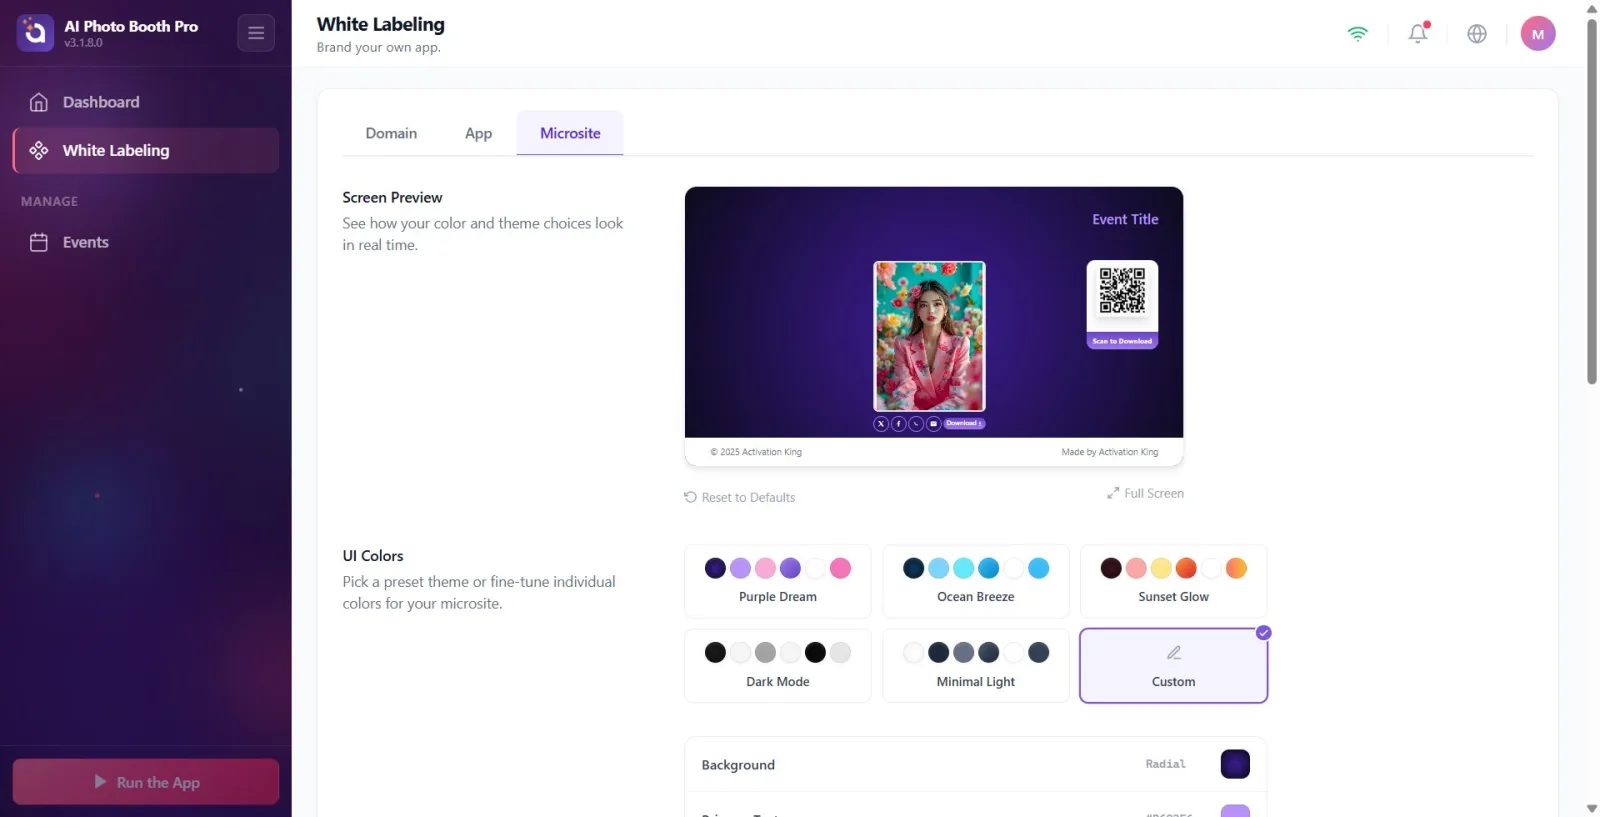
Step 2 · Recognize live preview with Screen Preview
White Labeling → Micro Site (top page)
At the top of the page there is a live mockup titled Screen Preview (See how your color and theme choices look in real time.). Any color/text/logo changes you make appear instantly here: logo + title at the top, sample photo and download/social buttons in the middle, QR box on the right, copyright and company line at the bottom. This is an in-app emulation — it doesn't open the real site (use Preview Micro Site from step 10 to open the real site).
🔎 Elements on the screen: Screen Preview card (logo, title, sample photo, action/social buttons, QR, footer). Reset to Defaults link and Full Screen button at the top right of the card.
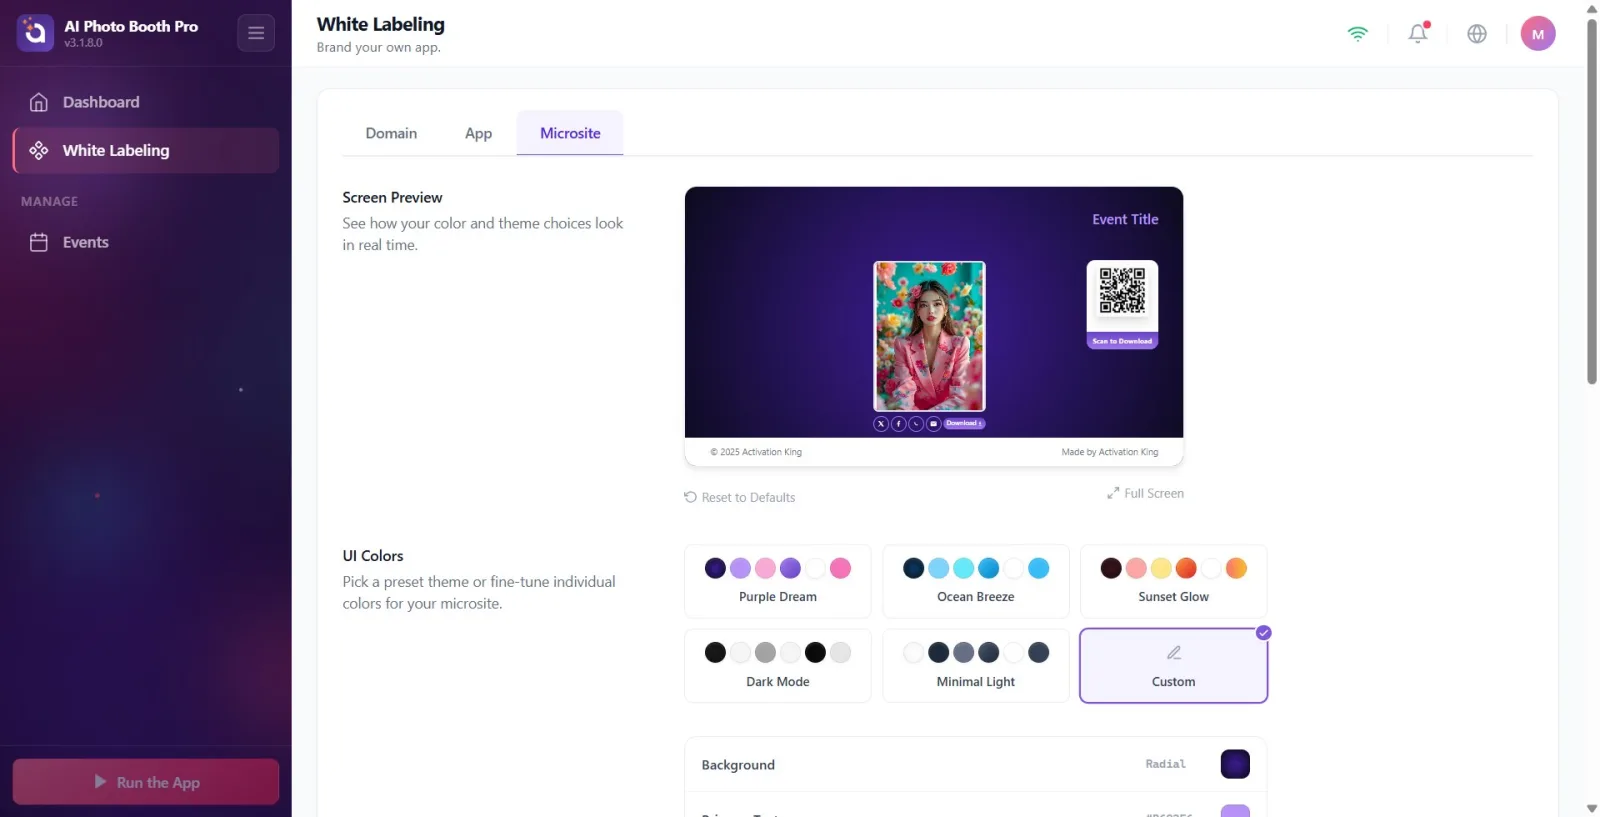
Step 3 · UI Colors — choose a ready-made theme
White Labeling → Microsite → UI Colors
In the UI Colors section ('Choose a theme for your microsite or adjust colors individually.') click on one of the ready-made theme cards: 'Purple Dream', 'Ocean Breeze', 'Sunset', 'Dark ModeorMinimal On'. The theme you choose sets all colors (background, text, button, QR) in one click and is instantly reflected in the preview. If you start changing colors manually, the selection automatically changes to Custom.
🔎 Items on screen: Theme cards: Purple Dream, Ocean Breeze, Sunset Glow, Dark Mode, Minimal Light, Custom.
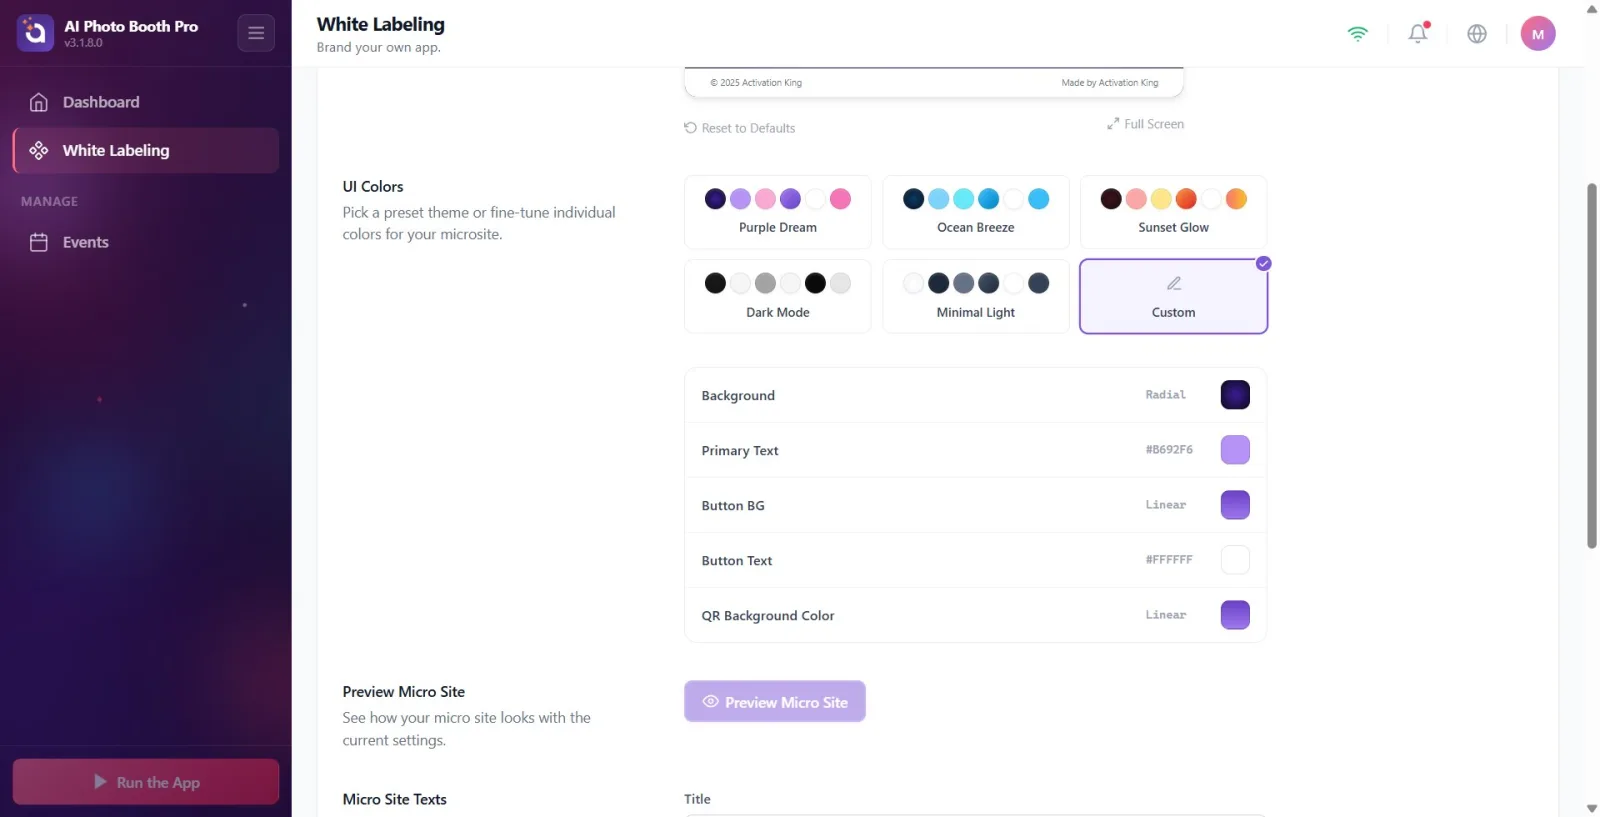
Step 4 · Adjust colors one by one (color rows + color picker)
White Labeling → Microsite → UI Colors
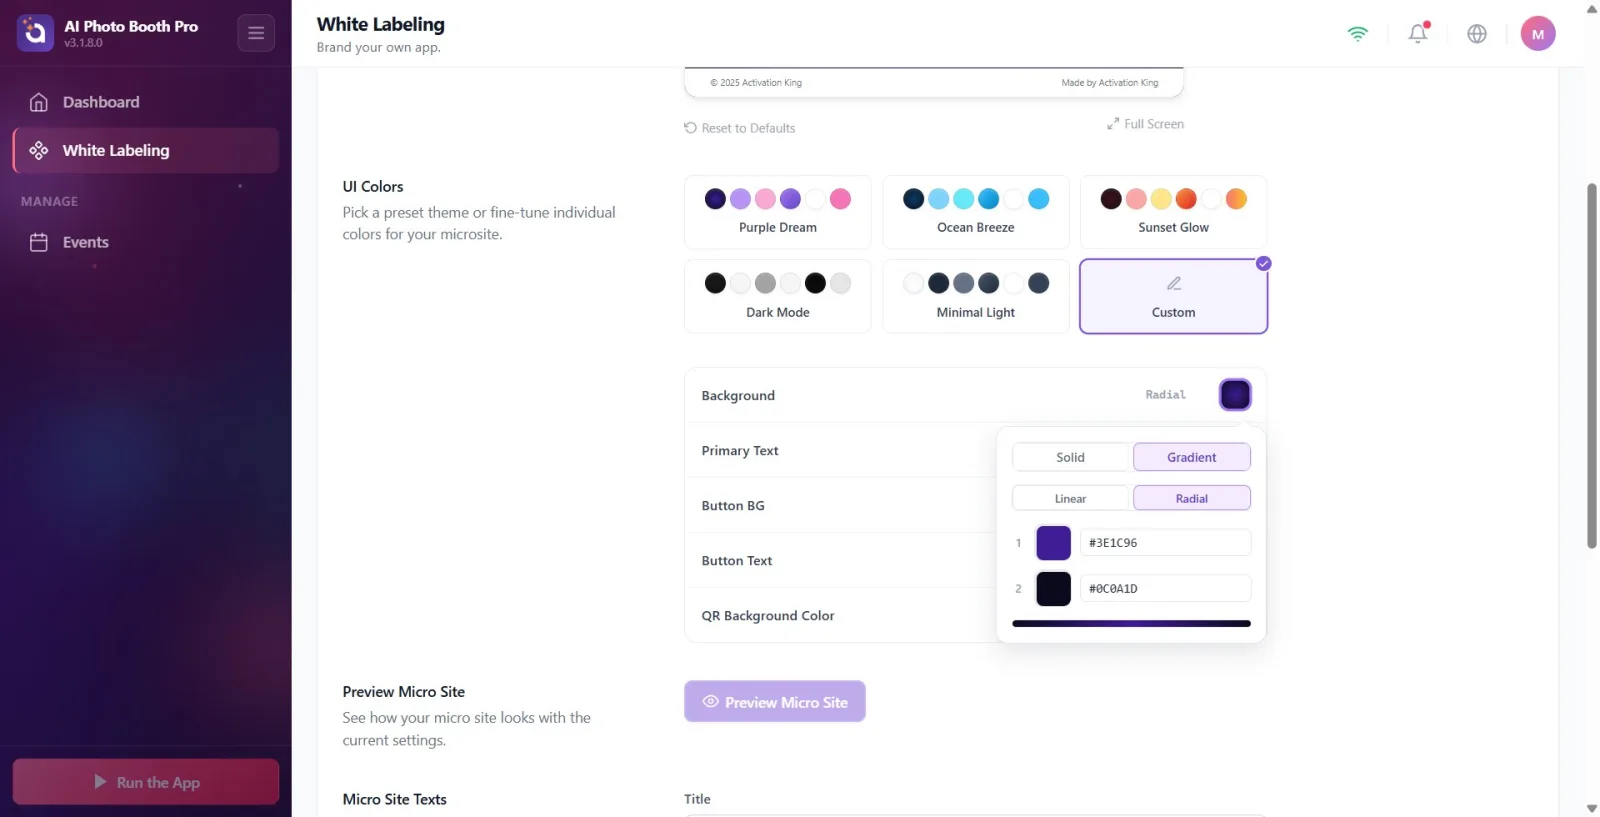
Click on the color box (swatch) to the right of the color rows under the theme that you want to edit. In the color picker that opens, there is a selection of Solid / Gradient at the top; Gradient also shows the Linear / Radial type, '1' and '2' color stops, and Linear gives the Angle menu. 5 editable lines: Background, Main Text, Button BG, Button Text, QR Background Color. Changes are applied with a ~0.5 sec delay (debounce).
🔎 Elements on the screen: Color rows (label + hex value + clickable color box); drop-down color picker (ColorSettingPicker): Solid/Gradient, Linear/Radial, '1'/'2' color stops, Angle menu.
Step 5 · Enter Micro Site Texts — Title
White Labeling → Microsite → Micro Site Texts
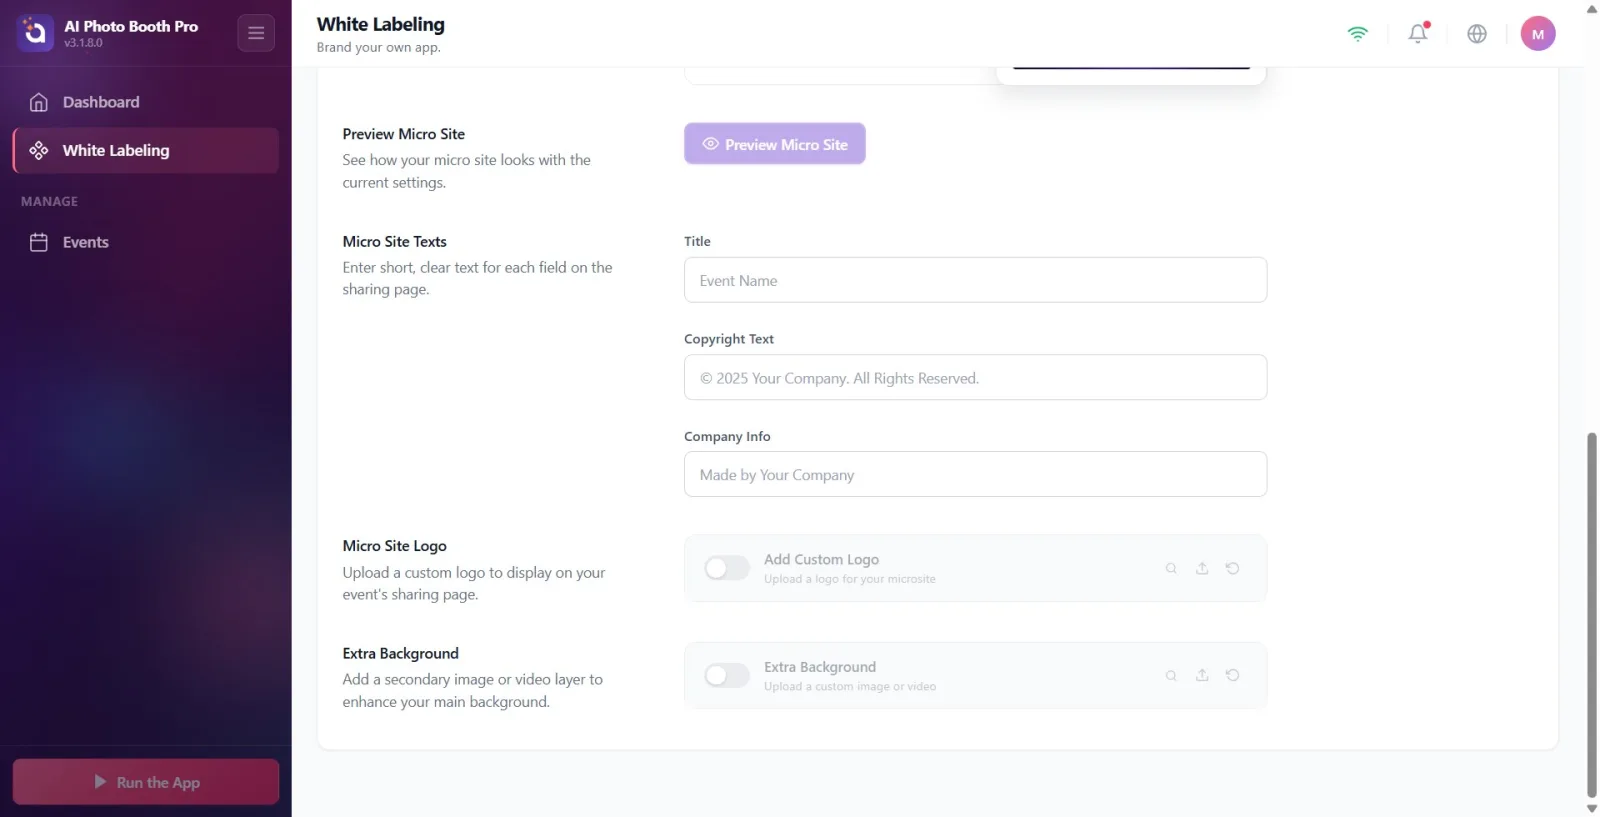
In the Micro Site Texts section (Enter short, clear text for each field on the sharing page.), write the title that will appear at the top of the microsite (header) in the Title box. If you leave it blank, the microsite will automatically show the name of the selected event — and the placeholder of the box is the current event name ('Event Name' if there is no event). As you type, it is automatically saved after ~0.5 seconds.
🔎 Elements on the screen: Title text box (placeholder = current event name).
Step 6 · Enter Copyright Text
White Labeling → Microsite → Micro Site Texts
In the Copyright Text box, type the copyright text that will appear in the footer of the microsite. Placeholder example: © 2025 Your Company. All Rights Reserved.. If left blank, a default text will appear on the site. This field is also automatically saved ~0.5 seconds after typing.
🔎 Elements on the screen: Copyright Text text box (placeholder: © 2025 Your Company. All Rights Reserved.).
Step 7 · Enter Company Info
White Labeling → Microsite → Micro Site Texts
In the Company Info box, type the company/brand line that will appear in the footer of the microsite. Placeholder: Made by Your Company. This line along with 'Copyright Text' is shown in the footer in the preview.
🔎 Elements on the screen: Company Info text box (placeholder: Made by Your Company).
Step 8 · Load Micro Site Logo
White Labeling → Microsite → Micro Site Logo
In the Micro Site Logo section ('Upload a custom logo to display on your event's share page.') click the upload button in the row; Select an image from the native file selector that opens. You can turn the logo on and off with the toggle on the left, reset it to default with the circular arrow button, and preview it with the magnifying glass button. The uploaded logo appears in the top corner in the preview. Max. file size is 50 MB, only images are accepted.
🔎 Items on the screen: Micro Site Logo / Add Custom Logo line; on/off switch + preview (magnifying glass), upload and reset (circular arrow) buttons. Button tooltips Upload / Preview / Reset appear in English.
Step 9 · Add Extra Background (image or video)
White Labeling → Microsite → Extra Background
In the Extra Background section ('Add a secondary image or video layer to enhance your main background.') select an image OR video via the upload button ('Upload a custom image or video'). The file type is automatically detected from the extension. On/off with switch, reset to default with circular arrow. Max. 50 MB.
🔎 Items on the screen: Extra Background line; on/off switch + load/preview/reset buttons; It accepts both images and videos.
Step 10 · Open real site in browser with Preview Micro Site
White Labeling → Microsite → Preview Micro Site
Click the Preview Micro Site button (See how your micro site looks with the current settings.). This opens the sample session of the selected activity at the actual microsite address (activationshare.com) in the system browser. First, an event must be selected; If not, the button will appear dim/translucent and Please select an event first to preview your micro site. warning will appear when clicked.
🔎 Elements on the screen: Preview Micro Site button (eye icon); If there is no activity, it appears translucent/passive, but when clicked, it gives a toast warning.
Step 11 · Preview Full Screen and Reset to Defaults
White Labeling → Microsite (Screen Preview)
View the mockup larger with the Full Screen button at the top right of the preview card (click on the X in the corner or outside to close). Click the Reset to Defaults link to start over — ATTENTION: this single action will revert the colors to the Purple Dream theme, clear all three text (Title, Copyright Text, Company Info), and turn off both the logo and extra background keys.
🔎 On-screen elements: Full Screen button + full screen close (X); Reset to Defaults connection.
Quickest start: first choose a ready-made theme (Purple Dream, Ocean Breeze, Sunset Glow, Dark Mode, Minimal Light), then fine-tune from individual color lines.
If you leave the Title box blank, the microsite will automatically display the name of the selected event — so the same branding can be used across multiple events.
Only two color stops ('1' and '2') are edited in the color picker; Angle appears only in Linear gradient, not Radial.
QR Background Color automatically changes to the same color as the button background when you select a theme; You can edit it separately later if you want.
Only 5 color lines are shown; The colors Secondary Text and Countdown are deliberately hidden because they are not used on the microsite.
Color and text changes are not recorded instantly, but with a ~0.5 second debounce — if they don't appear immediately, wait a moment.
This branding is at the account level: changes apply to all your events' microsites, not just the current event.
The top Screen Preview reflects changes immediately; Use Full Screen to see larger.
Confusing Screen Preview (in-app emulation) with Preview Micro Site (opens real site in browser) — they are two different things.
Pressing Preview Micro Site without selecting an activity: the button appears dimmed and Please select an event first to preview your micro site. warning appears, nothing opens.
Searching for an image/background image in a color row: color rows are just solid color or gradient; Micro Site Logo or Extra Background section is used for the image.
Thinking that the file is deleted when you turn off the logo/background switch (toggle) - turning it off only hides it, the file stops; It comes back when you open it again.
Underestimating _UI_VAL_0: one click reverts colors to Purple Dream, clears three texts and turns off logo + extra background keys.
Thinking of branding as event-specific: settings are stored at the account level and reflected on all microsites.
Attempting to upload logo/background file exceeding 50 MB — file will be rejected/error if size limit is exceeded.
Related topics
Domain App ActivationShare
