













AI Drawing Robot turns a guest's photo into a pen drawing. The guest takes a photo, optionally picks an AI effect, the app turns the photo into line art, and a Dobot robot arm draws it on paper. This article walks you through the first setup on a Windows PC: signing in, creating the event, connecting and calibrating the robot, opening the guest screen, and getting back to the settings.
- Sign in and create an event on the Events page.
- Add a camera in Event Settings → Camera.
- Plug the robot in by USB and open Drawing Robot; the robot appears as a card.
- Choose the Paper size, calibrate the pen height with Read Z from robot, place the paper and press Ready.
- Set a 4-character Dashboard PIN in Event Settings → Kiosk.
- Press Run the App and choose Start the Drawing Robot.
- To get back to the settings, tap the lock icon (or press F11 or F12) and enter the PIN.
Step by step
Step 1 · Sign in
Sign-in screen
Press Sign in with Activation King, sign in on the page that opens, and you come back to the app. After you sign in, the Dashboard opens.
The Dashboard shows your plan and your AI credits. Every drawing uses AI credits, because every photo is turned into line art by AI; add more with Add Credits before a busy event. On a trial plan the robot also draws the word TRIAL across every drawing until you move to a paid plan.
Step 2 · Create the event
Events → Create New Event
Paper size, drawing options, screens and PIN are saved on an event, so you need an event first. Open Events in the sidebar and press Create New Event. Type an Event Name (required) and, if you like, a Description. Press Create Event to finish. The new event becomes the current one and is marked Current.
To switch events, press Reuse on a row in Event Archive.
A new event starts with 4×6 portrait paper, the AI effect step on, and a short survey that asks the guest's name before the photo.
Step 3 · Find your way in the sidebar
Sidebar
Dashboard and Drawing Robot sit at the top; the other pages are grouped under Manage, Design, Run and System. Pages that belong to an event open only after you choose one.
| Page | What you set there |
|---|---|
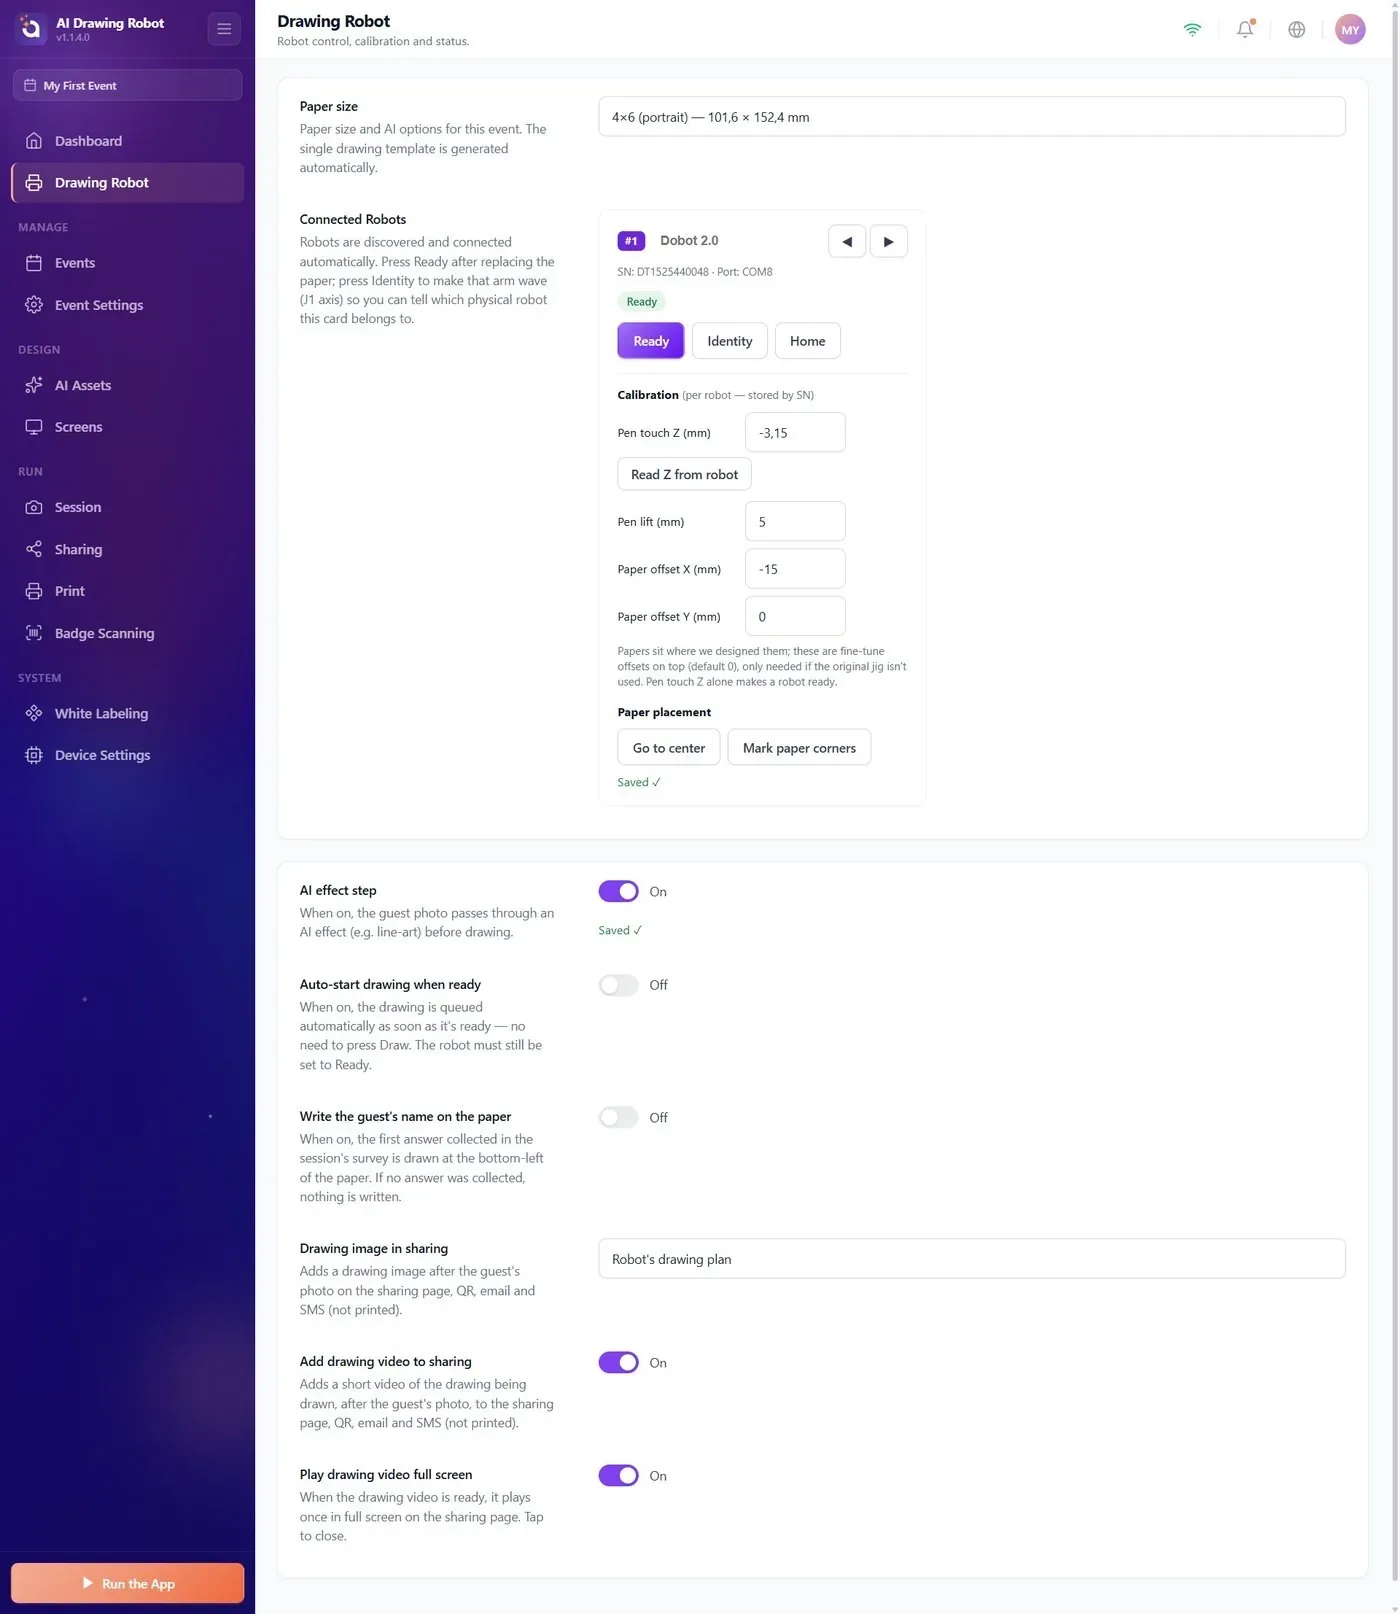
| Drawing Robot | Paper size, drawing options, and one card per connected robot with its calibration and buttons. |
| Events | Create, copy, import and switch events. |
| Event Settings | Event name, camera, Dashboard PIN and kiosk options. |
| Screens | The design and texts of the guest screens, the pause screen and the lock icon. |
| AI Assets | The AI effects guests can choose from. |
| Session | Countdown, survey, disclaimer and payments. |
| Sharing | The QR code and the guest download page. |
| An ordinary photo printer for the guest's photo. It has nothing to do with the robot. | |
| White Labeling | Your own logo, app name and web address, for the whole account. |
| Device Settings | Settings that belong to this device only. |
There is no Templates page in this product. The app builds the single drawing layout by itself from Paper size and AI effect step.
Step 4 · Add a camera
Event Settings → Camera → Add Camera
Press Add Camera and choose the webcam or DSLR connected to this PC. The camera choice is kept on this device, so set it on each kiosk. Without a camera the guest screen does not start.
Step 5 · Connect the robot
Drawing Robot → Connected Robots
Place the robot on a flat, steady table, switch it on and plug its USB cable into the PC. You do not choose a port: the app looks for robots every 3 seconds and shows each one as a card under Connected Robots. A robot you have never calibrated shows Not configured — pen/paper calibration missing. Details, supported models and what to do when no card appears: How Do I Connect the Robot? article.
Step 6 · Choose the paper and calibrate
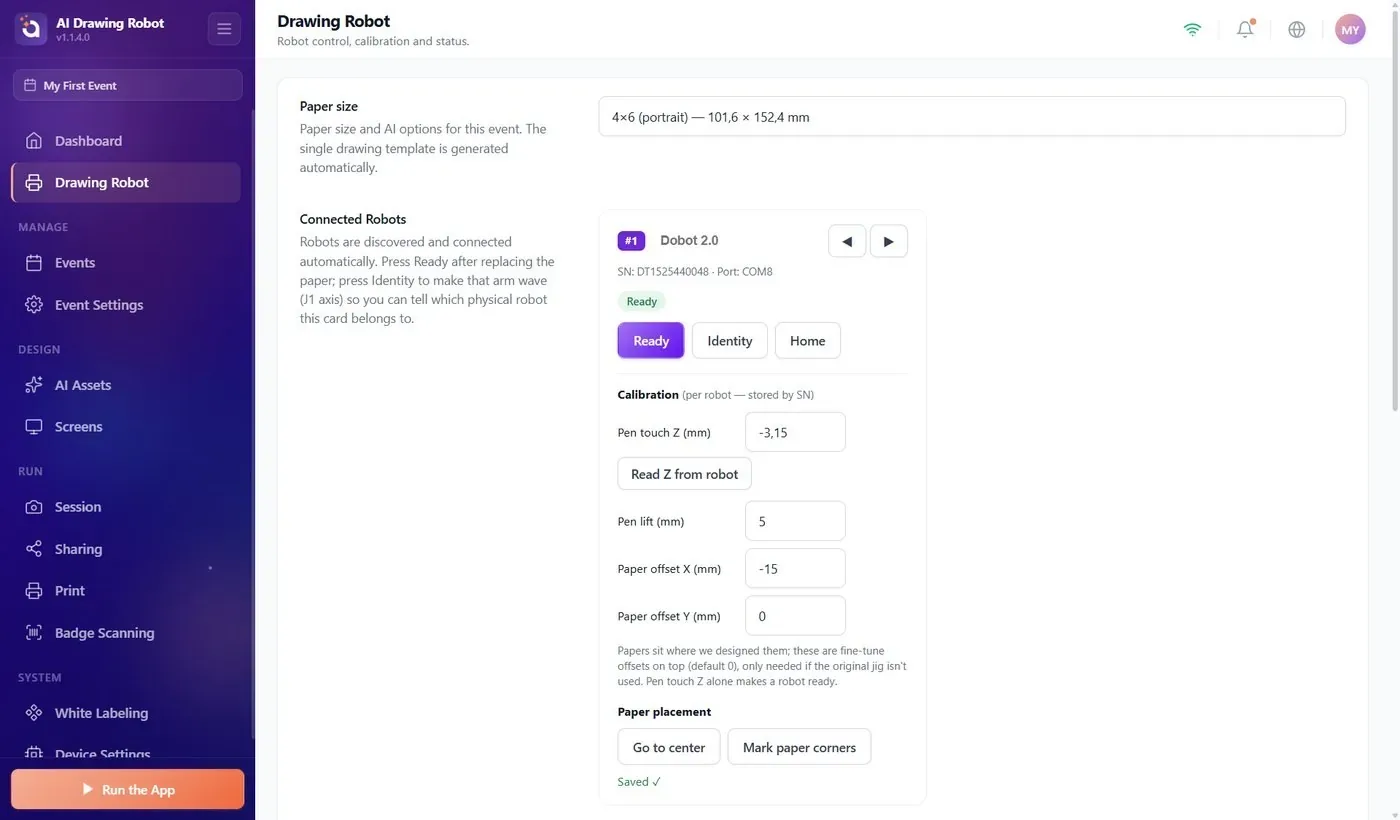
Drawing Robot → Paper size · robot card → Calibration
Calibration tells the robot how high the paper is and where it lies. The short version:
- Choose the Paper size at the top of the page. Changes on this page are saved at once; you see Saved ✓.
- Put a pen in the holder and press Home on the robot card.
- Hold the unlock key on the arm, move the pen tip down until it lightly touches the paper, and release the key.
- Press Read Z from robot. The height is written into Pen touch Z (mm) and saved.
- Press Go to center. The pen stops 5 mm above the centre of the paper area; slide the paper so its centre is under the pen tip.
- Press Ready. The card now shows Ready.
If the robot refuses Go to center, the paper does not fit at this height: raise or lower the paper, or choose a smaller size, and read the height again. Details: How Do I Calibrate the Robot? and Which Paper Sizes Can I Use and How Do I Place the Paper? articles.
The calibration is saved for the robot on this PC, not on the event.
Step 7 · Set a PIN
Event Settings → Kiosk → Dashboard PIN
Type a PIN of exactly 4 characters into Dashboard PIN. Without a PIN, anyone who taps the lock icon on the guest screen goes straight into the settings. The PIN is saved on the event.
Step 8 · Open the guest screen
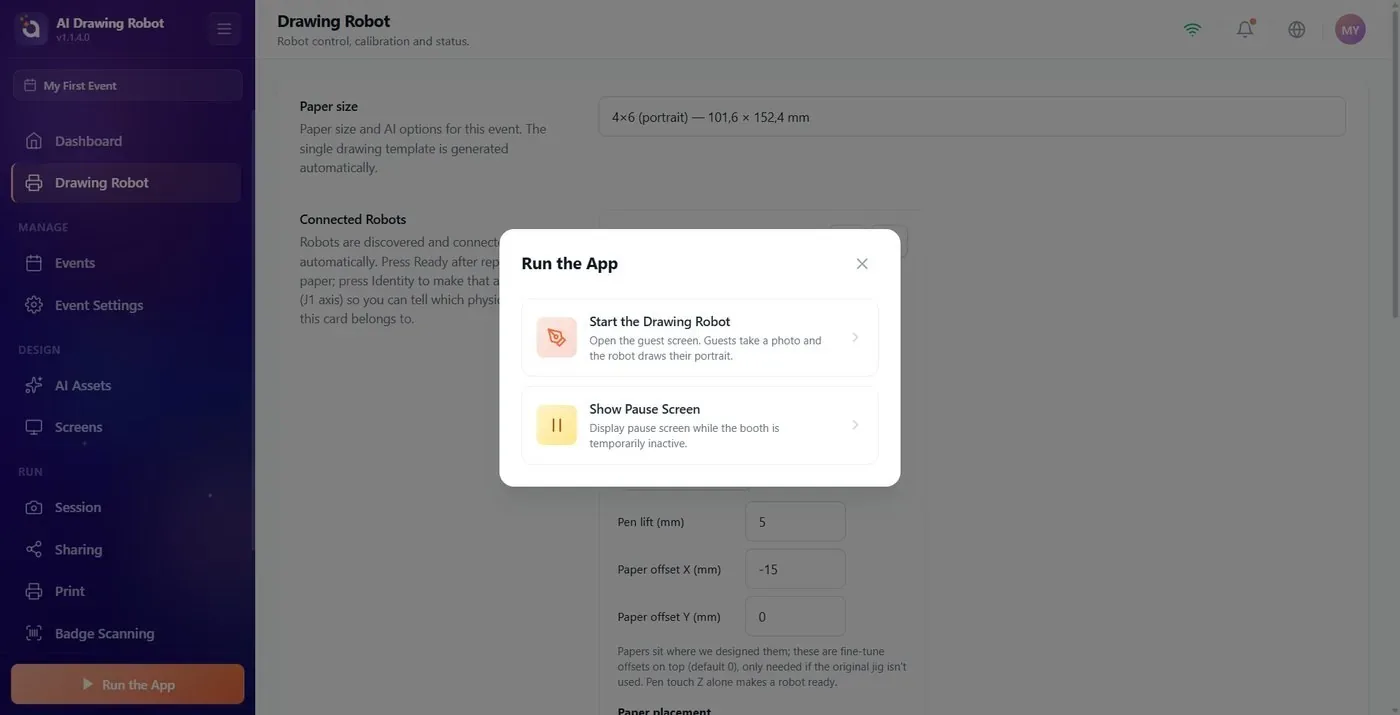
Run the App
Press Run the App. Without an event you see Select an event first to run the app. The window offers two choices:
- Start the Drawing Robot: opens the guest screen full screen, starting at the welcome screen. If no camera is selected, you see Select a camera before starting the app. Guests cannot be photographed without one.
- Show Pause Screen: covers the screen during a break; guests cannot tap anything. Design it in Screens → Pause.
The guest screen starts even when no robot is connected or ready, so check the robot card before you open it. After every drawing the robot waits in Awaiting paper until you put in a new sheet and press Ready, on the card or in the Robots strip on the guest screen. Details: How Do I Use the Robots Panel During an Event? and What Do Guests See, from Photo to Drawing? articles.
Step 9 · Get back to the settings
Guest screen → lock icon
Tap the lock icon on the guest screen and, if you set a PIN, enter it in the Operator Access window; a wrong PIN shows Incorrect PIN. Try again. With a keyboard, F11 or F12 does the same. The settings open and an open guest session is ended; a drawing the robot has already started carries on.
You change the icon's place and visibility in Screens → Main → Dashboard Icon. If you make it fully transparent, its spot still works: tap it 5 times within 3 seconds.
Opening the guest screen before the robot shows Ready: guests can take photos, but no drawing starts until you press Ready.
Going live without a PIN: a guest who taps the lock icon gets into the settings.
Starting an event with few AI credits: every drawing uses credits, also when the AI effect step is off.
Moving the robot or the table after calibration: the pen height and paper position no longer match. Read the height again and check with Go to center.
Related topics
How Do I Connect the Robot? How Do I Calibrate the Robot? Which Paper Sizes Can I Use and How Do I Place the Paper? How Do I Set Up the Drawing Options? What Do Guests See, from Photo to Drawing? How Do I Use the Robots Panel During an Event? How Do I Fix Common Robot and Drawing Problems?
