













Before a robot can draw, it has to know the height at which the pen touches the paper. You teach it by hand, then check that the paper lies in the right place. This article walks through the calibration on the Drawing Robot page and gives the height range that works for each paper size. The values were measured on a Dobot Magician Lite.
- Choose the Paper size and press Home on the robot's card.
- Hold the unlock key on the arm, touch the pen tip lightly to the paper and release the key.
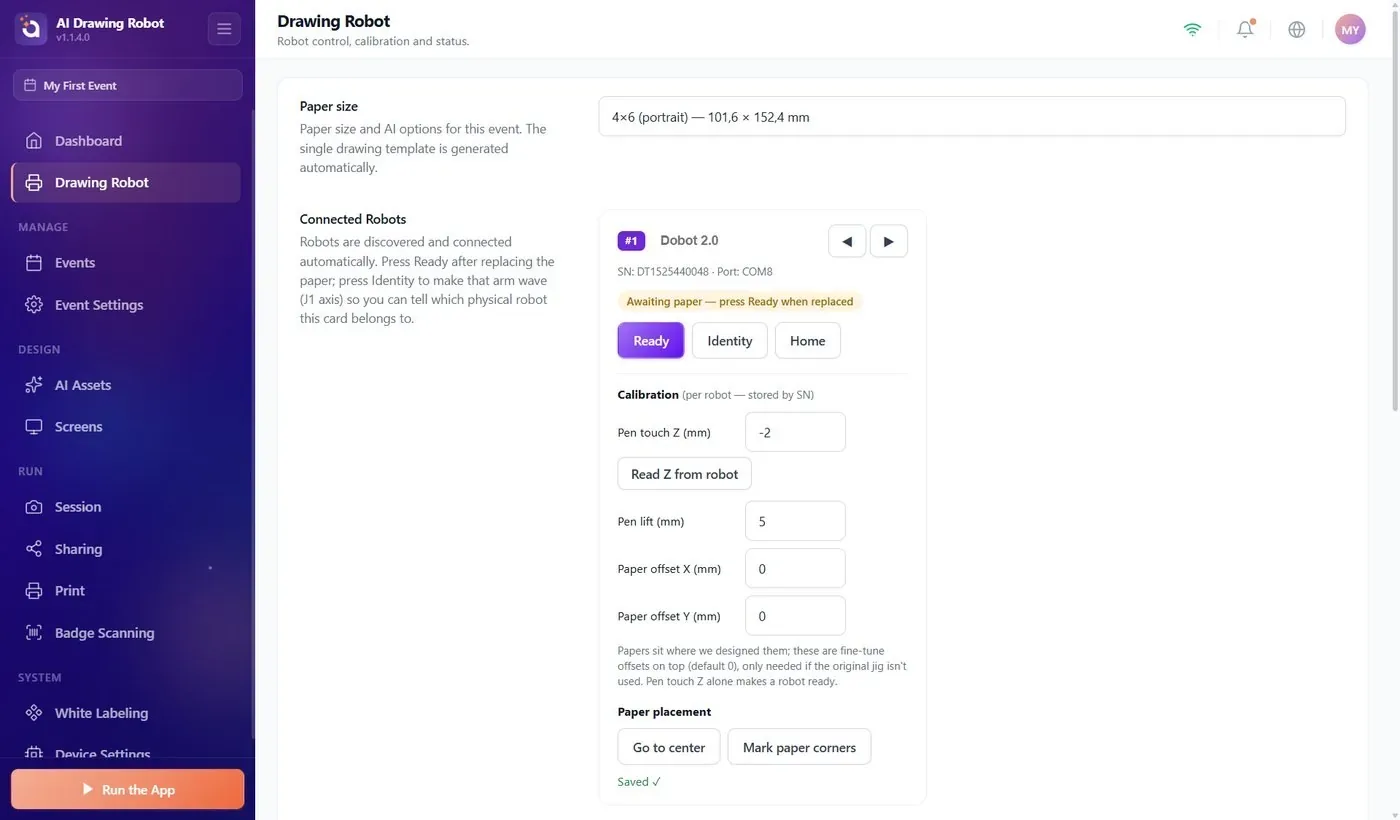
- Press Read Z from robot. Pen touch Z (mm) is filled in and saved.
- Check the value against the table below. If it is outside the range, raise or lower the paper and read Z again.
- Press Go to center and put the centre of the paper under the pen.
- Press Ready. Press it again after every paper change.
Before you start
Drawing Robot
Drawing Robot is the second item in the sidebar, right under Dashboard. Paper size is at the top; under Connected Robots there is one card for each robot that is plugged in. If no card appears, see the How Do I Connect the Robot? article.
Each card has a Calibration section marked (per robot — stored by SN). Calibration belongs to the robot, not to the event: it stays when you switch events. A robot that has never been calibrated shows Not configured — pen/paper calibration missing and takes no drawings.
There is no save button. Every field is saved the moment you change it, and Saved ✓ appears.
Have these ready: the pen fixed in its holder, the paper on a flat, firm surface in front of the robot, and an event selected, because Paper size is saved on the event.
Calibrate step by step
Step 1 · Choose the paper and send the arm home
Drawing Robot → Paper size
Pick the paper you will use in Paper size. Then press Home on the robot's card and wait until the arm stops at its home position.
Step 2 · Touch the pen to the paper
Hold the unlock key on the arm. While you hold it, the arm moves freely in your hand. Lower the pen until the tip just touches the paper, then release the key. The arm stays where you left it.
Touch lightly. If you press the pen into the paper, the robot learns a height that is too low, and the lines come out heavy.
Step 3 · Read the height
Drawing Robot → Connected Robots → Calibration
Press Read Z from robot. The app reads the arm's current height, writes it into Pen touch Z (mm) and saves it. The card's status changes from Not configured — pen/paper calibration missing to Awaiting paper — press Ready when replaced.
You can also type a value yourself to fine-tune the pressure: a higher number lifts the pen, a lower number pushes it down.
Step 4 · Check the value against the table
The arm's reach changes with height. For each paper size, Pen touch Z (mm) has to be inside a range, otherwise part of the paper is out of reach and the robot refuses to draw. These ranges are for a Magician Lite with the paper at its default position (both Paper offset fields at 0).
| Paper size | Pen touch Z that works | Note |
|---|---|---|
| 4×6 (portrait) | −8 to +2 | Ideal is about −2. |
| 6×4 (landscape) | −22 and above | |
| A6 (portrait) | −9 and above | |
| A6 (landscape) | −21 and above | |
| A5 (landscape) | −4 to +1 | Only with Paper offset X (mm) at about −11, the paper moved 11 mm towards the robot. |
| A5 (portrait) | none | Does not fit a Magician Lite. |
What to do when your value is outside the range:
- Below the range (for example −12 on 4×6 (portrait)): the paper is too low. Raise it, for instance with a board or a pad of paper under it.
- Above the range (4×6 (portrait) above +2, A5 (landscape) above +1): the paper is too high. Lower it.
After you change the height, touch the pen to the paper and press Read Z from robot again. Do not type a value from the table just to get inside the range; the number has to match the real paper height.
Step 5 · Set the pen lift
Pen lift (mm) is how high the pen rises between two lines. The default is 5 mm. If the pen leaves thin trails between lines because the paper is not flat, raise it a little.
Step 6 · Put the paper in the right place
Drawing Robot → Connected Robots → Paper placement
Press Go to center. The pen moves over the centre of the paper and stops in the air, 5 mm above it. Slide the paper so that its centre is exactly under the pen tip, with its edges straight to the robot.
This move is also the real test of your calibration. If the paper does not fit the robot's reach at this height, the robot refuses the move and the card shows Faulted — fix the issue, then press Ready. Being able to pull the arm to a corner by hand does not prove the robot can draw there; Go to center does. If it is refused, go back to Step 4.
For a faster paper change during the event, use Mark paper corners:
- Take the paper away and leave a larger base sheet on the table.
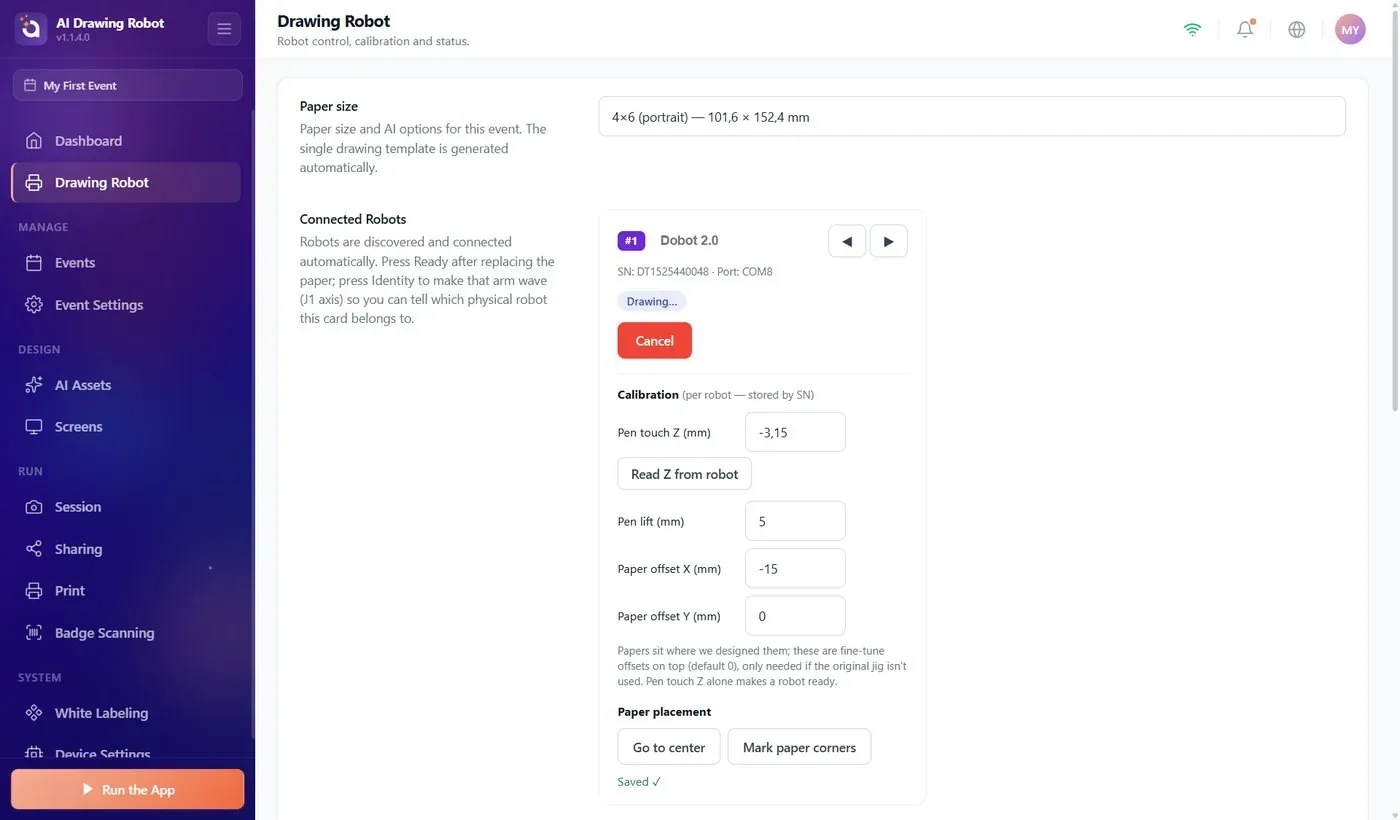
- Press Mark paper corners. The robot draws a short L at each of the four outer corners of the selected paper size.
- Seat each new sheet inside the four L marks.
While the arm moves, the card shows Drawing… and a red Cancel button. Both buttons stay greyed out, with the note Pen touch Z must be set first., until the robot has a Pen touch Z (mm).
Step 7 · Press Ready
With the paper in place, press Ready. The status turns to Ready and the robot takes the next drawing.
A robot never becomes ready by itself. After every drawing it goes back to Awaiting paper — press Ready when replaced, because the app cannot see the paper. Put in a new sheet and press Ready again, here or in the Robots panel on the guest screen. Details: How Do I Use the Robots Panel During an Event? article.
When to calibrate again
- You changed the pen, or pushed it deeper into or pulled it out of its holder.
- You moved the robot to another table, or changed what lies under the paper.
- You switched to a paper size with a different range in the table, or to much thicker paper.
- Lines are faint or missing (pen too high), or heavy (pen too low).
With two robots, calibrate each one on its own card. Identity makes the card's arm swing twice, so you can tell them apart.
Pressing the pen down hard before Read Z from robot: the robot learns a height that is too low, and the lines come out heavy.
Typing a value from the table instead of reading it: the pen draws in the air or digs into the paper.
Running Mark paper corners with the paper still in place: the L marks land on the corners of your sheet. Remove the paper and use a base sheet.
Forgetting Ready after a paper change: the next guest's drawing waits and nothing happens until you press it.
Skipping Go to center after changing the paper size: you find out that the paper does not fit only when a guest's drawing is refused.
