













This article lists the problems operators meet most often with the robot, the paper, the pen and the drawing, with the cause of each and what to do.
- Look at the robot's status first, on its card in Drawing Robot settings or in the Robots panel on the guest screen. Only a robot that shows Ready draws.
- Press Ready after every paper change. This is the most common reason a drawing does not start.
- Most paper and pen problems are solved with Pen touch Z (mm): read it again with Read Z from robot whenever the paper height changes.
- Go to center is the real test that the paper fits.
- For the AI effect step, use effects from Browse Library or effects you created yourself.
The robot
Drawing Robot → Connected Robots
| What you see | Cause | What to do |
|---|---|---|
| No robots connected yet. Plug a robot in via USB — it will appear here automatically. | The robot is off, the cable is loose, or the model is not supported. | Switch the robot on and plug the USB cable straight into the computer; the card appears within a few seconds. Details: How Do I Connect the Robot? article. |
| Not configured — pen/paper calibration missing | No Pen touch Z (mm) is saved for this robot. | Touch the pen to the paper and press Read Z from robot. Details: How Do I Calibrate the Robot? article. |
| Faulted — fix the issue, then press Ready | The last drawing or movement failed. The reason is written under the status on the card. | Fix the cause, press Home, then Ready. |
The paper does not fit
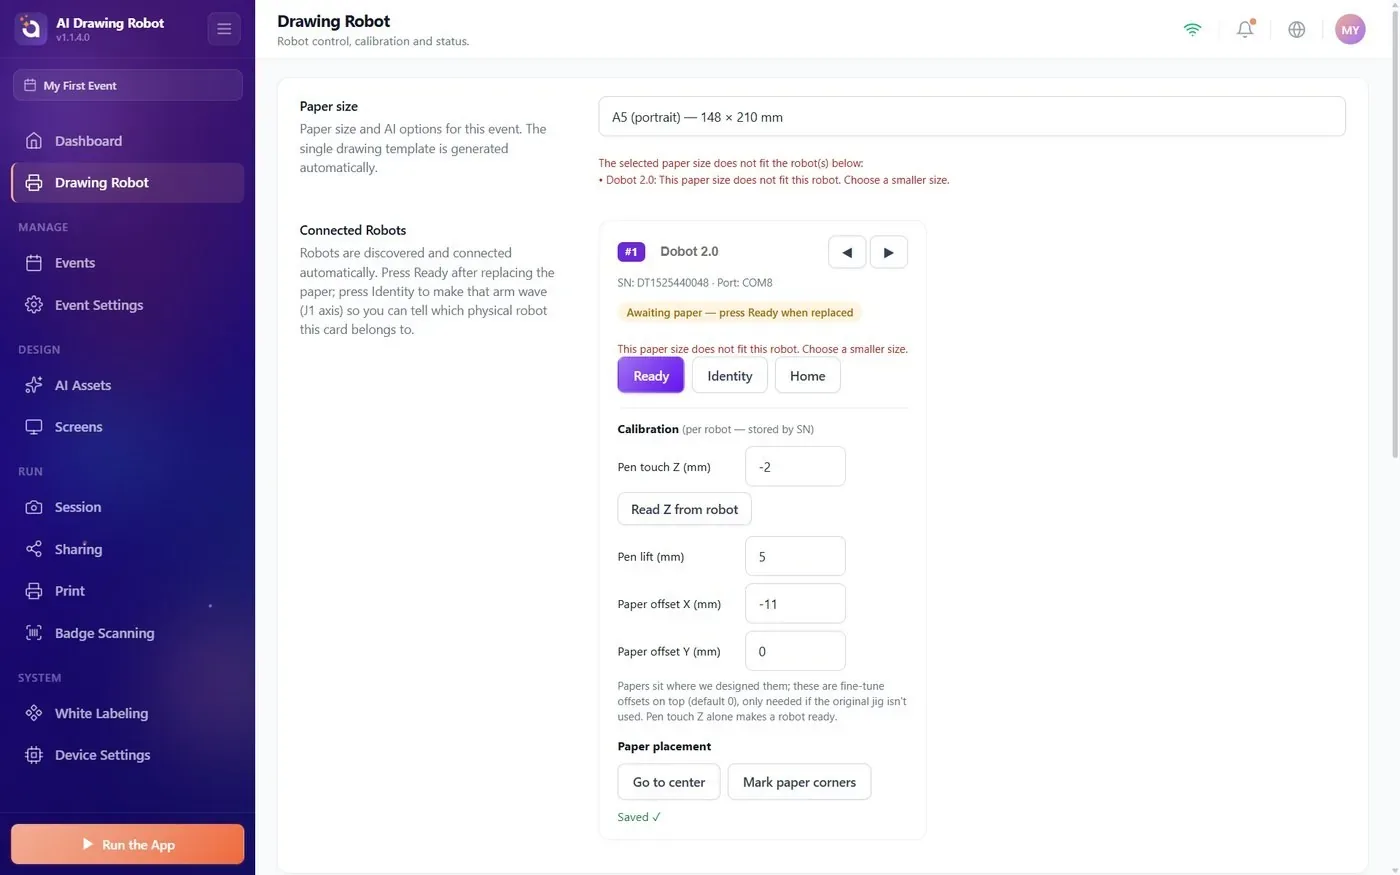
The selected paper size does not fit the robot(s) below:
This message under Paper size means that, at the saved Pen touch Z (mm), the arm cannot reach every corner of the selected paper. Each paper size has its own range of valid heights. For a Magician Lite with the paper at its default position:
| Paper size | Valid Pen touch Z (mm) |
|---|---|
| 4×6 (portrait) | −8 to +2 (best around −2) |
| 6×4 (landscape) | −22 and above |
| A6 (portrait) | −9 and above |
| A6 (landscape) | −21 and above |
| A5 (landscape) | −4 to +1, with Paper offset X (mm) about −11 (sheet moved 11 mm towards the robot) |
| A5 (portrait) | Does not fit a Magician Lite. |
| Cause | What to do |
|---|---|
| Z is below the range: the paper sits too low. | Raise the paper, for example with a board under it. Touch the pen to the paper again and press Read Z from robot. |
| Z is above the range (for 4×6 (portrait), above +2): the paper sits too high. | Lower the paper, then read Z again. |
| An offset is left from another paper size. The offsets are saved for the robot, not for the paper size. | Set Paper offset X (mm) and Paper offset Y (mm) back to 0, unless the table above says otherwise. |
| The paper is too large for the arm. | Choose a smaller Paper size. |
Then press Go to center. If the pen stops 5 mm above the middle of the paper, the paper fits and you can press Ready.
Pushing the unlocked arm to a paper corner by hand does not prove the robot can draw there.
The pen and the position of the drawing
Drawing Robot → robot card → Calibration
| What you see | Cause | What to do |
|---|---|---|
| The pen does not touch the paper anywhere | Pen touch Z (mm) is too high, or the paper height or the pen changed since calibration. | Hold the unlock key on the arm, touch the pen tip lightly to the paper, release, press Read Z from robot. |
| The pen does not touch in one area only | The surface is not flat there. | Flatten or tape the paper. If a gap remains, lower Pen touch Z (mm) by 0.5–1 mm. |
| The pen drags or tears the paper | Pen touch Z (mm) is too low. | Read Z again with a lighter touch. |
| The whole drawing is shifted, or part of it is off the paper | The sheet is not where the robot expects it. | Press Go to center and put the middle of the sheet under the pen. For a repeatable position, press Mark paper corners without paper on a base sheet, then seat every sheet in the four L marks. |
| The sheet cannot be moved (fixed tray) | The drawing must move instead. | Paper offset X (mm): plus moves the drawing away from the robot, minus towards it. Paper offset Y (mm): standing in front of the robot, plus moves it to your right, minus to your left. |
The offsets move the drawing, not the paper; normally both stay 0. After changing Z or an offset, check with Go to center and press Ready again.
The AI effect
The effect is not applied, or the guest waits a long time and gets the original photo
The guest picked an effect, but after a long wait the sharing screen shows the plain photo. The chosen effect could not be produced.
- Open AI Assets → AI Effects and look at Active AI Effects.
- Remove the effects that fail. A Blocked {0}× badge means the AI provider's content filter refused that effect.
- Add effects with Browse Library, or build your own with Create New, and test each one with a real photo before the event.
Messages on the guest screen
| Message | What to do |
|---|---|
| Photo upload incomplete | The photo could not be uploaded, so no drawing was prepared. Check the internet and take the photo again. |
| Drawing could not be created | This photo was refused by the AI. Take a new photo. |
| Drawing could not be prepared | The line art could not be made. Check the internet and the AI Credits card on the Dashboard, then try again. |
Every drawing uses AI credits for the line art, also with AI effect step Off.
The drawing does not start
| What you see | Cause | What to do |
|---|---|---|
| Start Drawing was pressed, the robot does not move | No robot shows Ready. After every drawing and every paper change the robot waits in Awaiting paper. | Open the Robots panel and press Ready. The waiting drawing starts at once. |
| Auto-start drawing when ready is On, nothing happens | Auto-start only puts the drawing in line; the robot must still be Ready. | Press Ready. |
| Preparing… stays on the sharing screen | The line art is being made; this is the longest step. | Wait. After 5 minutes the app gives up and shows a message. |
| The robot draws an earlier guest's portrait | Drawings started while no robot was Ready wait in line, oldest first. | Let it finish, or press Cancel in the Robots panel, change the paper and press Ready. |
On a trial plan the word TRIAL is drawn across every drawing; a paid plan removes it. Details: How Do I Use the Robots Panel During an Event? article.
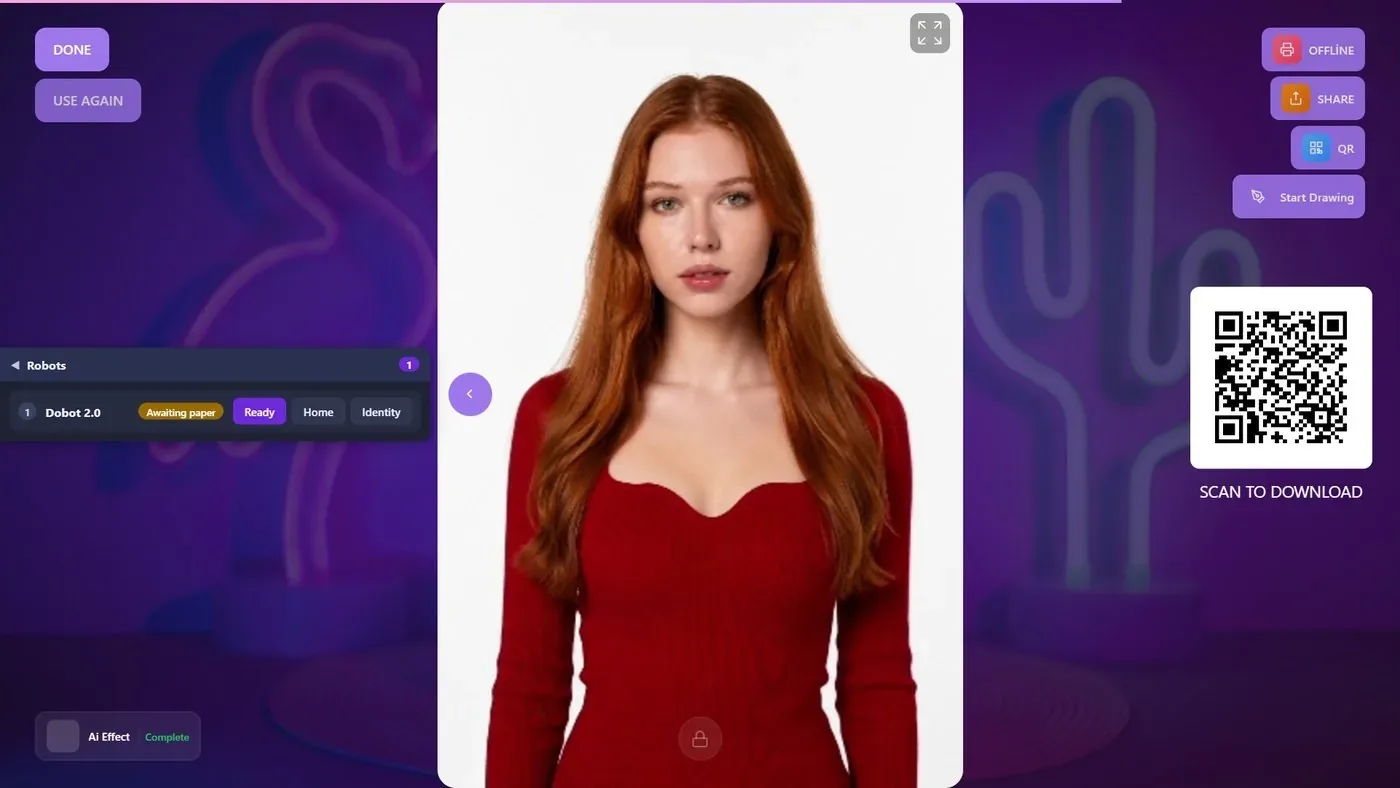
Changing the paper and not pressing Ready: the next drawing waits.
Changing the paper height without reading Z again: the pen floats above the paper or digs into it.
Leaving Paper offset X (mm) from A5 landscape when going back to 4×6: the drawing is shifted, or the paper no longer fits.
Adding untested effects just before the event: guests wait and get their original photo.
Related topics
How Do I Calibrate the Robot? Which Paper Sizes Can I Use and How Do I Place the Paper? How Do I Use the Robots Panel During an Event? How Do I Connect the Robot? How Do I Set Up the Drawing Options? What Do Guests See, from Photo to Drawing? How Do I Get AI Drawing Robot Ready for an Event?
