
Add printers, calibrate the print position and size, take test prints and set print limits. This is one of the more hardware-specific screens — expect to test on a real printer.
Adding and managing printers
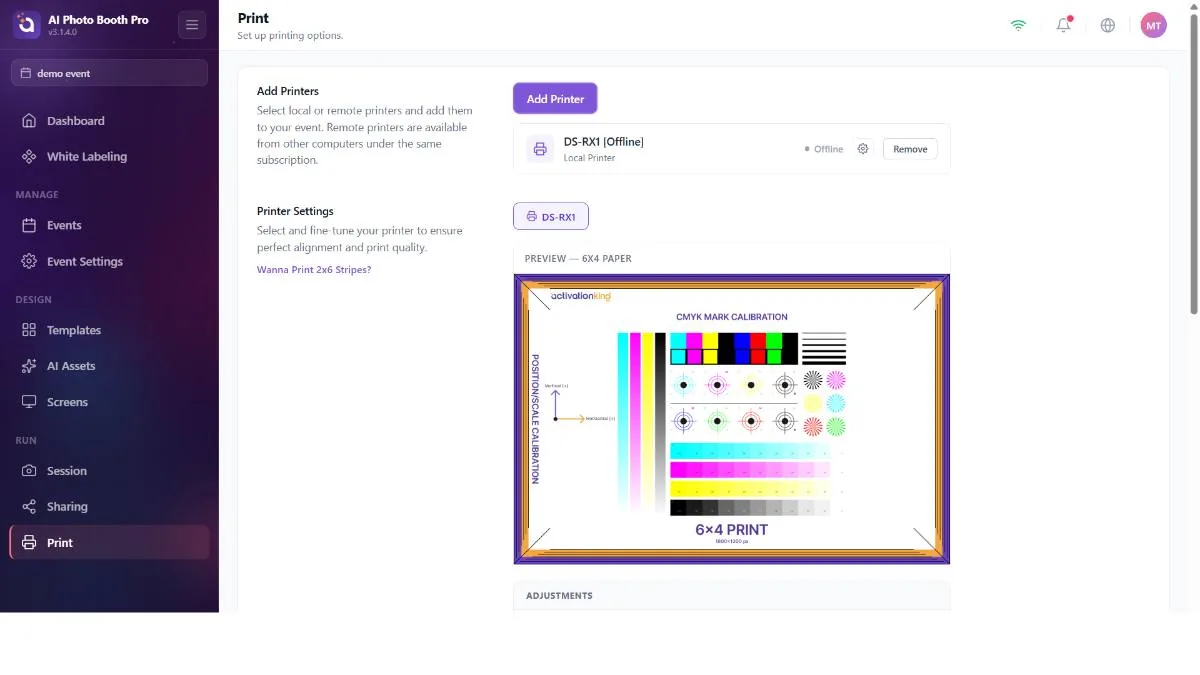
Add Printers opens a modal that lists local and remote printers with their online/offline states; add or remove them and use Refresh to rescan. The Connected Printers list shows a live status dot, a gear that opens the OS printer settings Windows/macOS and a remove button.
Fine-tuning the print
A per-printer preview (a 4×6 portrait / 6×4 landscape test image), plus four sliders and a paper-size picker.
- Horizontal / Vertical Position — shift the image on the paper (−20…20).
- Horizontal / Vertical Scale — resize the image (80–120%).
- Paper size — 6×4, 4×6, 6×6 (square), 6×8 and 8×6 (for the preview orientation and test print).
- Test Print — send the test image to the printer.
Slider changes are debounced before saving (~¼ second), so drag freely — it won't spam the printer settings. The paper-size choice builds the print job at 300 dpi.
The list here is for the test print and preview orientation. The output's actual size/shape comes from the size of the template you print (chosen in the template canvas's Size menu — including a 1×1 square). For the fine-tune (position/scale) to be meaningful, make sure the printer has that size of media loaded when you test, and that your template size matches this media.
2-inch cut calibration
Windows onlyFor printers that support a physical 2-inch cut, a Calibrate 2inch Cut button captures the driver's cut configuration so the app can reproduce it.
The interface only offers the Windows-specific calibrate action — there's no visible on/off switch for the 2-inch cut on this screen. Calibration captures a per-printer driver configuration block; it only comes into effect when the printer driver's own dialog actually enables the cutter (and you confirm it) when prompted.
Because the captured driver configuration isn't reconciled with the per-print paper size, an out-of-date cut configuration can silently force the wrong paper size (e.g. a DNP dropping to 6×8). If prints come out the wrong size after calibration, re-check the driver's paper and cut settings and re-calibrate. Remember that calibration is Windows-centric and tracked per printer.
Printing behavior and limits
- Enable Print Button — whether guests can print at all (on by default).
- Enable Auto Print — print automatically after each result (on by default).
- Auto Print Count — copies per result (1–5).
- Print Limits — per-event, per-session and a sliding window maximum to stop runaway printing.
The Enable Print Button toggle here is the operator control, but the app can also determine the printer state from the event's modes. If you turn printing on and it seems to turn itself off, the event's mode configuration is overriding you — reconcile the two (remember the printer default is set once at event creation; see Part 5).
The print pipeline is currently built around DNP printers (e.g. the DS-RX1). EPSON isn't specifically wired into this screen. For the limit fields, the "unlimited" marker is applied during the event rather than shown here.