View Categories

Create an Event: Multifunctional PhotoBooth Mode Photo

Creating an Event with PhotoBooth Mode Photo

Step 1: Mode Settings
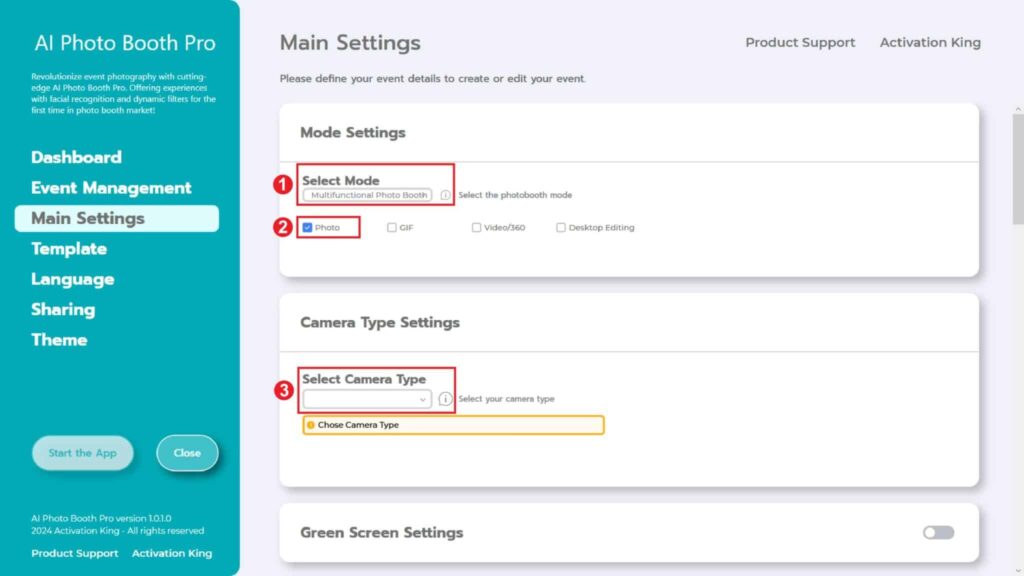
We select the “Multifunctional Mode.” After making the selection, we check the “Photo” option from the options below.

Step 2: Camera Type Settings
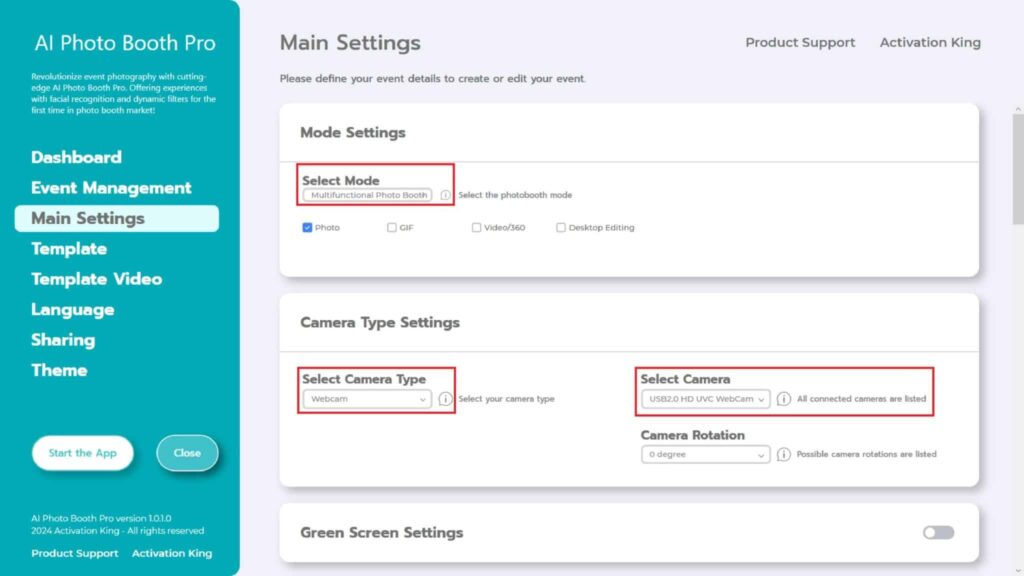
In the “Camera Type Settings” section, we select the type of camera we want to use from the dropdown menu in the “Select Camera Type” box. When you connect your camera to your computer, it should appear in the dropdown menu in the “Select Camera” box. (If it doesn’t appear, make sure your camera is on and connected to your computer, then try again.) After selecting your camera, you can adjust the orientation (horizontal or vertical) in the “Camera Rotation” section according to your usage.

Step 3: Camera Settings
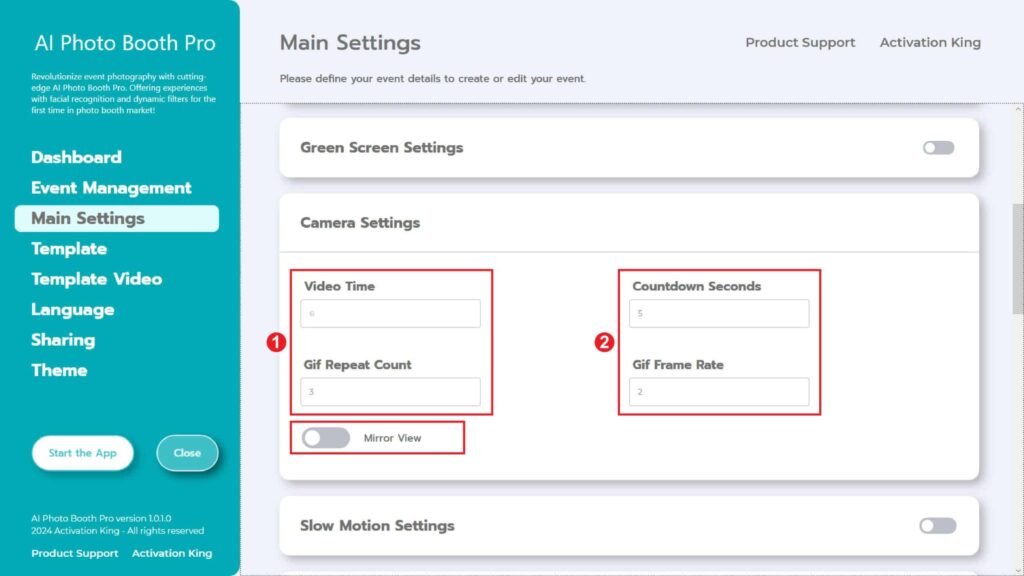
In the “Camera Settings” section, the “Countdown Seconds” part displays the time you have after giving the command to take a photo to see yourself on the screen and adjust your pose. In short, you can adjust your photo timer in this section.

Step 4: Template
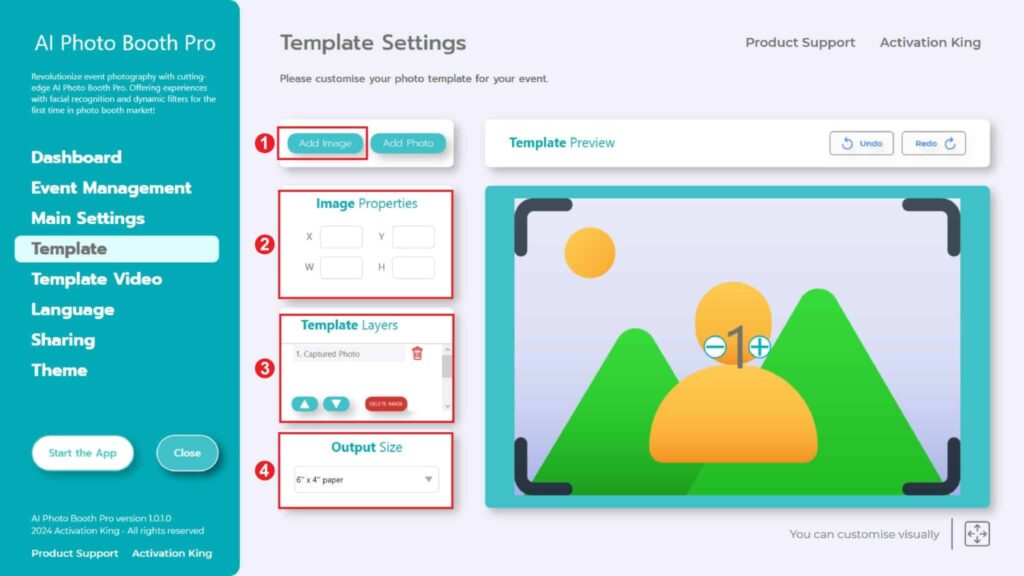
The “Template Settings” section is where we adjust the dimensions and positions of the photos we take and where we add digital frames and stickers.

In the “Output Size” section, you can set the dimensions of your photo. If you’re going to print it, we recommend entering the dimensions of your printing paper, either 6×4 or 6×8. If you’re only doing digital work, you can also consider other options like 1280×1280, 1080×1920, or 1280×720.

To add digital frames and stickers onto your photos, simply press the “Add Image” section located above.
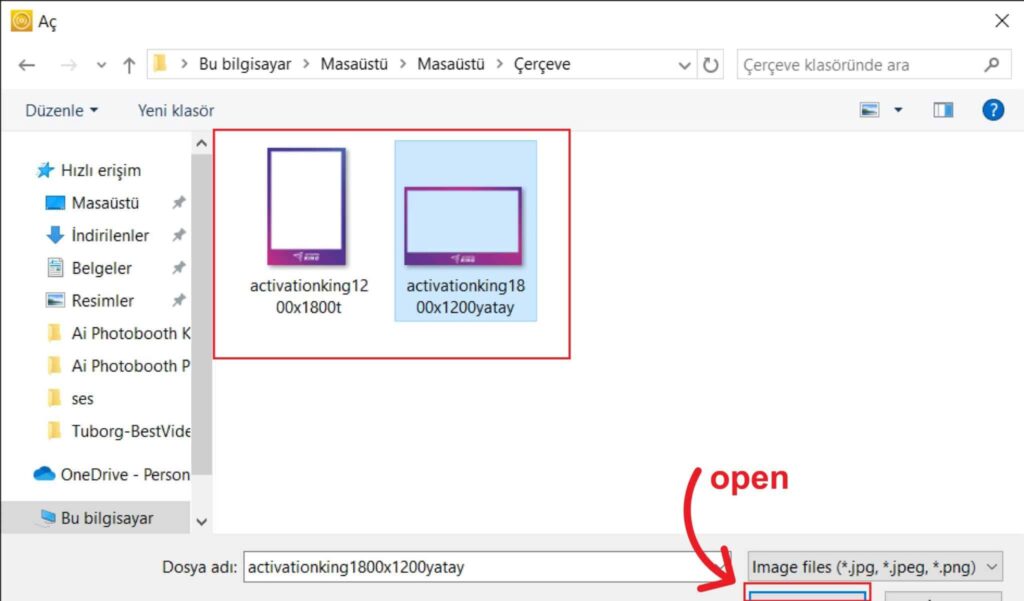
In this section, we select the horizontal or vertical frame we wish to use, then click “open.”
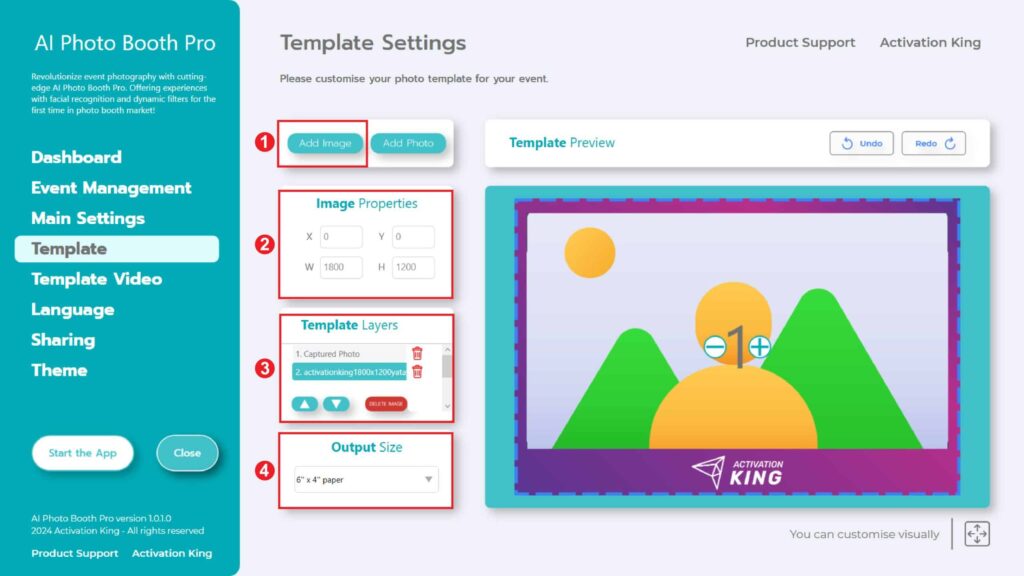
If the dimensions of the frame you added match your “Output Size” settings, it will automatically fit.
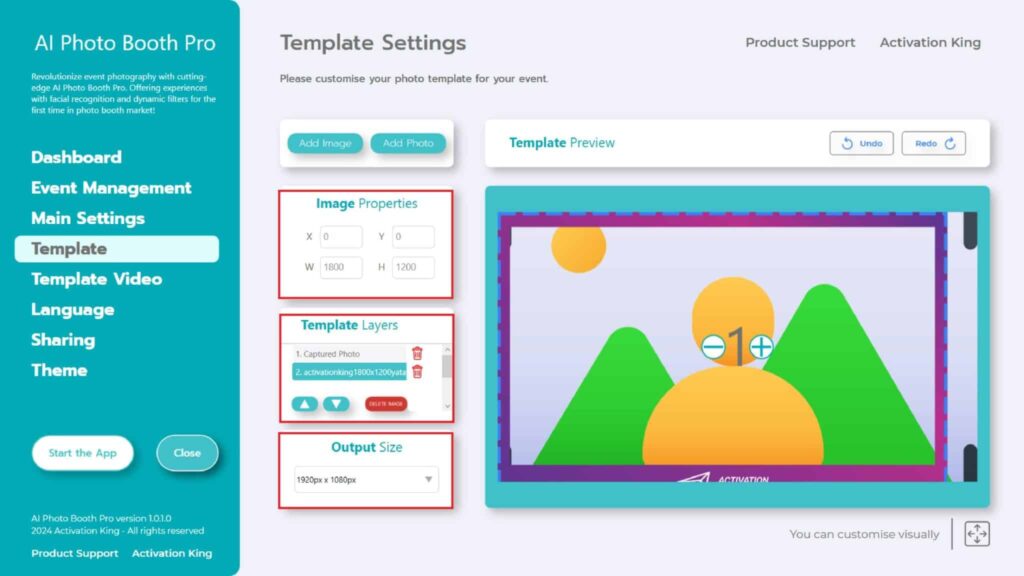
If the dimensions are different, press once on the frame in the “Template Layers” section. Enter the “Output Size” dimensions in the “Image Properties” section and make sure the frame fits perfectly on the image.

Step 5: Start the Apps
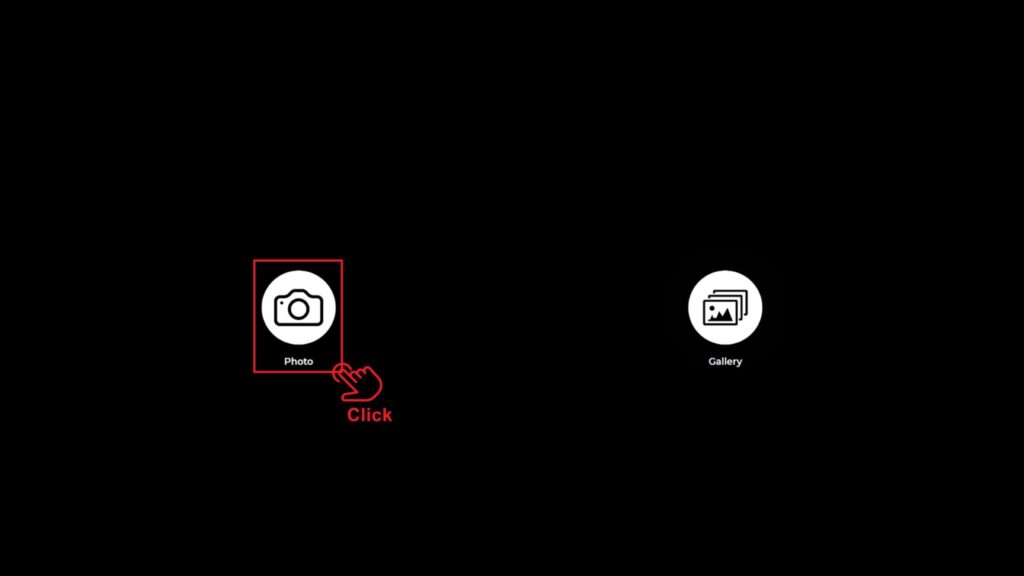
When we enter the “Start the Apps” section, we’ll be greeted with this screen. I click once on the “Photo” icon. After the countdown screen you’ve set up, your photo is taken.
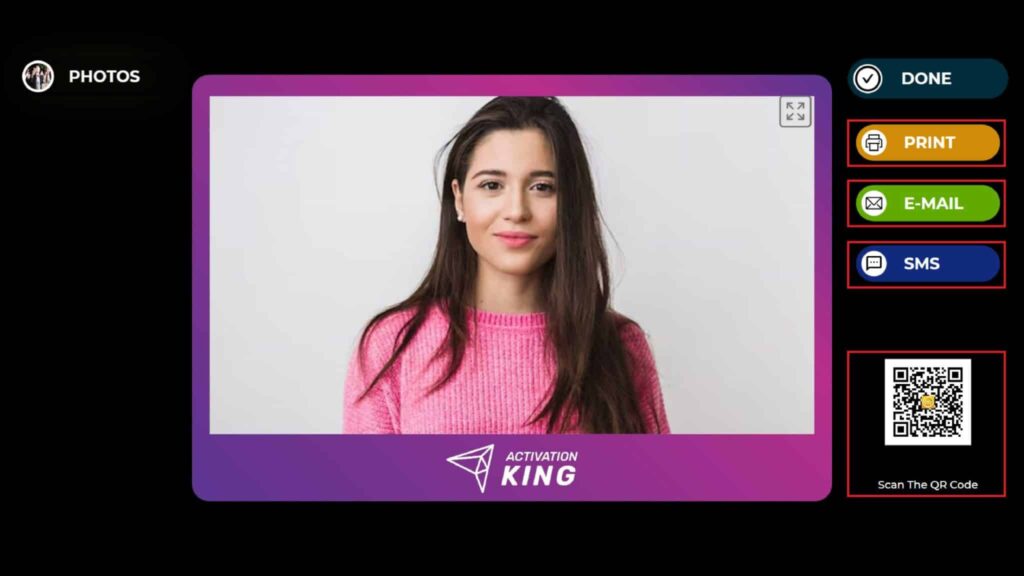
After taking the photo, your image along with the added frame appears. On the right-hand side, you can print, email, send via sms, or receive by scanning a QR code. To return to the capture screen, press the “DONE” icon.
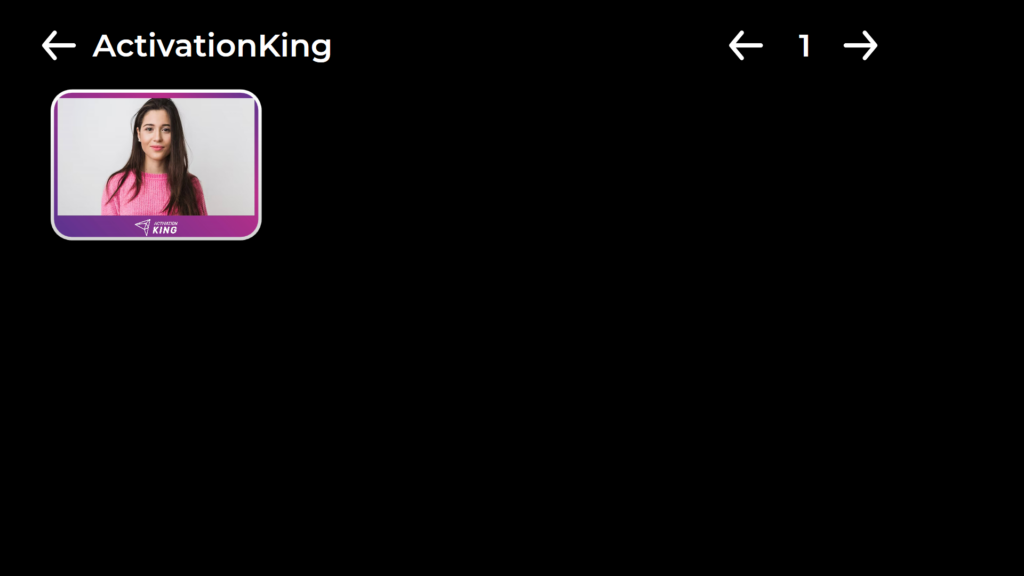
When you press the “Gallery” icon, you access the images you have previously taken. To return to the “Settings Menu,” press the “F11” key, or for users with a touchscreen, simply tap five times consecutively on the upper right corner.

View Categories

Создайте событие: Multifunctional PhotoBooth Mode Photo

Создание мероприятия с помощью PhotoBooth Mode Photo

Шаг 1: Настройки режима

Выбираем «Мultifunctional Mode». После выбора отмечаем опцию «Photo» из представленных ниже.

Шаг 2: Настройки типа камеры

В разделе «Camera Type Settings» мы выбираем тип камеры, которую хотим использовать, из раскрывающегося меню в поле «Select Camera Type» . Когда вы подключаете камеру к компьютеру, она должна появиться в раскрывающемся меню в поле «Select Camera» . (Если она не появляется, убедитесь, что камера включена и подключена к компьютеру, затем повторите попытку.) После выбора камеры вы можете настроить ее ориентацию (горизонтальную или вертикальную) в разделе «Camera Rotation» в соответствии с вашими потребностями.

Шаг 3: Настройки камеры

В разделе «Camera Settings» часть «Countdown Seconds» отображает время, которое у вас есть после подачи команды на фотосъемку, чтобы увидеть себя на экране и скорректировать позу. Короче говоря, в этом разделе вы можете настроить таймер фотосъемки.

Шаг 4: Шаблон

В разделе «Template Settings» мы настраиваем размеры и положение фотографий, а также добавляем цифровые рамки и наклейки.

В разделе «Output Size» вы можете задать размеры вашей фотографии. Если вы собираетесь ее распечатать, мы рекомендуем ввести размеры вашей бумаги для печати: 6×4 или 6×8. Если вы работаете только с цифровыми материалами, вы также можете рассмотреть другие варианты, такие как 1280×1280, 1080×1920 или 1280×720.

Чтобы добавить цифровые рамки и наклейки на ваши фотографии, просто нажмите на раздел «Add Image», расположенный выше.

В этом разделе мы выбираем горизонтальную или вертикальную рамку, которую хотим использовать, затем нажимаем «open».

Если размеры добавленной вами рамки соответствуют настройкам «Output Size» , она автоматически подгонит ее.

Если размеры отличаются, нажмите один раз на рамку в разделе «Template Layers» . Введите размеры «Output Size» в разделе «Image Properties» и убедитесь, что рамка идеально подходит к изображению.

Шаг 5: Запустите приложения

Когда мы заходим в раздел «Start the Apps» , нас встречает этот экран. Я нажимаю один раз на значок «Photo» . После установленного вами обратного отсчета будет сделана ваша фотография.

После того, как вы сделаете снимок, появится ваше изображение вместе с добавленной рамкой. С правой стороны вы можете распечатать, отправить по электронной почте, отправить по смс или получить, отсканировав QR-код . Чтобы вернуться на экран захвата, нажмите на значок «DONE» .

При нажатии на значок «Gallery» вы получаете доступ к ранее сделанным снимкам. Чтобы вернуться в «Settings Menu», нажмите клавишу «F11» или, для пользователей с сенсорным экраном, просто нажмите пять раз подряд в правом верхнем углу.

Leave a Reply
Sale!